Insider Risk Management Part 1: The Purview workload everyone skips

Insider Risk Management Part 1: The Purview workload everyone skips

Series: This is Part 1 of 7 in my series on Microsoft Purview Insider Risk Management. New to the series? Start with the series guide, which summarises every part.

Let me start with a comment. If your organisation is licensed for Microsoft 365 E5 and has no insider risk policies turned on, that is crazy. You are already paying for one of the most effective data protection controls Microsoft makes, and it is sitting there doing nothing while your people – and now your AI agents – have full, legitimate access to your most sensitive data.

Many organisations pay for Microsoft 365 E5 and then start a Microsoft Purview project. Purview is Microsoft’s set of tools for protecting and governing data. The project usually covers sensitivity labels (tags that mark how confidential a document is), data loss prevention or DLP (rules that stop sensitive information being shared where it should not be), and retention (how long data is kept). Then the project closes, and Insider Risk Management is quietly left on the shelf.

That is rarely a deliberate decision. It happens because Insider Risk Management is the least understood part of Purview. People are not sure what it does, think it is a tool for spying on staff, or believe DLP already covers it. None of that is true.

Who should run it – and why not IT

My recommended approach is to train your compliance officers in Purview Insider Risk Management and make them its owners – not your IT team.

The reason is simple. IT administrators have the widest access in any organisation: mailboxes, file shares, laptops and admin portals. That makes them some of the most important insiders to watch. If IT runs Insider Risk Management, they end up investigating themselves and their colleagues – and nobody can fairly assess themselves. Keeping the people being watched separate from the people doing the watching is a basic rule of good governance, known as segregation of duties.

IT still has a job to do. They build the foundations – audit logging, laptop onboarding, the HR connector. They just do not see the alerts.

Access to the Insider Risk Management roles that can see alerts and reveal names should be controlled with Microsoft Entra Privileged Identity Management (PIM), which is included in E5. Instead of permanent access, a compliance officer is made eligible for the role and switches it on only when they need it – for a limited time, with a reason recorded and, if you choose, approval from a second person. Every activation is logged.

How to set it up: In Microsoft Entra, create a security group for each Insider Risk role you use – for example Insider Risk Investigators – and turn on PIM for Groups for it. Make your compliance officers eligible members, with a time limit and approval on activation. Then add that group, not the individual people, to the matching Insider Risk Management role group in the Purview portal. Microsoft documents PIM for Groups as the way to give just-in-time access to Purview role groups.

What you are exposed to without it

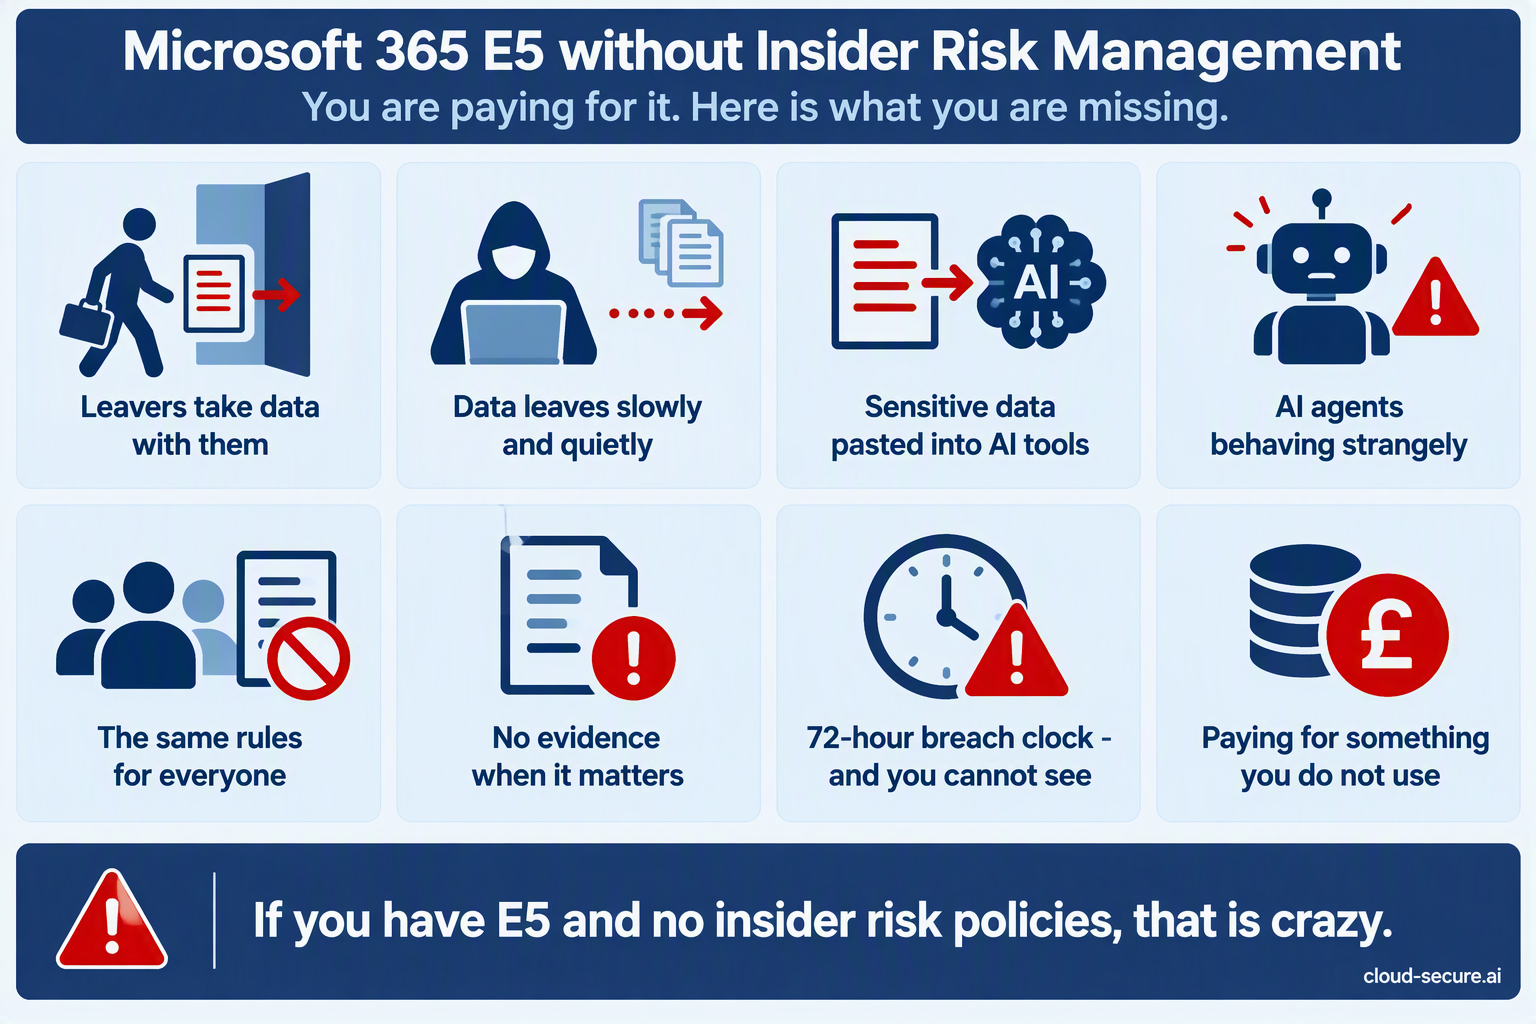
Here is what an organisation with E5 but no insider risk policies is living with today:

Risk What happens without Insider Risk Management
Leavers take data with them Nobody is told when someone who has resigned downloads, copies or emails sensitive files. You find out from a competitor, a client or a newspaper.
Data leaving slowly and quietly Data that leaves a little at a time never sets off a DLP rule. Nothing compares what a person is doing now with what they normally do, or with what their colleagues do.
Sensitive data pasted into AI tools You may block or record a single question typed into an AI tool, but you cannot see which people keep sharing sensitive data with Copilot, ChatGPT or other AI apps.
AI agents behaving strangely AI agents – software that carries out tasks on a person’s behalf – have genuine access to your data. Without risky agent policies, nobody is watching what they do with it.
The same rules for everyone Without insider risk, your security controls treat your riskiest user exactly like everyone else. You either restrict everybody or nobody.
No evidence when it matters When HR or legal need to act, there is no timeline of what happened and no record of what left the organisation.
The breach clock is ticking and you cannot see Under GDPR you must tell the Data Protection Commission about a personal data breach within 72 hours of becoming aware of it. You cannot report – or stop – what you cannot see.
Paying for something you do not use The licence, the Security Copilot capacity included with E5, and the Triage Agent are all paid for and sitting idle.
Microsoft 365 E5 without Insider Risk Management: eight risks you are exposed to

Look at the email below. Insider Risk Management sends it after it scans an organisation for risky activity. Every single person who had resigned had moved data out of the organisation. Without an insider risk policy, every one of them walked out the door without a single alert.
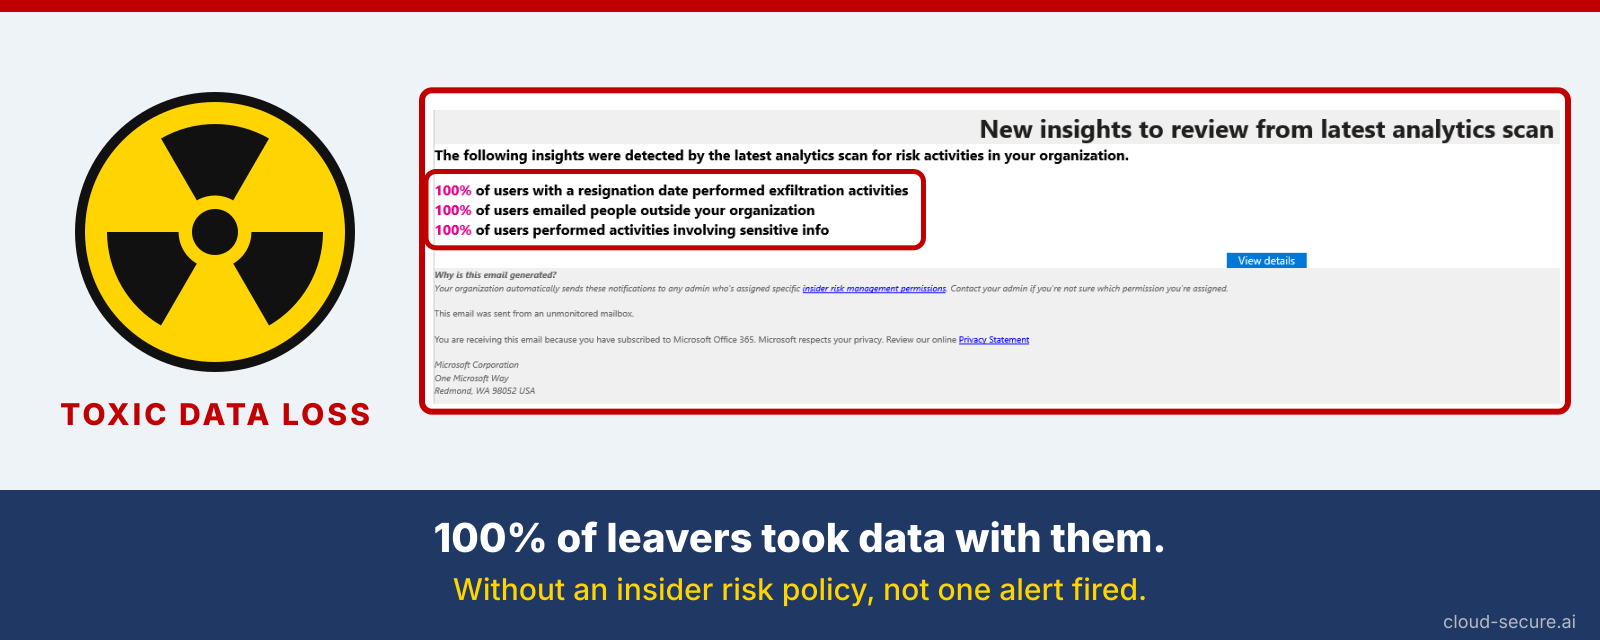
This is what you absolutely do not want to see

Why Insider Risk Management gets skipped

When I review a Purview programme, the reasons it was left out fall into the same handful of buckets:

  • “It feels like spying on our people.” Without a clear explanation of the privacy controls, the business, HR and legal teams say no.
  • “We already have DLP.” DLP and Insider Risk Management solve different problems – more on that below.
  • “We do not know what good looks like.” Insider risk alerts and risk scores are less familiar than labels and DLP, so the value is harder to explain.
  • “Licensing is confusing.” Teams are unsure what they are entitled to and what else it depends on.
  • “Nobody owns it.” Insider risk sits between security, HR, legal and compliance. Without a sponsor, it falls through the cracks.

Every one of these is solvable, and most are solved simply by understanding how the product works.

What insider risk actually is

An insider is anyone who is allowed to access your data – employees, contractors, partners, and increasingly AI agents working on their behalf. Insider risk is the chance that this access causes harm, whether on purpose or by accident.

Most insider incidents are not malicious. They are a well-meaning employee emailing a client file to their personal address, uploading a spreadsheet to an AI tool the company has not approved, or copying a project folder to their personal Dropbox before leaving. The result is the same as a deliberate leak – sensitive data outside your control.

Microsoft Purview Insider Risk Management joins the dots. It brings together activity from Microsoft 365, from laptops protected by Microsoft Defender for Endpoint, from Microsoft Entra ID (where user accounts live) and from HR systems, and looks for risky patterns. It comes with ready-made policy templates for the most common situations, such as data theft by people who are leaving, data leaks, security policy breaches and risky use of AI.

Key terms in plain English: Exfiltration – moving data out of the organisation. Indicator – a specific activity Insider Risk Management watches for, such as copying files to USB. Triggering event – something that starts the watching, such as a resignation. Risk score – how worrying a person’s activity looks, which decides whether an alert is raised. Pseudonymised – names are replaced with codes, so investigators do not know who they are looking at until they need to.

Insider Risk Management is not DLP

DLP checks a single action against a rule at that moment – for example, blocking an email that contains credit card numbers. It has no memory of what that person did yesterday.

Insider Risk Management looks at behaviour over time. Picture someone who resigns, then a week later downloads far more files than usual, renames them, zips them up and copies them to a USB stick. That raises a high-priority alert, even though no single step on its own would have broken a DLP rule.

The two work best together. A feature called Adaptive Protection takes the risk level Insider Risk Management gives each person and passes it to DLP and to Conditional Access (the rules that decide who can sign in to what). Controls then tighten automatically for the few people who present a real risk, while everyone else carries on as normal.

A worked example: Contoso

Contoso is licensed for Microsoft 365 E5. A senior engineer hands in their notice. HR records the resignation and last working day in the HR system, and that information is passed to Insider Risk Management automatically. Over the following week the engineer:

  1. Downloads several hundred files from a project SharePoint site they have not touched in months
  2. Downgrades the sensitivity label on a client proposal
  3. Uploads a compressed archive to a personal cloud storage service

On its own, each of these looks normal. Together, and straight after a resignation, they tell a clear story. Insider Risk Management raises an alert with the full timeline, and HR and legal have the evidence before the engineer’s last day rather than after it.

Privacy is built in, not bolted on

  • Names hidden by default. People appear as codes until an authorised investigator chooses to reveal who they are.
  • Only the right people see alerts. Separate roles for the people who set it up, the people who review alerts and the people who investigate.
  • Nobody is watched without a reason. Most policies only start looking at a person after a triggering event, such as a resignation.
  • The watchers are watched. Every action taken inside Insider Risk Management is itself recorded.

Part 6 covers how these controls line up with GDPR and the Data Protection Commission’s workplace guidance.

Final thoughts

What holds organisations back from Insider Risk Management is understanding, not technology. Over the rest of this series I will walk through everything you need to make the case internally and switch it on with confidence. In Part 2, I look at how the product has changed – because if you looked at it in 2020, it is not the same product today.


The rest of the series

References

Seรกn O’Farrell | cloud-secure.ai
Insider Risk Management Part 5: Adaptive Protection with DLP

Insider Risk Management Part 5: Adaptive Protection with DLP

Series: This is Part 5 of 7 in my series on Microsoft Purview Insider Risk Management. New to the series? Start with the series guide, which summarises every part.

In Part 4 we built a policy that spots people taking data before they leave. On its own, that policy raises alerts – and then waits for a person to act. Adaptive Protection removes the wait. It turns each person’s insider risk into a level, and lets your other security controls tighten automatically for the few people who are genuinely risky, while everyone else carries on as normal.

This is the feature that turns Insider Risk Management from a reporting tool into protection. In this part I explain how it works in plain English, what quick setup creates for you, and how to roll it out without upsetting anyone.

What Adaptive Protection does

Most security controls treat everyone the same. A data loss prevention (DLP) rule that blocks copying to USB blocks it for the whole organisation, which frustrates the many to stop the few. So most organisations set their rules loosely – and the risky few get through.

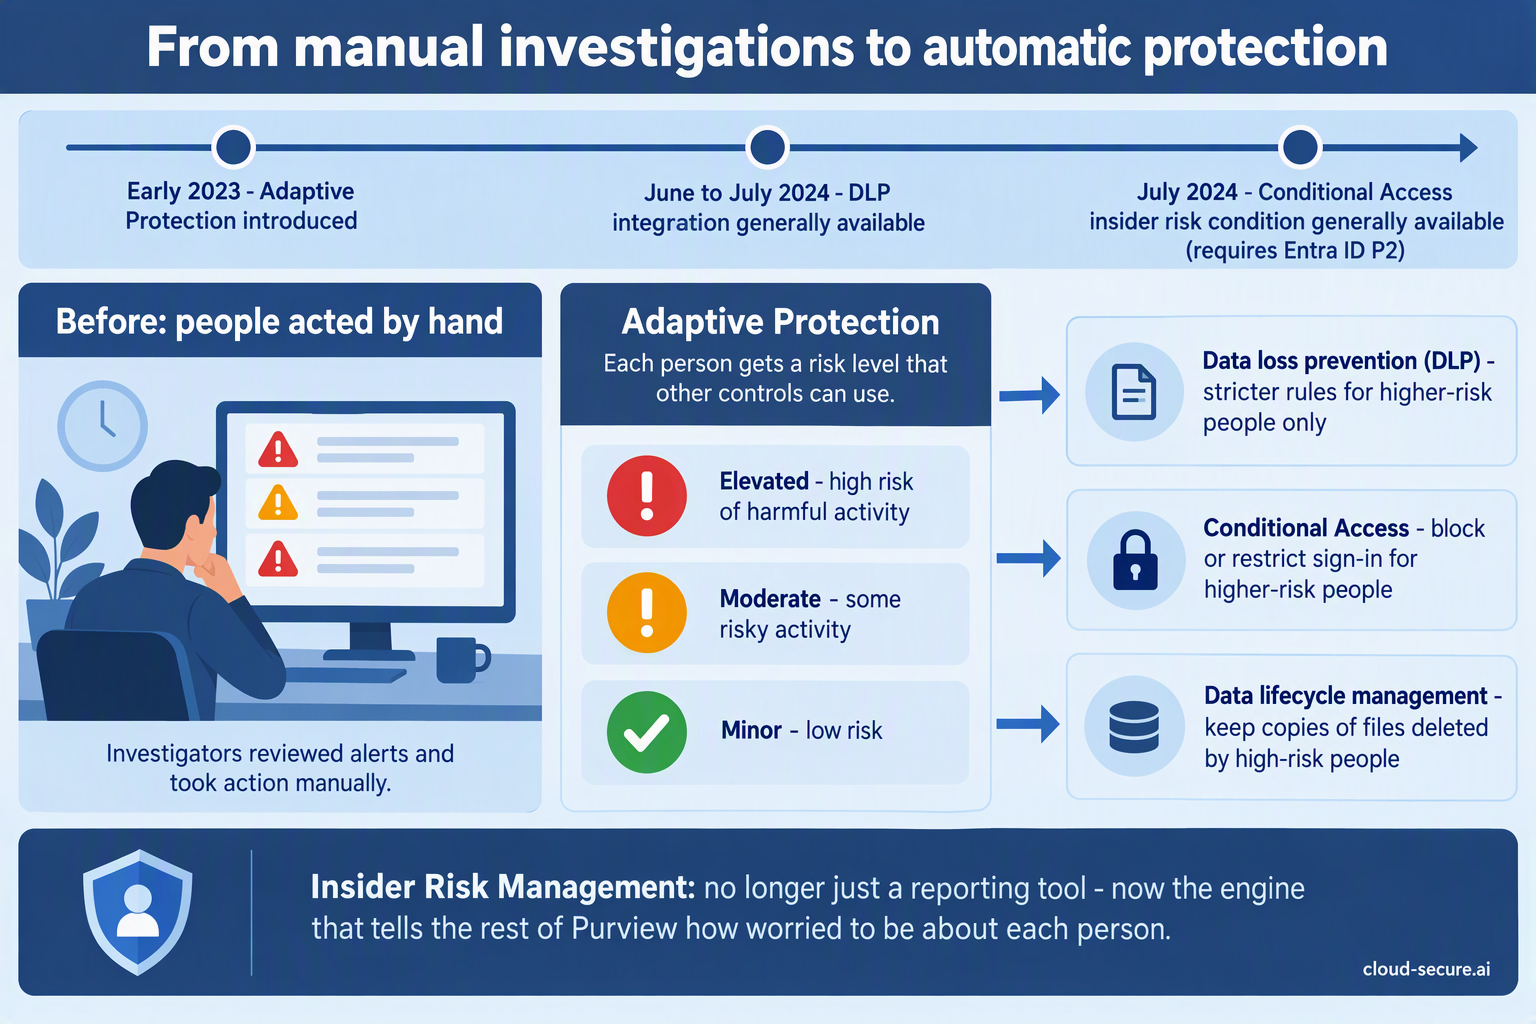
Adaptive Protection fixes that. Insider Risk Management watches behaviour and gives each person a risk level. Other controls then read that level and act on it:

  • Data loss prevention – stricter rules for higher-risk people only.
  • Conditional Access – block or restrict sign-in for higher-risk people (covered in Part 7).
  • Data lifecycle management – keep copies of anything a high-risk person deletes.

Levels go up and down automatically as behaviour changes. Nobody has to remember to add someone to a “watch list” or take them off it again.

From manual investigations to automatic protection with Adaptive Protection

The three risk levels

Adaptive Protection uses three levels. Microsoft provides built-in definitions, which you can change:

Level Built-in definition (simplified) Typical response
Elevated High-severity alerts, several high-severity sequences of risky activity, or a confirmed high-severity alert Block
Moderate Medium-severity alerts, or at least two high-severity data exfiltration activities Warn, record, or require extra steps
Minor Low-severity alerts, or at least one high-severity data exfiltration activity Record only

Do not confuse the two: Alert severity (Low, Medium, High) helps analysts decide which alert to look at first. Insider risk levels (Minor, Moderate, Elevated) are what drive automatic protection. They are related, but they are not the same thing.

How long a level lasts

  • Risk level timeframe: a level lasts 7 days by default (you can choose between 5 and 30). If the person keeps meeting the criteria, it is extended.
  • Past activity detection: how far back Adaptive Protection looks at activity when assigning a level – also 7 days by default, between 5 and 30.
  • Automatic expiry: on by default. When the related alert is dismissed or the case is closed, the level is removed.
  • Manual reset: an investigator can expire a person’s level at any time under Adaptive Protection > Users assigned insider risk levels. Alerts and cases are kept.

Quick setup or custom setup?

Quick setup is the fastest way to start and needs no existing policies. It creates everything for you in a safe, test-only state:

What it creates What it does Starts as
Insider risk policy Adaptive Protection policy based on the Data leaks template, covering all users Active
DLP policy for laptops (Endpoint DLP) Elevated: blocks USB copies, printing, uploads to unapproved cloud sites and more. Moderate and Minor: recorded only Simulation (test mode)
DLP policy for Teams and Exchange Elevated: blocks sharing sensitive content with people outside the organisation. Moderate and Minor: recorded only Simulation (test mode)
Conditional Access policy Blocks Elevated people from Office 365 apps Report-only
Data lifecycle policy Keeps deleted SharePoint, OneDrive and Exchange content from Elevated people for 120 days Active

Quick setup can take up to 72 hours to finish, and you get an email when it is done. Do not turn Adaptive Protection off while it is still setting up.

Custom setup suits organisations that already have insider risk and DLP policies. You choose the insider risk policy, define the three levels yourself, add the risk level condition to your existing DLP and Conditional Access policies, then switch Adaptive Protection on. Results can take up to 36 hours to appear.

How DLP uses the risk level

Once Adaptive Protection is on, DLP policies gain a new condition: “Insider risk level for Adaptive Protection is”. You choose one, two or all three levels, then choose what happens. It works in DLP policies for Exchange email, Teams and devices (company laptops).

The pattern Microsoft uses in quick setup is a good starting point:

Where Elevated Moderate and Minor
Laptops Block copying to USB and network shares, printing, copying to the clipboard, uploads to unapproved cloud sites and use by unapproved apps Record the same activities, without blocking
Email and Teams Block or encrypt sensitive content shared with people outside the organisation Record external sharing, without blocking

For laptops: Adaptive Protection on devices needs either Advanced classification scanning and protection switched on, or the “File type is” condition in your DLP rule. If someone is covered by both an Adaptive Protection policy and another device DLP policy, the strictest one wins.

Who needs which role

Task Role
Set up Adaptive Protection Insider Risk Management or Insider Risk Management Admins
Edit DLP policies that use the risk level Compliance Administrator, Compliance Data Administrator or DLP Compliance Management
Edit Conditional Access policies that use the risk level Conditional Access Administrator or Security Administrator
See who has which risk level Insider Risk Management, Analysts or Investigators – ideally your compliance officers through PIM, as described in Part 1

Rolling it out safely

  1. Run quick setup and wait for the completion email.
  2. Leave everything in simulation for two to four weeks. Review which people reach each level and what the DLP policies would have blocked.
  3. Check for surprises. Are the right people reaching Elevated? Would any legitimate work have been blocked? Adjust the level definitions if needed.
  4. Turn on blocking for Elevated only. Leave Moderate and Minor recording only.
  5. Tell people. Your IT acceptable use policy and privacy notice should explain that controls can tighten automatically when risky activity is detected – see Part 6.
  6. Review regularly. Look at who is assigned a level each week, and use manual expiry when an investigation clears someone.

Switching it off

If you ever need to, turn Adaptive Protection off in its settings. Levels stop being assigned and are reset within about six hours. Your insider risk, DLP, Conditional Access and data lifecycle policies are not deleted – they simply stop receiving risk levels.

Final thoughts

Adaptive Protection is where the investment in Insider Risk Management pays back. Instead of choosing between rules that are too strict for everyone or too loose to matter, you get strict rules for the few who need them and freedom for everyone else – automatically.

In Part 6 I tackle the question every data protection officer asks: is this something we are obliged to do?


The rest of the series

References

Seรกn O’Farrell | cloud-secure.ai

Insider Risk Management Part 7: Insider risk in Conditional Access and the Data Security Triage Agent

Insider Risk Management Part 7: Insider risk in Conditional Access and the Data Security Triage Agent

Series: This is Part 7 of 7 in my series on Microsoft Purview Insider Risk Management. New to the series? Start with the series guide, which summarises every part.

This is the final part of the series, and it brings everything together. Insider Risk Management spots risky behaviour. Adaptive Protection turns it into a risk level. In this part, that risk level reaches the front door – sign-in – and an AI assistant helps your compliance team deal with the alerts.

Part A: Insider risk in Conditional Access

Conditional Access is the set of rules in Microsoft Entra ID that decides who can sign in to what, from where and on which device. Most organisations already use it – for example, to require multi-factor authentication. Since July 2024, it can also use a person’s insider risk level as a condition.

That means the same risk level that tightens DLP in Part 5 can also block or restrict someone’s access to Microsoft 365 apps. You need Microsoft Entra ID P2, which is included in E5, and Adaptive Protection switched on.

What Microsoft recommends for each level

Level Recommended Conditional Access response Effect on the person
Elevated Block sign-in to Microsoft 365 apps, block access to specific labelled SharePoint sites, or block downloads from cloud apps Cannot reach the data at all
Moderate Require them to accept Terms of Use when signing in to admin portals A reminder of their obligations, with no loss of access
Minor Run a policy in report-only mode None – you just gain visibility

The Copilot angle: Blocking an Elevated person from specific labelled SharePoint sites also stops Microsoft 365 Copilot generating answers from those sites for them. A risky person cannot use Copilot as a back door to sensitive content.

Creating the block policy for Elevated risk

If you ran Adaptive Protection quick setup in Part 5, a policy called “1-Block access for users with Insider Risk” already exists in report-only mode. To create one yourself, sign in to the Microsoft Entra admin center as at least a Conditional Access Administrator and:

  1. Go to Entra ID > Conditional Access > Policies and select New policy.
  2. Users: include All users. Exclude your emergency access (break-glass) accounts and guest or external user types.
  3. Target resources: include All resources.
  4. Conditions: select Insider risk, set Configure to Yes, and tick Elevated.
  5. Grant: select Block access.
  6. Enable policy: set it to Report-only and select Create.
  7. Review the report-only results for a few weeks, then switch the policy to On.

Never skip report-only: Blocking sign-in is the strongest action in this series. Run it in report-only first, check exactly who would have been blocked, and always exclude your emergency access accounts so a mistake cannot lock everyone out.

Part B: The Data Security Triage Agent

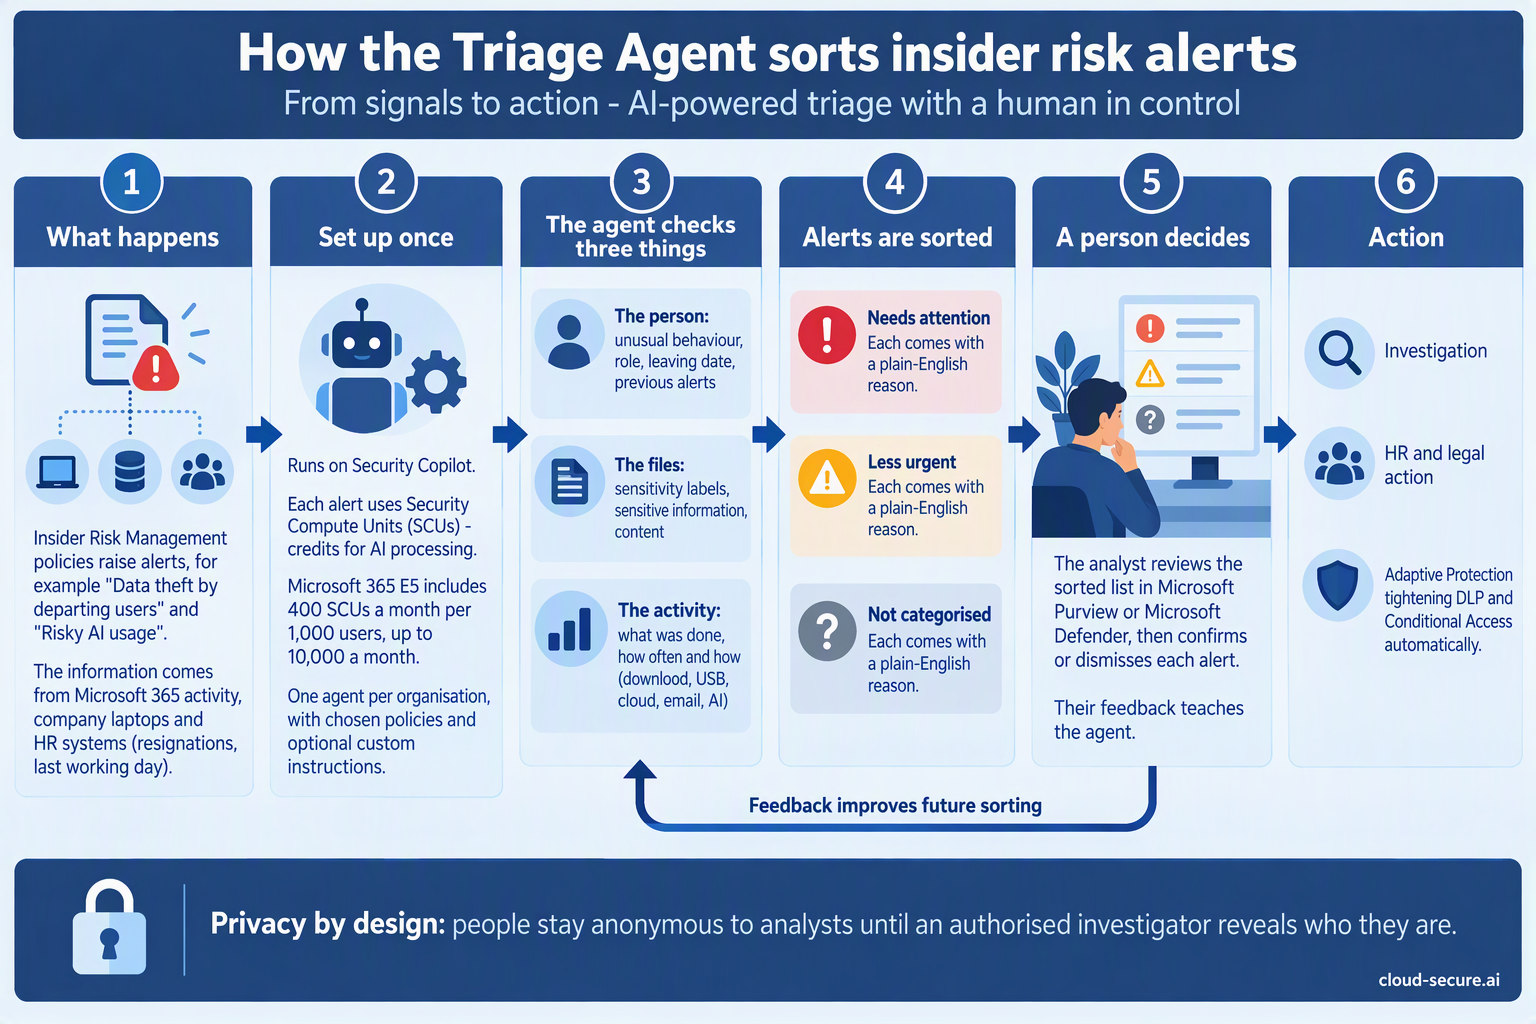
Every insider risk policy produces alerts, and someone has to look at them. On a busy day that queue can be long, and the most important alert can sit behind dozens of harmless ones. The Triage Agent is an AI assistant, built on Security Copilot, that reads each alert first and sorts the queue so your compliance team starts with what matters.

It does not investigate, decide or take action. It sorts and explains. A person still makes every decision.

How the Triage Agent sorts insider risk alerts

How it sorts alerts

Category What it means
Needs attention The alerts the agent judged highest risk. Start here.
Less urgent Lower-risk alerts to review when you have capacity.
Not categorized Alerts the agent could not assess – for example, unsupported activity or an error. These still need a person to look at them.

For each alert, it weighs up the person (for example, whether they are a priority user and how many cases they already have open), the activity (how likely it is to be data leaving the organisation) and the content involved, and writes a short plain-English explanation of its decision.

How it runs and what it costs

  • Scope: you choose which insider risk policies it covers, and whether it looks only at new alerts or also at alerts from up to 30 days back.
  • Schedule: it can run automatically on a schedule, or an analyst can run it on one alert at a time.
  • Cost: each alert it processes uses Security Compute Units (SCUs). Microsoft 365 E5 includes 400 SCUs a month for every 1,000 users, up to 10,000 a month – see Part 3.
  • Feedback: analysts can give feedback on its decisions, which it takes into account when it triages future alerts.

Getting started well

  1. Tune noisy policies first. The agent sorts what your policies produce – and every alert costs credits.
  2. Start with new alerts only, then widen the lookback once you trust the results.
  3. Compare for two weeks. Have your compliance team triage as normal and compare their view with the agent’s.
  4. Check Not categorized every day. Those alerts have not been assessed by anyone yet.
  5. Watch your SCU usage in Security Copilot, so the monthly allowance is not used up by one noisy policy.

The people reviewing the sorted queue need the same Insider Risk Management roles as before – Analysts or Investigators, through PIM. Setting up the agent needs additional Purview agent and Security Copilot roles.

Bringing it full circle

Over seven parts, we have gone from a licence sitting on the shelf to a joined-up system:

  • Insider Risk Management spots risky behaviour, starting with people who are leaving.
  • Adaptive Protection turns that behaviour into a risk level.
  • DLP and Conditional Access tighten automatically for the few who need it.
  • The Triage Agent helps your compliance team deal with the alerts.
  • Compliance officers, not IT, own the process, with access controlled through PIM.

And all of it is included in the Microsoft 365 E5 licence many organisations already pay for.

Final thoughts

If you take one thing from this series, make it this: if you have E5 and no insider risk policies, you are paying for protection you are not using. Start small – one departing users policy, a few compliance officers, quick setup in simulation – and build from there. The scripts and KQL queries from Part 4 will help you prove it works.

Thank you for following the series. If you have questions or want to talk about your own deployment, get in touch through cloud-secure.ai.


The rest of the series

References

Seรกn O’Farrell | cloud-secure.ai
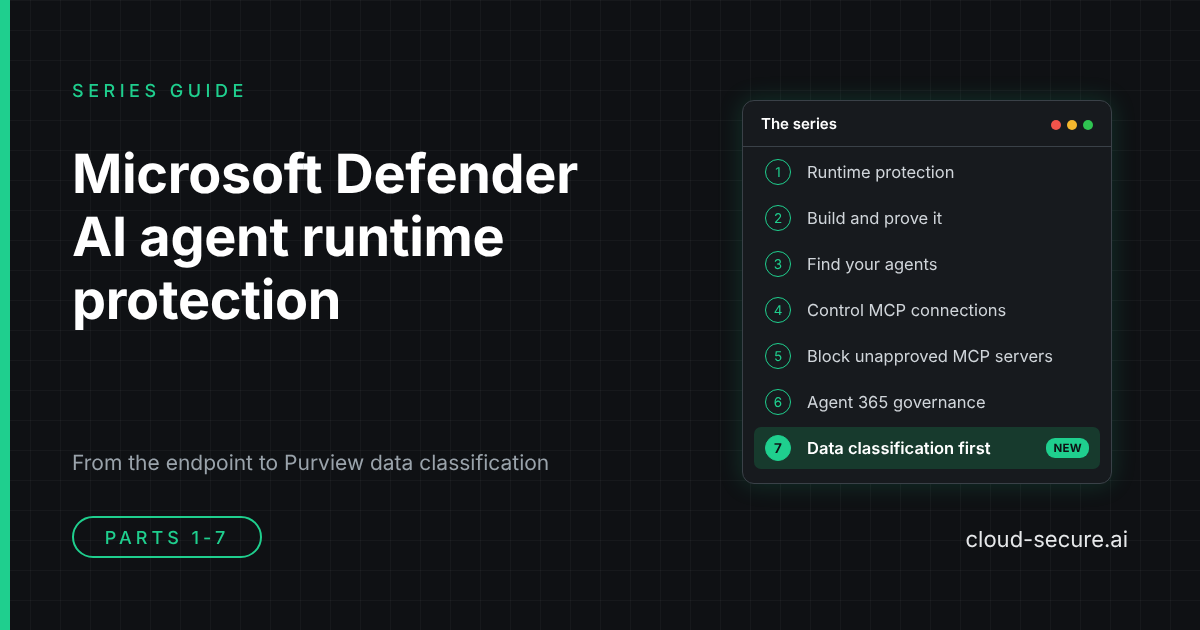
Microsoft Defender AI agent runtime protection: the series guide (parts 1 to 7)

Microsoft Defender AI agent runtime protection series guide, parts 1 to 7

Series guide: seven parts on securing the AI agents in your organisation, from Microsoft Defender for Endpoint on the device, to governance in Microsoft Agent 365, to classifying the data they can reach with Microsoft Purview: what each part covers, and where to start.

AI agents such as Claude Code, GitHub Copilot and Gemini CLI are already on managed endpoints, running with the full rights of the signed-in user and connecting to MCP servers that nobody has reviewed. This series works through what Microsoft Defender for Endpoint can do about that today: detecting prompt injection, finding the agents, and controlling and automatically blocking the servers they talk to. It then moves up a level to Microsoft Agent 365, where you decide which agents exist, who owns them and what they can reach, and finally to Microsoft Purview, where classification decides what data is allowed through once a destination is approved.

Every part is built and tested in a lab or dev tenant, with screenshots of what actually happened, including where the product or the documentation did not behave as expected.

The series at a glance

Part Question it answers What you get
Part 1 What is AI agent runtime protection? How Defender detects prompt injection against local AI agents
Part 2 Does it work, and how do I build it? A lab build, validation, and the gaps in the documentation
Part 3 Which agents are running on my endpoints? The Local agents view, licensing and advanced hunting queries
Part 4 How do I stop an agent reaching an MCP server? Custom domain indicators, network protection and a custom detection rule
Part 5 How do I block every new MCP server automatically? An Azure Automation runbook that blocks by default, with scripts on GitHub
Part 6 How do I govern every agent, not just the ones on endpoints? Agent 365 approval, owners and sponsors, and Conditional Access for agents, with a script on GitHub
Part 7 What can DLP protect if nothing has been classified? Purview classification methods, the types of DLP, and a layered design to protect Contoso’s intellectual property

What each part covers

Part 1: the control for agents already on your endpoints

The starting point: what AI agent runtime protection is, which agents it covers and how it detects prompt injection against agents running locally on your endpoints. If you are new to the topic, start here.

Part 2: building it, proving it, and where the documentation is wrong

The lab build and the validation work behind it. It shows the protection working end to end, and records where the published documentation did not match what the tenant actually served, so you do not lose the same time I did.

Part 3: finding the agents you did not know you had

Visibility before control. The Local agents view in the Defender portal, why discovery is activity based rather than installation based, the licensing split between the inventory and the risk assessment, and a set of advanced hunting queries that go well beyond what the portal shows.

Part 4: controlling where Claude can connect

Runtime protection does not decide which MCP servers an agent may reach. Part 4 closes that gap for a known server: a Defender for Endpoint custom domain indicator, enforced by network protection, blocks Claude Code from an unsanctioned remote MCP server. It covers why the indicator must be the bare domain, why Edge enforces it before network protection does, and a custom detection rule to alert on the blocks.

Part 5: blocking MCP servers you have not approved

An indicator only blocks the domains you list. Part 5 automates it: an Azure Automation runbook with a managed identity runs every hour, finds every new remote endpoint an AI agent has used, and blocks it with a Defender indicator and an alert. Approved servers are permitted with an Allow indicator. It is tested with Claude Code, GitHub Copilot CLI and Gemini CLI (an agent runtime protection does not support), and the scripts are on GitHub.

Part 6: moving AI agent governance from Defender into Agent 365

Parts 1 to 5 act on the device, once an agent is already running. Part 6 moves up to governance in Microsoft Agent 365, where every agent in the tenant is inventoried and approved before people can use it. A dev tenant with 318 agents had only 84 visible to Entra, so most were out of reach of Conditional Access. The post works through four gates: who can build, Agent 365 approval, owners, sponsors and access packages, and Conditional Access and ID Protection for agents. It also covers the Workload ID Premium gap that E7 does not include, and a companion script on GitHub that reviews the tenant and creates the policies in report-only mode.

Part 7: data classification first – protecting Contoso’s intellectual property

Parts 1 to 6 decide where data is allowed to go. Part 7 answers the question that has to come first: what is the data? Once a destination is approved, whether an MCP server, Copilot or an AI app, only a control that recognises the content can stop the wrong data reaching it. The post covers every Purview classification method – sensitivity labels, custom SITs, exact data match, document fingerprinting and trainable classifiers – and the types of DLP that act on them, from Endpoint DLP to inline web traffic and the Copilot location. It walks through how proximity and confidence levels keep a custom SIT from flooding the alert queue, where GSA prompt injection protection fits and where it does not, finding IP already at rest with eDiscovery, and the Triage Agent in DLP. It is the foundation the other six parts stand on.

Where to start

  • New to the topic: read part 1, then part 3 to see what is already running in your estate.
  • Building a lab or a proof of concept: part 2.
  • Need to control MCP servers now: part 4 for a single server, then part 5 to block every new one automatically.
  • Need to know which agents exist and who approved them: part 6.
  • Need to stop sensitive data reaching agents and AI apps you have approved: part 7, the foundation every other control relies on.

More to come

The series is not finished. Microsoft is moving quickly on AI agent security in the Defender portal, and the next parts will follow the new capabilities as they arrive, including the new Sentinel workbook and automation features in the Defender portal. Each one is built and tested in a lab before it is written up.

Follow along on cloud-secure.ai or connect with me on LinkedIn to hear when the next part is published.


The series

Disclaimer: The views in this series are my own. They do not represent my employer, or Microsoft or any other vendor whose products are discussed here.

Seรกn O’Farrell | cloud-secure.ai
Microsoft Defender AI agent runtime protection, part 5: blocking MCP servers you have not approved

Part 5 cover - Blocking MCP servers you have not approved

Series: Part 1 introduced AI agent runtime protection in Microsoft Defender for Endpoint. Part 2 covered the lab build and validation. Part 3 found the agents running on your endpoints. Part 4 blocked an unsanctioned MCP server with a Defender indicator. Part 5 automates it, so every new MCP server is blocked until you approve it.

In part 4 a Defender for Endpoint custom domain indicator, enforced by network protection, stopped Claude Code reaching an unsanctioned remote MCP server. It worked, but it only blocks the domains you list. A developer who adds a new MCP server on a different domain connects to it without anyone noticing.

This part closes that gap with automation. An Azure Automation runbook runs every hour, finds every new remote endpoint an AI agent has used, and blocks it with a Defender indicator and an alert. Approved servers are permitted with an Allow indicator. There is no Sentinel dependency, no app registration and no secret to rotate – just a managed identity, two API permissions and three PowerShell scripts.

The same approach covers any agent, not just the ten or so that runtime protection supports. This post tests it with Claude Code, GitHub Copilot CLI and Gemini CLI, which runtime protection does not support.

Why MCP servers need controlling

A remote MCP server is a third-party service that an AI agent sends data to and takes instructions from. Developers add them in minutes, usually without security, procurement or data protection review – and each one becomes a new processor of your organisation’s data.

Key risks of sending corporate data to unapproved MCP servers

Risk What could happen Risk level
Data exfiltration Prompts, documents, credentials, customer information, source code or other sensitive data could be transmitted to the MCP operator. โ— Critical
Loss of data governance Once information is sent outside approved Microsoft 365 and Azure controls, your organisation may lose control over where it is stored, processed or subsequently transferred. โ— Critical
Unknown data retention The MCP provider may log requests, responses, prompts or tool parameters indefinitely, or use different retention policies from your organisation. โ— High
Credential and token exposure OAuth tokens, API keys, connection strings or other authentication material could inadvertently be exposed to a malicious or poorly designed MCP server. โ— Critical
Excessive permissions An MCP server may be granted access to files, databases, Git repositories, email, APIs or cloud services beyond what the user actually needs. โ— Critical
Malicious tool execution A compromised or malicious MCP server could expose tools designed to manipulate an agent into performing unintended actions. โ— Critical
Prompt and tool injection Content returned by an MCP server can influence an AI agent into invoking additional tools or disclosing information it would not normally provide. โ— High
Supply-chain compromise A legitimate MCP server, its dependencies or its hosting environment could subsequently become compromised. โ— High
Data residency Data may be processed or logged in regions that do not meet organisational, customer or regulatory residency requirements. โ— High
Compliance exposure Sending personal, regulated or customer data to an unapproved service could breach GDPR, contractual obligations or internal security policies. โ— High
Lack of auditability Security teams may have little or no visibility of what users sent to the MCP server or what the server subsequently did with it. โ— High
Shadow AI and shadow IT Users can introduce new third-party processors and integrations without security, procurement or data protection review. โ— High

Controlling which MCP servers agents can reach addresses these risks at the source, and brings two further benefits:

  • Visibility. Every block alert is an inventory entry. You learn which servers your DevOps teams actually use, rather than guessing.
  • Any agent. Runtime protection covers a fixed list of agents. Network indicators apply to every process on every onboarded device, so new and unsupported agents are covered too.

How it works

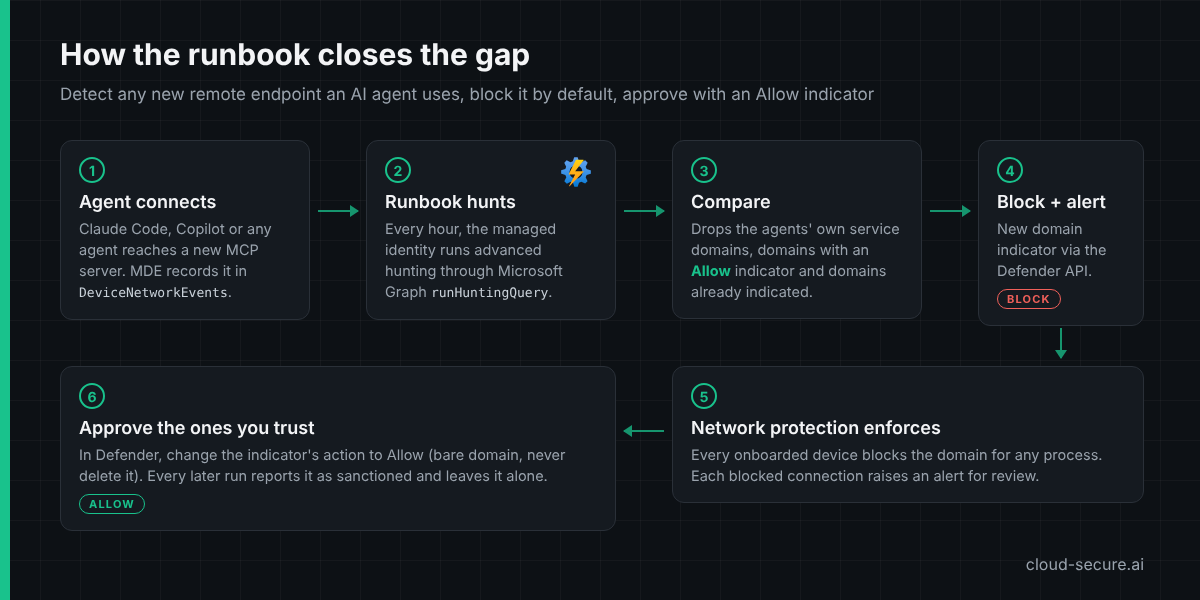
How the MCP-ServerAutoBlock runbook works
  1. An agent connects to a remote MCP server. Defender for Endpoint records the connection in DeviceNetworkEvents.
  2. Every hour, the Automation account’s managed identity runs an advanced hunting query through Microsoft Graph runHuntingQuery for domains that AI agent processes reached.
  3. The runbook drops the agents’ own service domains (a never-block list), any domain with an Allow indicator and any domain that already has an indicator.
  4. Every domain left gets a Block domain indicator with alert generation, created through the Defender for Endpoint indicators API.
  5. Network protection enforces the block on every onboarded device, and each blocked connection raises an alert.
  6. An administrator approves trusted servers by changing the indicator’s action to Allow. Later runs report them as sanctioned and leave them alone.

The default is deny: anything new is blocked until someone approves it. An IndicatorAction parameter switches the runbook to Audit for a tuning period.

What advanced hunting showed first

Before building anything, I ran the runbook’s hunting logic over 30 days of lab data. It returned 63 domains contacted by agent processes. Only one was a remote MCP server reached directly from the device – mcp.context7.com, already blocked in part 4. The rest taught three lessons that shaped the runbook:

  • claude.exe is two products. Claude Code, the CLI, logs with a plain claude.exe command line. The Claude desktop app is an Electron app, and its traffic comes from helper processes with --type=utility on the command line – hCaptcha, Datadog, Sentry and claudeusercontent.com. The runbook excludes those helper processes, so it assesses Claude Code only. The desktop app’s remote connectors only ever appeared as mcp-proxy.anthropic.com, so the MCP server’s own domain is not visible to the device.
  • VS Code hides the extension. All GitHub Copilot extension traffic leaves through VS Code’s shared network service process. Hunting can attribute a connection to code.exe, never to Copilot, so the whole editor is treated as the agent and its own service domains go on the never-block list.
  • Telemetry is noise. Agent and editor telemetry endpoints (datadoghq.com, sentry.io, exp-tas.com) would otherwise be blocked on the first run. They are on the never-block list.

With those changes, replaying the 30 days of data through the runbook produced no new blocks – the right baseline before adding new MCP servers.

Prerequisites

Requirement Detail
Defender for Endpoint Devices onboarded, network protection in block mode and custom network indicators enabled (part 4)
Azure subscription To host the Automation account
Entra role Global Administrator or Privileged Role Administrator, to grant the API permissions
Azure role Automation Contributor or Contributor on the Automation account
PowerShell 7 With the Microsoft Graph and Az modules, on the administrator’s workstation

Step 1 – Create the Automation account

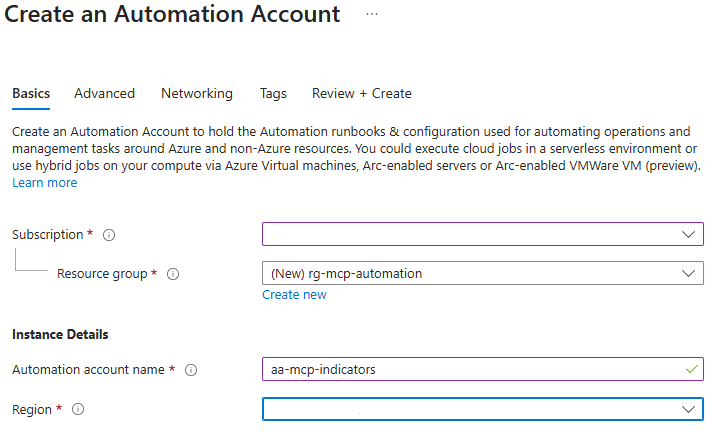
In the Azure portal, search for Automation Accounts and select Create. On Basics, create a resource group such as rg-mcp-automation, name the account aa-mcp-indicators and pick your region.

Create an Automation Account - Basics tab

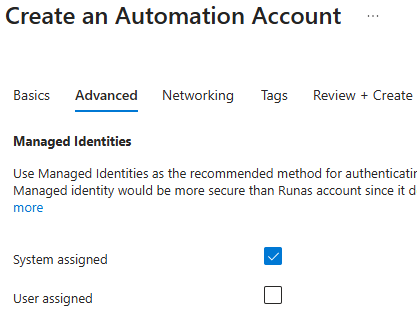
On Advanced, leave System assigned ticked. This managed identity is what the runbook authenticates as, so there are no credentials to store.

Create an Automation Account - Advanced tab with System assigned ticked

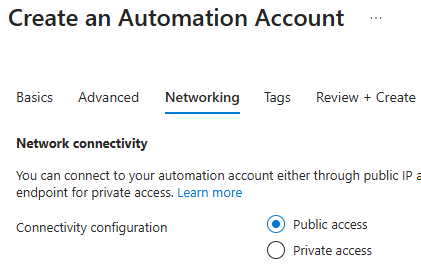
On Networking, choose Public access. The setting only controls inbound access to the account’s own endpoints, such as webhooks and Hybrid Runbook Workers. The runbook’s outbound calls to Graph and the Defender API work either way. Choose private access if your policy requires Private Link on every PaaS resource.

Create an Automation Account - Networking tab with Public access selected

Select Review + Create > Create.

Step 2 – Confirm the managed identity

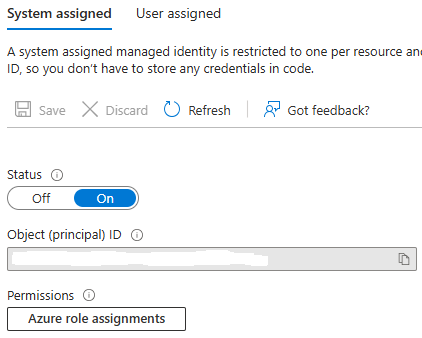
Open the account and go to Account Settings > Identity > System assigned. Status should be On. The runbook never needs the object ID – Azure Automation provides the identity’s token endpoint inside every job.

Automation account Identity blade with System assigned status On

Step 3 – Grant the API permissions

The managed identity needs two application permissions:

API Permission Used for
Microsoft Graph ThreatHunting.Read.All Advanced hunting through runHuntingQuery
WindowsDefenderATP Ti.ReadWrite.All Reading and creating indicators. The .All permission lets the runbook see indicators created by people as well as its own.

Hunting goes through Microsoft Graph because Microsoft is retiring the Defender for Endpoint and Defender XDR advanced hunting APIs on 1 February 2027 (MC1220762). Indicators stay on the Defender for Endpoint API.

App roles cannot be assigned to a managed identity in the portal, so the first script does it. Run it from PowerShell 7 and enter the tenant and the Automation account name when prompted:

.\Grant-McpRunbookPermissions.ps1
PowerShell output showing ThreatHunting.Read.All and Ti.ReadWrite.All assigned

The script finds the identity by name and contains no tenant-specific IDs. It is safe to re-run – roles already assigned are skipped. New role assignments can take 15-30 minutes to appear in the identity’s tokens.

Step 4 – Create the runbook

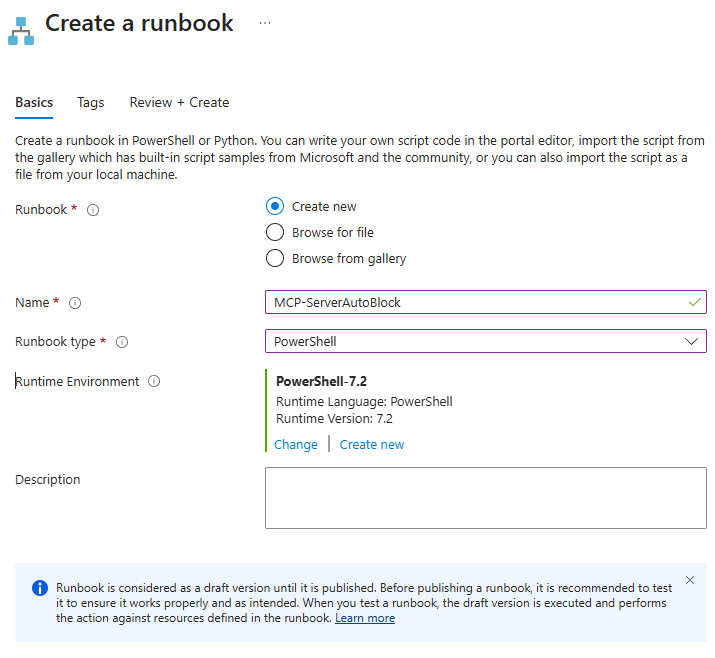
Go to Process Automation > Runbooks > Create. Name it MCP-ServerAutoBlock with runbook type PowerShell.

Create a runbook named MCP-ServerAutoBlock, type PowerShell

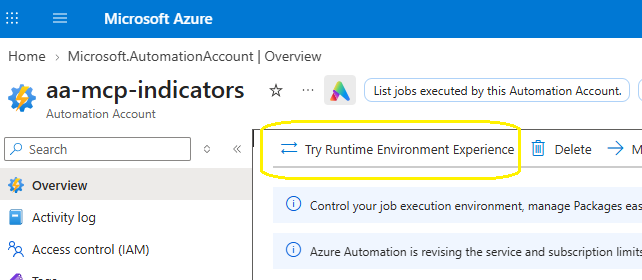
The classic runbook experience offers PowerShell 7.2 at most. Support for PowerShell 7.1 and 7.2 in Azure Automation has ended, so the runbook should move to a newer runtime. Newer versions are only available through Runtime environments. On the account Overview, select Try Runtime Environment Experience.

Automation account overview with Try Runtime Environment Experience highlighted

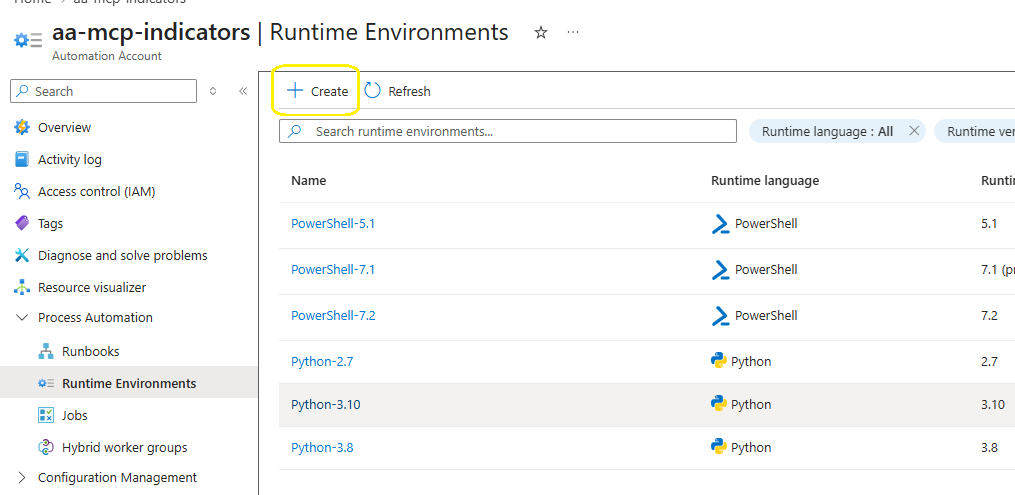
Go to Process Automation > Runtime Environments > Create. The system-generated environments stop at 7.2.

Runtime Environments list showing system-generated environments up to PowerShell 7.2

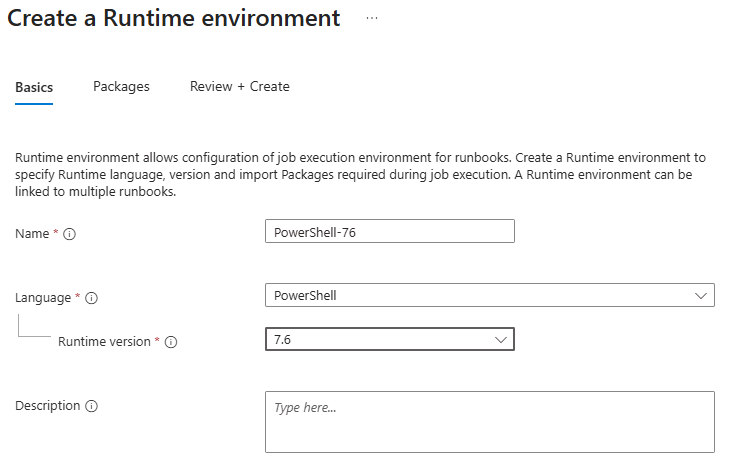
Name the new environment PowerShell-76, language PowerShell, runtime version 7.6, and leave the default packages. The runbook needs no extra modules. In my tenant 7.6 reported itself as a preview (7.6.0-preview.5). Use 7.4 where it is offered and you need a generally available runtime – the runbook runs unchanged on 7.2, 7.4 and 7.6.

Create a Runtime environment named PowerShell-76 with runtime version 7.6

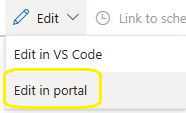
Open the runbook and select Edit > Edit in portal.

Edit menu with Edit in portal highlighted

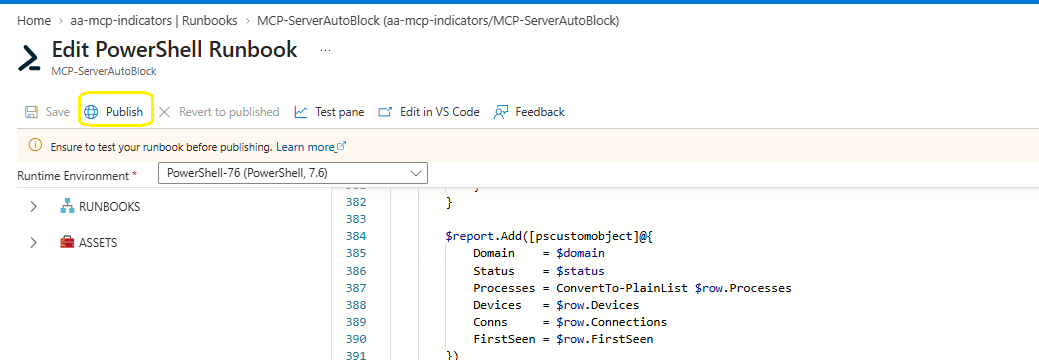
Set Runtime Environment to PowerShell-76, paste the contents of MCP-ServerAutoBlock.ps1 and select Save. Do not publish yet.

Runbook editor with PowerShell-76 runtime environment selected and Publish highlighted

What the runbook runs

The core of the runbook is a single advanced hunting query. The agent process list and node.exe markers come from Automation variables, with lab-tested defaults:

let agentProcesses = dynamic(['claude.exe', 'copilot.exe', 'code.exe', 'cursor.exe', 'gemini.exe']);
let nodeMarkers = dynamic(['claude', 'copilot', 'gemini']);
DeviceNetworkEvents
| where Timestamp > ago(2h)
| where isnotempty(RemoteUrl)
| where InitiatingProcessFileName in~ (agentProcesses)
    or (InitiatingProcessFileName =~ "node.exe" and InitiatingProcessCommandLine has_any (nodeMarkers))
| where not(InitiatingProcessFileName =~ "claude.exe" and InitiatingProcessCommandLine has "--type=")
| extend HostPart = iff(RemoteUrl has "://", tostring(parse_url(RemoteUrl).Host), tostring(split(RemoteUrl, "/")[0]))
| extend Domain = tolower(trim_end(@"\.", tostring(split(HostPart, ":")[0])))
| where Domain matches regex @"^[a-z0-9-]+(\.[a-z0-9-]+)+$" and not(Domain matches regex @"^[0-9.]+$")
| summarize FirstSeen = min(Timestamp), Connections = count(), Devices = dcount(DeviceId),
            Processes = make_set(InitiatingProcessFileName, 5) by Domain

Agents that run under node.exe, such as Gemini CLI, are matched on their command line. The runbook then compares the results with the never-block list and the tenant’s existing domain indicators before creating anything.

Parameter Default Purpose
DryRun False Report what would be created without creating anything
LookbackHours 2 Overlaps the hourly schedule so nothing is missed
MaxNewIndicators 20 Safety cap per run
IndicatorAction Block Audit logs and alerts only, for tuning

Step 5 – Dry run in the test pane

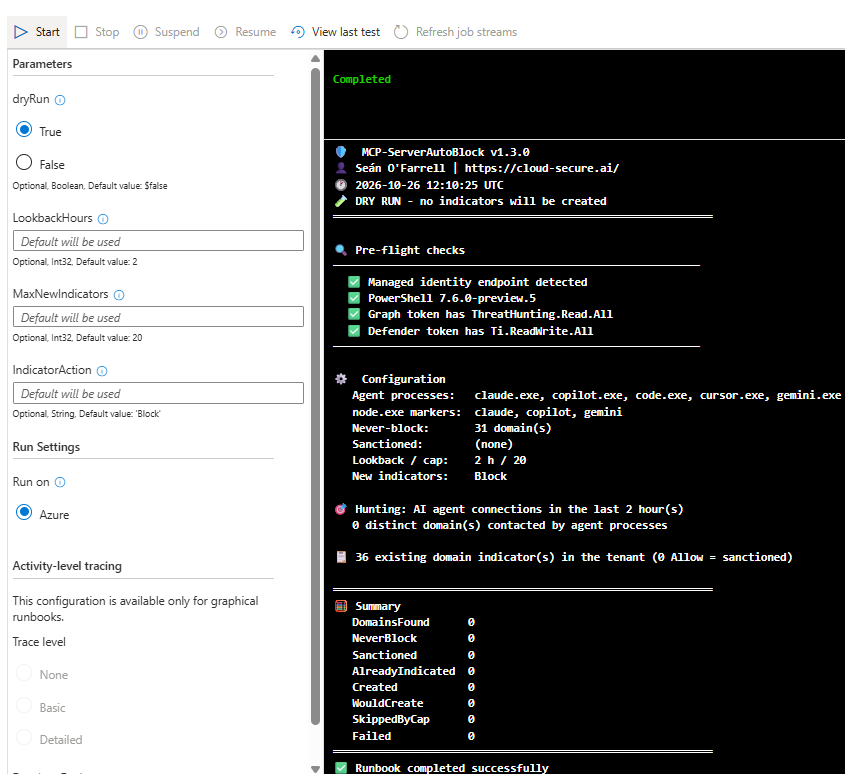
Select Test pane, set dryRun to True and select Start. The pre-flight checks decode each token and confirm both app roles are present before the runbook does anything else.

Test pane output for MCP-ServerAutoBlock v1.3.0 dry run with all pre-flight checks passed

With no new agent activity in the last two hours, there is nothing to block – and nothing was created. When new MCP servers appear, they show as Would create (Block) in a dry run.

Step 6 – Publish and schedule

Select Publish > Yes. Scheduled runs always use the published version. Then run the third script, which needs no parameters:

.\New-McpRunbookSchedule.ps1
  1. Enter the tenant ID or domain when prompted, for example contoso.onmicrosoft.com.
  2. Sign in to Azure.
  3. If your account can see more than one subscription, type the number shown next to the subscription that holds the Automation account – for example 1 or 10 – and press Enter.
  4. If more than one Automation account has the runbook, type the number of the right one.

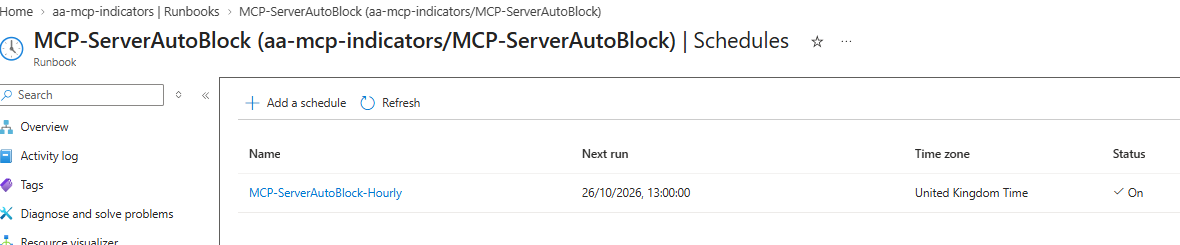
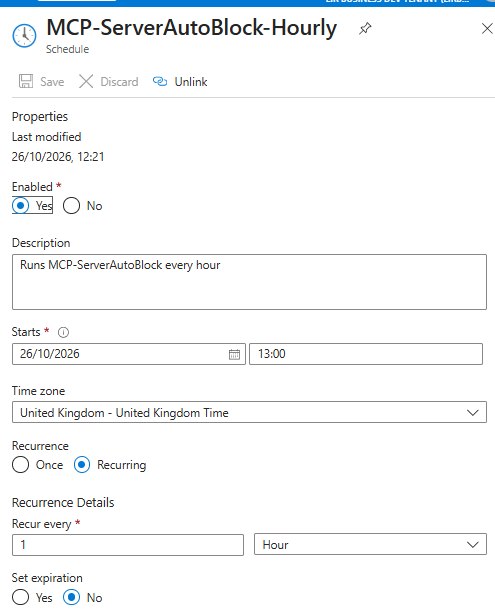
The script creates an hourly schedule starting at the next full hour and links it to the runbook with DryRun set to False, LookbackHours to 2 and IndicatorAction to Block. One hour is the most frequent a schedule can run in Azure Automation.

Runbook Schedules blade showing MCP-ServerAutoBlock-Hourly with status On
Schedule properties - recurring every 1 hour, no expiration

Permitting an approved MCP server

Approval lives in Defender, next to the blocks. In the Defender portal, go to Settings > Endpoints > Indicators > URLs/Domains:

  • Already blocked – open the AI agent endpoint (auto, Block): โ€ฆ indicator, change Action to Allow and save.
  • Approving in advance – select Add item, enter the domain, set Action to Allow and record the owner or change reference in the title.

Every later run reports the domain as Sanctioned (Allow). Two rules apply:

  • Change the action, never delete the indicator. If a Block indicator is deleted, the next run sees the domain again and blocks it again.
  • Use the bare domain. As part 4 showed, network protection only sees the domain name for non-browser processes, so a URL-style indicator never matches.

Network protection can take time to pick up indicator changes on a device – in part 4 the device needed a restart. Plan approvals with that delay in mind.

Defender for Cloud Apps is not the right place for this list. It sanctions apps from its catalogue, and most MCP endpoints are not in the catalogue, so they are never discovered as apps and cannot be sanctioned there.

Seeing it work with three agents

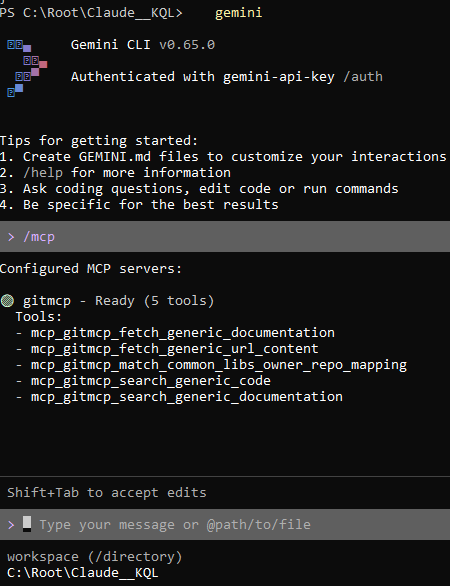
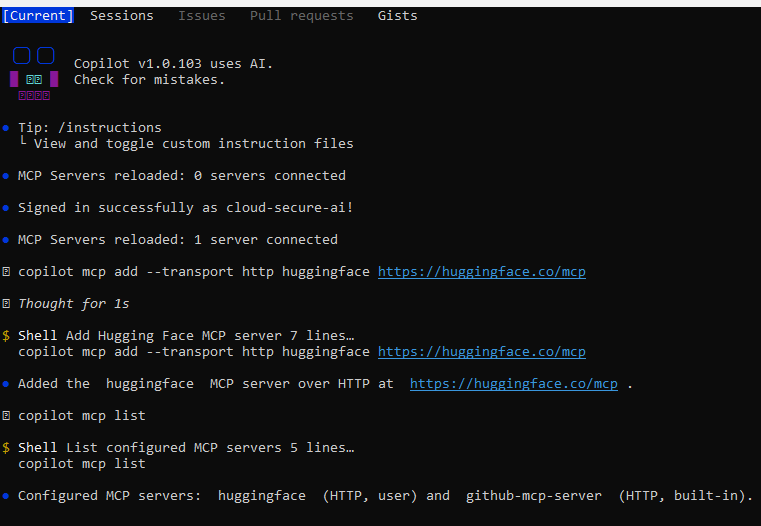
To prove the “any agent” claim, I gave three agents a new remote MCP server each, on domains with no indicator. Only Claude Code is on runtime protection’s supported list – Gemini CLI is not supported at all.

Agent MCP server Process Defender sees
Claude Code https://mcp.deepwiki.com/mcp claude.exe
Gemini CLI https://gitmcp.io/docs node.exe (command line contains gemini)
GitHub Copilot CLI https://huggingface.co/mcp copilot.exe

Claude Code

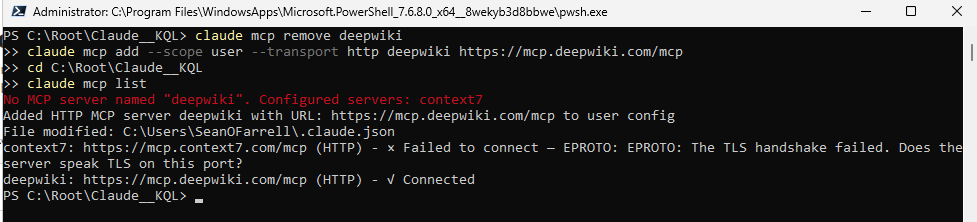
Add the server for the user, so it is available in every folder:

claude mcp add --scope user --transport http deepwiki https://mcp.deepwiki.com/mcp
claude mcp list
claude mcp list showing context7 failing with a TLS handshake error and deepwiki connected

The list shows both sides of the control in one screen. Context7 fails with EPROTO: The TLS handshake failed – that is network protection enforcing the part 4 indicator. DeepWiki, which nobody has reviewed, connects.

Gemini CLI and GitHub Copilot CLI

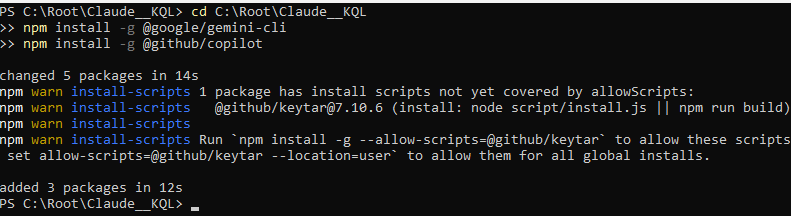
Both install from npm, so Node.js comes first:

npm install -g @google/gemini-cli
npm install -g @github/copilot
npm installing Gemini CLI and GitHub Copilot CLI

A note on TLS inspection. In my lab the installs first failed: the Node.js download returned 403 and npm reported SELF_SIGNED_CERT_IN_CHAIN. Both were caused by Entra Internet Access (Global Secure Access) web filtering and TLS inspection on the same device. If you run Global Secure Access, add exclusions for nodejs.org and registry.npmjs.org, or set NODE_USE_SYSTEM_CA=1 so Node.js trusts the Windows certificate store. For this test I paused the client, so the only control in the path was Defender for Endpoint.

Gemini CLI signs in with a Gemini API key from Google AI Studio – its Sign in with Google option is no longer offered for individual accounts. Add GitMCP to %USERPROFILE%\.gemini\settings.json:

{ "mcpServers": { "gitmcp": { "httpUrl": "https://gitmcp.io/docs" } } }
Gemini CLI /mcp showing gitmcp ready with 5 tools

Copilot CLI signs in with /login, and the server is added from PowerShell:

copilot mcp add --transport http huggingface https://huggingface.co/mcp
copilot mcp list
Copilot CLI signed in, adding the huggingface MCP server and listing servers

Note the built-in github-mcp-server. Copilot CLI ships with GitHub’s own MCP server already configured, which matters for the shared-domain point below.

What Defender records

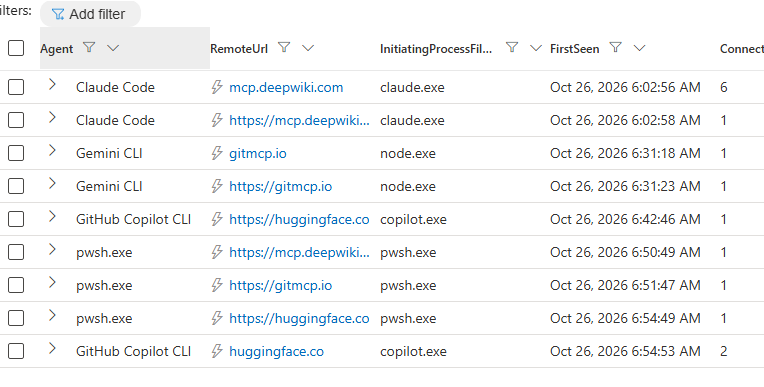
A small lab helper, Invoke-McpAgentTest.ps1, runs each agent non-interactively with a prompt that uses its MCP tool. Each agent connects to its MCP servers as it starts, so the connection is logged even when the tool call itself fails. Minutes later, all three appear in advanced hunting:

DeviceNetworkEvents
| where Timestamp > ago(2h)
| where RemoteUrl has_any ("deepwiki.com", "gitmcp.io", "huggingface.co")
| extend Agent = case(
    InitiatingProcessFileName =~ "claude.exe", "Claude Code",
    InitiatingProcessCommandLine has "gemini", "Gemini CLI",
    InitiatingProcessCommandLine has "copilot", "GitHub Copilot CLI",
    InitiatingProcessFileName)
| summarize FirstSeen = min(Timestamp), Connections = count() by Agent, RemoteUrl, InitiatingProcessFileName
| order by FirstSeen asc
Advanced hunting results showing Claude Code, Gemini CLI and GitHub Copilot CLI connecting to their MCP servers

Three details are worth noticing:

  • Gemini CLI is node.exe. Only the command line identifies it, which is why the runbook matches node.exe agents on command-line markers.
  • Copilot CLI is copilot.exe, even when installed from npm – the package runs a native binary.
  • Each server appears twice, once as a bare domain and once as an https:// URL. The runbook reduces both to the bare domain, so each server gets one indicator. The pwsh.exe rows are the test helper’s own reachability check – PowerShell is not in the agent list, so the runbook ignores them.

What the user sees when a server is blocked

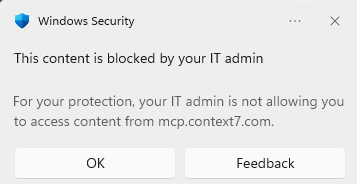
When an agent reaches a blocked domain, network protection drops the connection and Windows shows a notification. This is Context7, blocked by the part 4 indicator, being reached when Claude Code started:

Windows Security notification - This content is blocked by your IT admin - mcp.context7.com

Claude Code connects to every configured MCP server at start-up, so the block – and its alert in the Defender portal – happened before anyone asked it a question. DeepWiki, GitMCP and Hugging Face are now in advanced hunting and match none of the never-block entries, so they are exactly what the runbook’s next hourly run picks up: each gets a Block indicator and an alert, and from then on each agent sees this same notification until an administrator approves the server.

GitHub Copilot and shared domains

GitHub hosts its remote MCP server at api.githubcopilot.com/mcp/, and Copilot CLI includes it as a built-in server. Network protection cannot see the /mcp/ path, so a block on api.githubcopilot.com affects everything on that host. In the lab, Copilot Free traffic from VS Code used api.individual.githubcopilot.com for the Copilot service itself, a different host – but Business and Enterprise plans use other hosts, so do not assume the same split.

For that reason githubcopilot.com is on the never-block list, and the runbook does not block GitHub’s own MCP server. Treat it as approved by default. If you want to block it, test with a manual Block indicator on api.githubcopilot.com first and confirm Copilot itself still works on your plan.

Limits to know

  • Detect, then block. A brand-new server is reachable until it appears in advanced hunting and the next run blocks it – typically within one to two hours. A true pre-emptive allow-list belongs at the network edge, in a proxy or egress firewall.
  • Domain only. The runbook cannot tell an MCP server from any other site an agent reaches. A site Claude Code fetches during a web search can be blocked too. Keep the never-block list tuned, review the alerts, and start on Audit if that risk is too high.
  • Shared hosts. Where an MCP server shares a host with the agent’s own service, blocking one blocks both.
  • Electron hosts. VS Code traffic is attributed to code.exe, not to the extension, and the Claude desktop app’s remote connectors are not visible on the device.
  • Indicator alerts. As part 4 found, the indicator’s own alert ignores the severity set on it. Use the part 4 custom detection rule for tailored alerting.

The scripts

The scripts are in the Defender-mcp-server-autoblock repository on GitHub, each with its own README. None contains tenant-specific IDs.

Script Runs Purpose
MCP-ServerAutoBlock Azure Automation, hourly Hunts, compares and blocks new AI agent endpoints
Grant-McpRunbookPermissions Once, by an administrator Grants the managed identity its two API permissions
New-McpRunbookSchedule Once, by an administrator Creates the hourly schedule and links it to the runbook
Invoke-McpAgentTest Lab only, on a test device Makes Claude Code, Gemini CLI and Copilot CLI call their MCP servers, before and after the block

Wrapping up

Part 4 showed that one indicator can stop an agent reaching one MCP server. Part 5 turns that into a standing control: every new remote endpoint an AI agent uses is found within the hour, blocked by default and raised as an alert, and approval is a single change in the Defender portal. It works for any agent you can name, with nothing more than a managed identity, two API permissions and a scheduled runbook.


The rest of the series

References

Seรกn O’Farrell | cloud-secure.ai