Insider Risk Management Part 5: Adaptive Protection with DLP

Insider Risk Management Part 5: Adaptive Protection with DLP

Series: This is Part 5 of 7 in my series on Microsoft Purview Insider Risk Management. New to the series? Start with the series guide, which summarises every part.

In Part 4 we built a policy that spots people taking data before they leave. On its own, that policy raises alerts – and then waits for a person to act. Adaptive Protection removes the wait. It turns each person’s insider risk into a level, and lets your other security controls tighten automatically for the few people who are genuinely risky, while everyone else carries on as normal.

This is the feature that turns Insider Risk Management from a reporting tool into protection. In this part I explain how it works in plain English, what quick setup creates for you, and how to roll it out without upsetting anyone.

What Adaptive Protection does

Most security controls treat everyone the same. A data loss prevention (DLP) rule that blocks copying to USB blocks it for the whole organisation, which frustrates the many to stop the few. So most organisations set their rules loosely – and the risky few get through.

Adaptive Protection fixes that. Insider Risk Management watches behaviour and gives each person a risk level. Other controls then read that level and act on it:

  • Data loss prevention – stricter rules for higher-risk people only.
  • Conditional Access – block or restrict sign-in for higher-risk people (covered in Part 7).
  • Data lifecycle management – keep copies of anything a high-risk person deletes.

Levels go up and down automatically as behaviour changes. Nobody has to remember to add someone to a “watch list” or take them off it again.
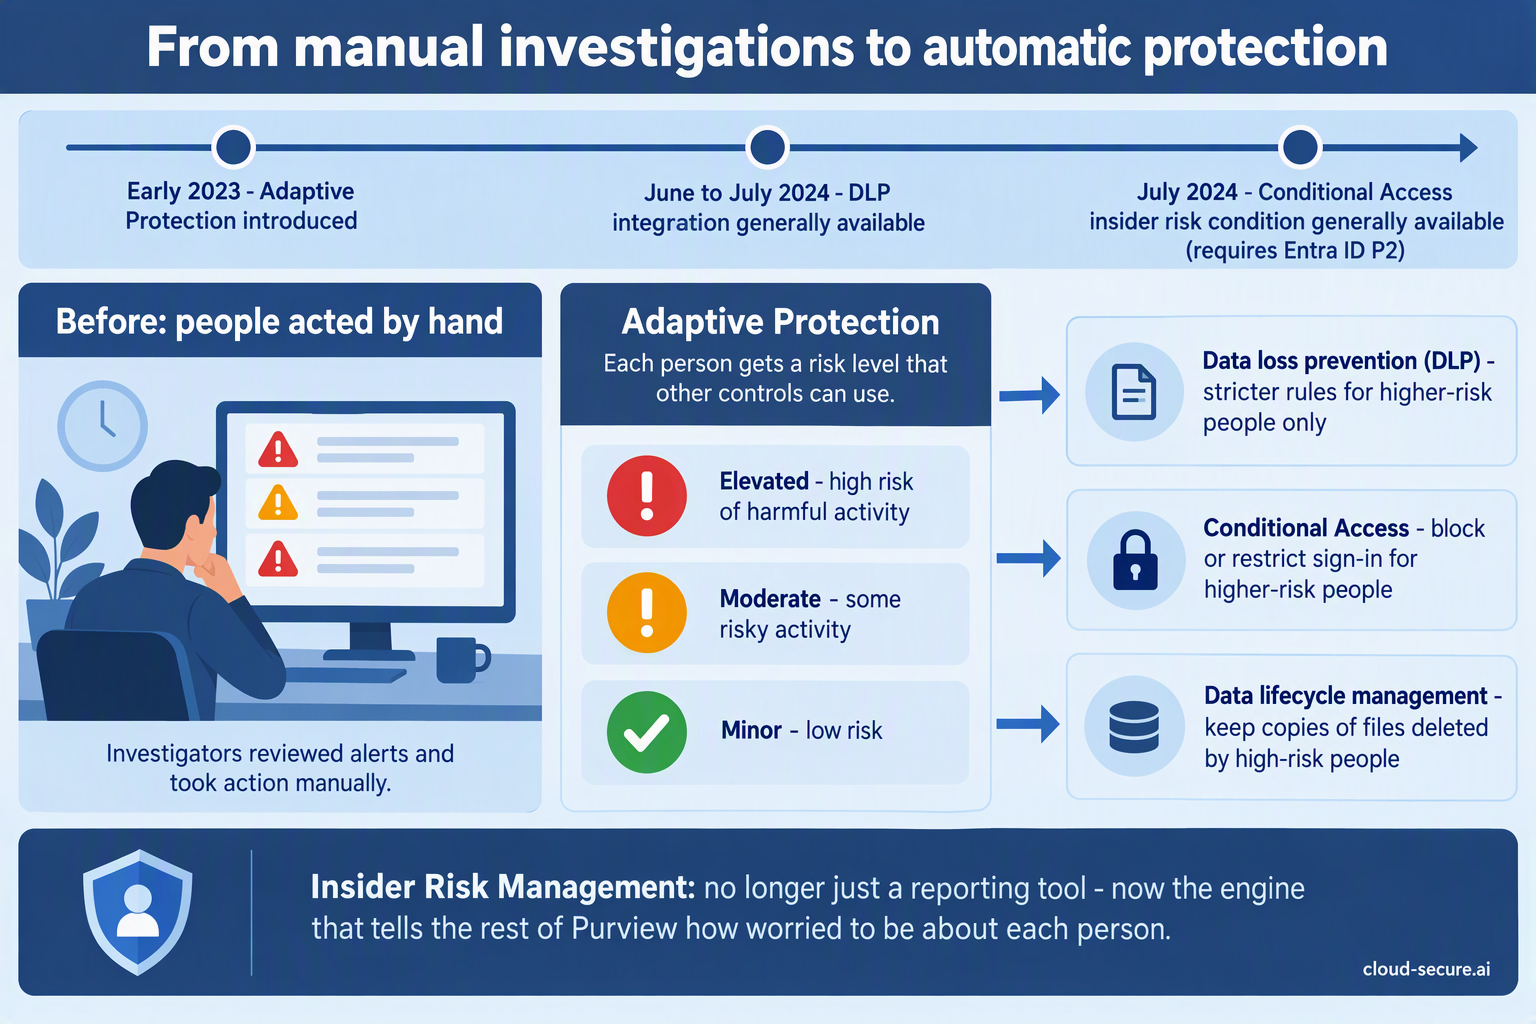
From manual investigations to automatic protection with Adaptive Protection

The three risk levels

Adaptive Protection uses three levels. Microsoft provides built-in definitions, which you can change:

Level Built-in definition (simplified) Typical response
Elevated High-severity alerts, several high-severity sequences of risky activity, or a confirmed high-severity alert Block
Moderate Medium-severity alerts, or at least two high-severity data exfiltration activities Warn, record, or require extra steps
Minor Low-severity alerts, or at least one high-severity data exfiltration activity Record only

Do not confuse the two: Alert severity (Low, Medium, High) helps analysts decide which alert to look at first. Insider risk levels (Minor, Moderate, Elevated) are what drive automatic protection. They are related, but they are not the same thing.

How long a level lasts

  • Risk level timeframe: a level lasts 7 days by default (you can choose between 5 and 30). If the person keeps meeting the criteria, it is extended.
  • Past activity detection: how far back Adaptive Protection looks at activity when assigning a level – also 7 days by default, between 5 and 30.
  • Automatic expiry: on by default. When the related alert is dismissed or the case is closed, the level is removed.
  • Manual reset: an investigator can expire a person’s level at any time under Adaptive Protection > Users assigned insider risk levels. Alerts and cases are kept.

Quick setup or custom setup?

Quick setup is the fastest way to start and needs no existing policies. It creates everything for you in a safe, test-only state:

What it creates What it does Starts as
Insider risk policy Adaptive Protection policy based on the Data leaks template, covering all users Active
DLP policy for laptops (Endpoint DLP) Elevated: blocks USB copies, printing, uploads to unapproved cloud sites and more. Moderate and Minor: recorded only Simulation (test mode)
DLP policy for Teams and Exchange Elevated: blocks sharing sensitive content with people outside the organisation. Moderate and Minor: recorded only Simulation (test mode)
Conditional Access policy Blocks Elevated people from Office 365 apps Report-only
Data lifecycle policy Keeps deleted SharePoint, OneDrive and Exchange content from Elevated people for 120 days Active

Quick setup can take up to 72 hours to finish, and you get an email when it is done. Do not turn Adaptive Protection off while it is still setting up.

Custom setup suits organisations that already have insider risk and DLP policies. You choose the insider risk policy, define the three levels yourself, add the risk level condition to your existing DLP and Conditional Access policies, then switch Adaptive Protection on. Results can take up to 36 hours to appear.

How DLP uses the risk level

Once Adaptive Protection is on, DLP policies gain a new condition: “Insider risk level for Adaptive Protection is”. You choose one, two or all three levels, then choose what happens. It works in DLP policies for Exchange email, Teams and devices (company laptops).

The pattern Microsoft uses in quick setup is a good starting point:

Where Elevated Moderate and Minor
Laptops Block copying to USB and network shares, printing, copying to the clipboard, uploads to unapproved cloud sites and use by unapproved apps Record the same activities, without blocking
Email and Teams Block or encrypt sensitive content shared with people outside the organisation Record external sharing, without blocking

For laptops: Adaptive Protection on devices needs either Advanced classification scanning and protection switched on, or the “File type is” condition in your DLP rule. If someone is covered by both an Adaptive Protection policy and another device DLP policy, the strictest one wins.

Who needs which role

Task Role
Set up Adaptive Protection Insider Risk Management or Insider Risk Management Admins
Edit DLP policies that use the risk level Compliance Administrator, Compliance Data Administrator or DLP Compliance Management
Edit Conditional Access policies that use the risk level Conditional Access Administrator or Security Administrator
See who has which risk level Insider Risk Management, Analysts or Investigators – ideally your compliance officers through PIM, as described in Part 1

Rolling it out safely

  1. Run quick setup and wait for the completion email.
  2. Leave everything in simulation for two to four weeks. Review which people reach each level and what the DLP policies would have blocked.
  3. Check for surprises. Are the right people reaching Elevated? Would any legitimate work have been blocked? Adjust the level definitions if needed.
  4. Turn on blocking for Elevated only. Leave Moderate and Minor recording only.
  5. Tell people. Your IT acceptable use policy and privacy notice should explain that controls can tighten automatically when risky activity is detected – see Part 6.
  6. Review regularly. Look at who is assigned a level each week, and use manual expiry when an investigation clears someone.

Switching it off

If you ever need to, turn Adaptive Protection off in its settings. Levels stop being assigned and are reset within about six hours. Your insider risk, DLP, Conditional Access and data lifecycle policies are not deleted – they simply stop receiving risk levels.

Final thoughts

Adaptive Protection is where the investment in Insider Risk Management pays back. Instead of choosing between rules that are too strict for everyone or too loose to matter, you get strict rules for the few who need them and freedom for everyone else – automatically.

In Part 6 I tackle the question every data protection officer asks: is this something we are obliged to do?


The rest of the series

References

Seรกn O’Farrell | cloud-secure.ai

Insider Risk Management Part 7: Insider risk in Conditional Access and the Data Security Triage Agent

Insider Risk Management Part 7: Insider risk in Conditional Access and the Data Security Triage Agent

Series: This is Part 7 of 7 in my series on Microsoft Purview Insider Risk Management. New to the series? Start with the series guide, which summarises every part.

This is the final part of the series, and it brings everything together. Insider Risk Management spots risky behaviour. Adaptive Protection turns it into a risk level. In this part, that risk level reaches the front door – sign-in – and an AI assistant helps your compliance team deal with the alerts.

Part A: Insider risk in Conditional Access

Conditional Access is the set of rules in Microsoft Entra ID that decides who can sign in to what, from where and on which device. Most organisations already use it – for example, to require multi-factor authentication. Since July 2024, it can also use a person’s insider risk level as a condition.

That means the same risk level that tightens DLP in Part 5 can also block or restrict someone’s access to Microsoft 365 apps. You need Microsoft Entra ID P2, which is included in E5, and Adaptive Protection switched on.

What Microsoft recommends for each level

Level Recommended Conditional Access response Effect on the person
Elevated Block sign-in to Microsoft 365 apps, block access to specific labelled SharePoint sites, or block downloads from cloud apps Cannot reach the data at all
Moderate Require them to accept Terms of Use when signing in to admin portals A reminder of their obligations, with no loss of access
Minor Run a policy in report-only mode None – you just gain visibility

The Copilot angle: Blocking an Elevated person from specific labelled SharePoint sites also stops Microsoft 365 Copilot generating answers from those sites for them. A risky person cannot use Copilot as a back door to sensitive content.

Creating the block policy for Elevated risk

If you ran Adaptive Protection quick setup in Part 5, a policy called “1-Block access for users with Insider Risk” already exists in report-only mode. To create one yourself, sign in to the Microsoft Entra admin center as at least a Conditional Access Administrator and:

  1. Go to Entra ID > Conditional Access > Policies and select New policy.
  2. Users: include All users. Exclude your emergency access (break-glass) accounts and guest or external user types.
  3. Target resources: include All resources.
  4. Conditions: select Insider risk, set Configure to Yes, and tick Elevated.
  5. Grant: select Block access.
  6. Enable policy: set it to Report-only and select Create.
  7. Review the report-only results for a few weeks, then switch the policy to On.

Never skip report-only: Blocking sign-in is the strongest action in this series. Run it in report-only first, check exactly who would have been blocked, and always exclude your emergency access accounts so a mistake cannot lock everyone out.

Part B: The Data Security Triage Agent

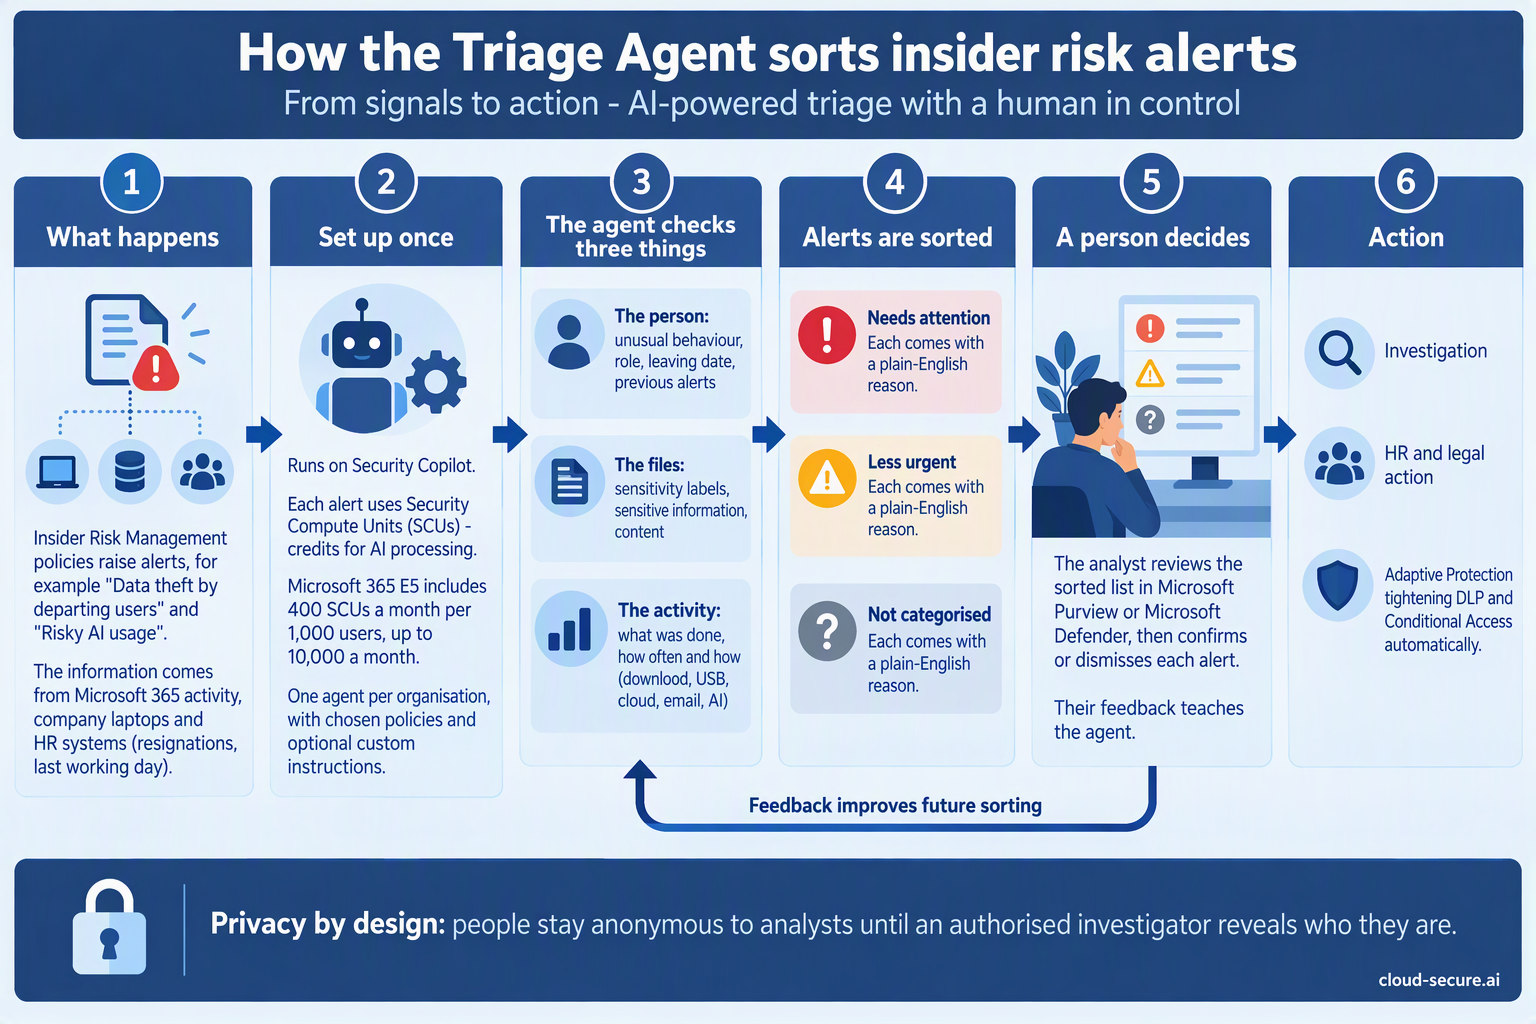
Every insider risk policy produces alerts, and someone has to look at them. On a busy day that queue can be long, and the most important alert can sit behind dozens of harmless ones. The Triage Agent is an AI assistant, built on Security Copilot, that reads each alert first and sorts the queue so your compliance team starts with what matters.

It does not investigate, decide or take action. It sorts and explains. A person still makes every decision.

How the Triage Agent sorts insider risk alerts

How it sorts alerts

Category What it means
Needs attention The alerts the agent judged highest risk. Start here.
Less urgent Lower-risk alerts to review when you have capacity.
Not categorized Alerts the agent could not assess – for example, unsupported activity or an error. These still need a person to look at them.

For each alert, it weighs up the person (for example, whether they are a priority user and how many cases they already have open), the activity (how likely it is to be data leaving the organisation) and the content involved, and writes a short plain-English explanation of its decision.

How it runs and what it costs

  • Scope: you choose which insider risk policies it covers, and whether it looks only at new alerts or also at alerts from up to 30 days back.
  • Schedule: it can run automatically on a schedule, or an analyst can run it on one alert at a time.
  • Cost: each alert it processes uses Security Compute Units (SCUs). Microsoft 365 E5 includes 400 SCUs a month for every 1,000 users, up to 10,000 a month – see Part 3.
  • Feedback: analysts can give feedback on its decisions, which it takes into account when it triages future alerts.

Getting started well

  1. Tune noisy policies first. The agent sorts what your policies produce – and every alert costs credits.
  2. Start with new alerts only, then widen the lookback once you trust the results.
  3. Compare for two weeks. Have your compliance team triage as normal and compare their view with the agent’s.
  4. Check Not categorized every day. Those alerts have not been assessed by anyone yet.
  5. Watch your SCU usage in Security Copilot, so the monthly allowance is not used up by one noisy policy.

The people reviewing the sorted queue need the same Insider Risk Management roles as before – Analysts or Investigators, through PIM. Setting up the agent needs additional Purview agent and Security Copilot roles.

Bringing it full circle

Over seven parts, we have gone from a licence sitting on the shelf to a joined-up system:

  • Insider Risk Management spots risky behaviour, starting with people who are leaving.
  • Adaptive Protection turns that behaviour into a risk level.
  • DLP and Conditional Access tighten automatically for the few who need it.
  • The Triage Agent helps your compliance team deal with the alerts.
  • Compliance officers, not IT, own the process, with access controlled through PIM.

And all of it is included in the Microsoft 365 E5 licence many organisations already pay for.

Final thoughts

If you take one thing from this series, make it this: if you have E5 and no insider risk policies, you are paying for protection you are not using. Start small – one departing users policy, a few compliance officers, quick setup in simulation – and build from there. The scripts and KQL queries from Part 4 will help you prove it works.

Thank you for following the series. If you have questions or want to talk about your own deployment, get in touch through cloud-secure.ai.


The rest of the series

References

Seรกn O’Farrell | cloud-secure.ai

Stopping leaked credentials with Microsoft Purview DLP

Cover - Stopping leaked credentials with Microsoft Purview DLP

In this post: why every licensed Microsoft 365 tenant should block credentials with Purview DLP, what a single leaked secret can lead to, a step-by-step build in the Purview portal, and a PowerShell script that deploys the same policy in one run.

Credentials end up in places they were never meant to be. A connection string pasted into a Teams chat to unblock a colleague. An API key in a config file uploaded to a project site. A service account password emailed to a contractor. Each copy outlives the conversation that created it - it is indexed, searchable, synced to devices and retained for years.

Secrets are different from most sensitive data. A leaked customer record exposes information; a leaked credential hands over access. Most secrets - storage keys, SAS tokens, client secrets, personal access tokens - are accepted on their own. There is no MFA prompt, no Conditional Access check and often no sign-in log to give the game away.

This policy belongs in every licensed tenant

There is no reason for any organisation whose Microsoft 365 subscription includes credential scanning sensitive information types not to have this policy configured and turned on. It costs nothing extra, takes minutes to deploy and protects every user in every Microsoft 365 workload. The risks in the table below make the case on their own.

Key risks of leaked credentials

Credential leaked What an attacker gets Business impact Severity
User login credentials and passwords Direct sign-in as the user, and often to other services where the password is reused Account takeover and further phishing from a trusted mailbox โ— Critical
Azure storage account key or SAS token Read, write and delete access to the storage account data, with no MFA or Conditional Access check Data theft, tampering, and deletion of data and backups held in storage โ— Critical
Azure SQL connection string Direct access to the database Bulk exfiltration of customer and business data โ— Critical
Client secret or API key The ability to act as the application, with every permission it has been granted Tenant-wide data access where the app holds broad Microsoft Graph permissions โ— Critical
X.509 private key or management certificate The ability to impersonate a service or authenticate as an app Persistent access that survives user password resets โ— Critical
GitHub personal access token Source code, pipelines and the secrets stored in them Supply chain compromise โ— High
Slack, Google and other third-party tokens Access to partner and SaaS platforms Exposure that spreads beyond Microsoft 365 โ— High
Any of the above A foothold for privilege escalation and lateral movement Ransomware, and GDPR notification to the Data Protection Commission within 72 hours where personal data is put at risk โ— Critical

Scenario: a phished mailbox

Picture a common incident. A finance user falls for a phishing email, an attacker steals their session token and gets into their mailbox. The first thing many attackers do with mailbox access is search it - for terms such as password, AccountKey= or connection string.

Now picture what they find: an email from eight months ago in which a developer sent an Azure Storage connection string to unblock a data upload. That single line contains the storage account name and its access key.

  • The key works on its own. No MFA, no Conditional Access, no sign-in risk policy stands between the attacker and the data.
  • The blast radius is the whole storage account. Every container, file share, queue and table in it can be read, altered or deleted.
  • It stays valid until someone rotates it. Resetting the phished user’s password and revoking their sessions does nothing to the key.
  • It may go unnoticed. Key-based access does not appear in Entra ID sign-in logs, and storage diagnostic logging is often not enabled.

A mailbox compromise that should have been contained to one user becomes a data breach. With this policy enforced, that email is blocked at the moment it is sent, so the key never lands in the mailbox for an attacker to find.

Existing secrets are still there. DLP stops new credentials being shared. It does not remove the ones already sitting in mailboxes, sites and chats - use the Data Security Posture Agent or a content search to find them, then rotate every one.

Why DLP is the right control

Secret scanning in code repositories and threat detection in Defender both matter, but neither stops a person sharing a secret in email or Teams. A Purview DLP policy acts at the moment of sharing, across the Microsoft 365 workloads where most collaboration happens, and applies whether the leak is careless or deliberate.

Blocking is not revocation. If the policy fires, the credential has already been typed or pasted somewhere. Treat every alert as a prompt to rotate the secret, not just as a blocked message.

Credential protection in 2026

Microsoft’s credential scanning sensitive information types (SITs) have been in Purview since 2022 (MC402123, roadmap 88941), with All Credential Types as the bundled detection. What has changed in 2026 is how much further Microsoft is taking credential detection:

  • Credential scanning in the Data Security Posture Agent (MC1259828). LLM-powered detection of exposed credentials, including Entra ID credentials, private keys and API tokens, across selected data locations, with risk scores and AI-generated insights. Public preview began in late March 2026; general availability is rolling out from early October to early November 2026.
  • SIT testing in DLP (MC1235742, February 2026). Upload a file of up to 2.5 MB and test it against one SIT or all of them before building a policy - a quick way to confirm your credential samples are detected.

The two work together. The posture agent finds credentials already sitting in your data estate; the DLP policy in this post stops new ones being shared. Roadmap dates move and features roll out in waves, so confirm availability in your own tenant.

The All Credential Types SIT

All Credential Types is a bundled SIT. Rather than matching a single pattern, it fires when any of its underlying credential SITs matches, using checksums or keyword and pattern combinations. Detections include:

  • Azure storage account access keys and shared access signatures
  • Azure SQL connection strings and Azure Redis Cache connection string passwords
  • Azure Service Bus, Event Grid, SignalR and Function keys
  • Client secrets and API keys
  • Amazon S3 client secret access keys
  • GitHub personal access tokens, Google API keys and Slack access tokens
  • HTTP authorisation headers
  • X.509 certificate private keys
  • User login credentials and general passwords (English keywords only)

Prerequisites

Requirement Detail
Licensing Microsoft 365 E5, E5 Compliance or E5 Information Protection & Governance - required for credential scanning SITs
Purview role group Compliance Administrator, Compliance Data Administrator, Information Protection Admin or Security Administrator - or a custom role group with DLP Compliance Management for least privilege
Alert recipients Users, groups or mail contacts that already exist in the tenant. External addresses need a mail contact first
PowerShell (script only) Windows PowerShell 5.1 or PowerShell 7, with ExchangeOnlineManagement 3.2.0 or later

Policy design

Setting Value Why
Policy name Block Credentials and Secrets Clear purpose in alerts and reports
Locations Exchange, SharePoint, OneDrive, Teams Where credentials are most often shared
Scope All users (full directory) Secrets leak from every team, not just IT
Condition All Credential Types, Medium confidence, 1+ instances Broad coverage with a sensible false-positive balance
Action Block everyone A secret shared internally is still a leaked secret
Alerts High severity, every match, to the security team Every match needs triage and likely rotation
Incident report content Excludes original and matched content Stops the alert email becoming a second leak
Mode Turned on immediately Enforced as soon as the policy syncs

Step 1 - Open Data Loss Prevention

Sign in to the Microsoft Purview portal and go to Data Loss Prevention > Policies.

Step 2 - Start a custom policy

Select Create policy, then Enterprise applications & devices. Under Categories choose Custom, select Custom policy and then Next.

Step 3 - Name the policy

Name the policy Block Credentials and Secrets, add a description and select Next. On Assign admin units, leave Full directory and select Next.

Step 4 - Choose the locations

Make sure Exchange email, SharePoint sites, OneDrive accounts and Teams chat and channel messages are ticked. Untick Devices, Instances and On-premises repositories - the portal ticks these by default, and they need extra configuration this policy does not cover.

Step 5 - Add the credential condition

On Define policy settings, choose Create or customize advanced DLP rules and select Next. Select Create rule and name it Block credentials and secrets.

Under Conditions, choose Add condition > Content contains > Add > Sensitive info types, tick All Credential Types and select Add. Leave Medium confidence and an instance count of 1 to Any.

Step 6 - Block everyone

Under Actions, choose Add an action > Restrict access or encrypt the content in Microsoft 365 locations. The default is Block only people outside your organization - change it to Block everyone.

Step 7 - Configure alerts

Under Incident reports, set the severity to High, keep Send an alert to admins when a rule match occurs on, and use Add or remove users to add your security team. If you turn on email incident reports, leave out the matched and original content so the alert never carries the secret.

Step 8 - Turn the policy on

Select Save, then Next. On Policy mode, choose Turn the policy on immediately - the default is simulation mode. Select Next, review the summary and select Submit.

Allow up to an hour for the policy to sync to all four locations before testing.

Automating it with PowerShell

The companion script New-CredentialDlpPolicy.ps1 builds the same policy and rule in one run. It lists the required privileges and licensing before it starts, prompts for the tenant ID, admin UPN and alert recipients, and then:

  • Confirms the tenant ID exists, and that you signed in to that tenant, before changing anything
  • Checks your account holds DLP management permissions
  • Creates the policy and rule idempotently, with -WhatIf support and a confirmation before enforcing
  • Keeps the credential itself out of incident report emails

Preview the changes, then run it:

.\New-CredentialDlpPolicy.ps1 -WhatIf
.\New-CredentialDlpPolicy.ps1

What the script runs

New-DlpCompliancePolicy -Name 'Block Credentials and Secrets' `
    -ExchangeLocation All -SharePointLocation All `
    -OneDriveLocation All -TeamsLocation All -Mode Enable

New-DlpComplianceRule -Name 'Block credentials and secrets' `
    -Policy 'Block Credentials and Secrets' `
    -ContentContainsSensitiveInformation @{
        Name = 'All Credential Types'; minCount = '1'; confidencelevel = 'Medium' } `
    -BlockAccess $true -BlockAccessScope All `
    -GenerateAlert 'secops@contoso.com' `
    -GenerateIncidentReport 'secops@contoso.com' `
    -IncidentReportContent Title, DocumentAuthor, Service, Severity, RulesMatched `
    -ReportSeverityLevel High

Check the policy has synced:

Get-DlpCompliancePolicy -Identity 'Block Credentials and Secrets' |
    Select-Object Name, Mode, DistributionStatus

Testing and tuning

  • Use synthetic credentials only. A fake GitHub token or an Azure storage connection string with a made-up key is enough to trigger the rule. Never test with a live secret.
  • Validate detection first. Use the Test option under Sensitive info types to confirm your samples match before you send them.
  • Watch the signals. Check Data loss prevention > Alerts and Activity explorer after each test.
  • Tune General Password if it is noisy. It relies on English password keywords and is the most likely source of false positives. Raise the confidence level or handle it in a separate rule.
  • Rotate, then investigate. Every true positive means a secret has been exposed. Rotate it, then find out how it got there.

The script

The script is in the GitHub repository with its README. It contains no tenant-specific IDs.

Script Runs Purpose
New-CredentialDlpPolicy Once, by an administrator Creates the Block Credentials and Secrets policy and rule, with tenant, permission and licensing checks

Wrapping up

A leaked credential is not a data protection problem waiting to happen - it is access already handed over. If your licensing includes credential scanning SITs, this policy should be on. It takes minutes in the portal or one run of the script, it covers every user across Exchange, SharePoint, OneDrive and Teams, and it turns the next pasted connection string from a breach into a blocked message and an alert.


References

Seรกn O’Farrell | cloud-secure.ai

How to begin your data classification journey

The container and content classification graphical representation above represents a high-level starting point around formalizing your data classification requirements. Microsoft have created an innovative solutions suite around data protection that is scalable for small, medium and enterprise requirements.

In some Sectors data classification has already been implemented and applied as part of the general operational procedures to support regulatory compliance (i.e., Pharma and Finance).

Since data classification has been established, it has been expanded to 204 different sensitive information types as defined by Microsoft in compliance.microsoft.com

Policy creation can be created easily to protect personally identifiable information via DLP (data loss prevention), classification and retention policies by using these sensitive information types that Microsoft provide as part of their Office365 platform.

Regex101.com is a free utility that provides the ability to create regular expressions (regex) and test the regex against input of a sensitive information types.

As an example, to implement โ€“ within the Office365 platform, Microsoft only provide three sensitive information types applicable to Ireland:

  • Ireland Driver’s License Number
  • Ireland Passport Number
  • Ireland Personal Public Service (PPS) Number

There is however some more common sensitive information type unique to Ireland as follows:

  • Eircode
  • Mobile phone number
  • Landline phone number

Regex101 also provides a regex library to cater for a particular sensitive information type.

The European Union caused quite considerable anxiety when the GDPR regulation was released during 2018.

The GDPR regulationโ€™s primary purpose is to provide individuals control over their personal data and to simplify the regulatory environment for international business by unifying the regulation within the EU.

Regrettably, this regulation does not protect an organizationโ€™s intellectual property.

Use cases listed below could however enable organisations to protect their intellectual property more effectively:

  • Food Industry: Using document fingerprinting and if working for Coca Cola or Guinness and an employee attempts to leak the secret recipe. Office365 can prevent this.
  • Manufacturing Industry: If a patent or manufacturing process were attempted to be shared outside the organization to that organizationsโ€™ competitors, it could cause the source organization to lose market share or cease to exist. If an employee sends an email with 100 mobile phone numbers or 100 land line phone numbers, this could be classed as data exfiltration and the employee is leaking their employersโ€™ customers information to a competitor.
  • Technology Industry (Nokia, Ericsson or Huawei): may invent the next Wi-Fi standard and before the company that invents the technology registers the patent for this new technology and the information is leaked to one of their competitors, it could cause billions in lost revenue.
  • Legal industry: GDPR in certain scenarios can mandate that data is deleted after 7 years. This can really suit legal organizationโ€™s as they are no longer liable if the data has been permanently destroyed via a retention policy.
  • Pharmaceutical Industry: The first company that manufactures a permanent vaccine for Covid 19 and all Covid variants that successfully patents the solution would not like their intellectual property falling into the hands of their competitors.

AIP (Azure Information Protection) scanner is generally the initiation point of data classification as it can scan file shares and on-premises SharePoint farms. To prove the benefit of data classification, define some sensitive information types for an organization. Use AIP scanner to integrate with an Azure Log Analytics workspace and then demonstrate to an organization, how much of their critical intellectual property is not protected.

The basic overall implementation approach to enable data classification is as follows:

  • Monitor
  • Provide Tips
  • Protect.

AIP scanner can auto classify data, depending on the organizationโ€™s Office365 license plan, but this is all useless unless the organization has begun their data classification journey. Obviously sharing a credit card number is the most common instance of data loss prevention, but what about protecting critical intellectual property for an organization.

Another use case is when an organization has already begun their data classification journey with another vendor like Forcepoint, Symantec or McAffee. If Office365 is in the organizationโ€™s roadmap then it is easy to transfer all the custom sensitive information types and regexsโ€™ into Office365. Regex is a universal standard and works across all vendors.

Cyber Attacks are most commonly associated with phishing attacks and most commonly performed by BOTs on the dark web, however in a targeted attack and when the bad actor’s are trying to specify the exact information they are trying to steal from an organization, if this information is classified then there is a very strong chance the bad actors attempt to steal the information will be unsuccessful and the attack will generate alerts and notify the security admins of an organization.

Microsoft have also introduced some new technology: trainable classifiers. Trainable classifiers introduce the power of Azure and AI (artificial intelligence). An organization can choose not to classify their data but let a trainable classifier analyze their data and then report on all the known sensitive information types defined in an organisationโ€™s Office365 tenant.

A Microsoft 365 trainable classifier is a useful tool you can train to recognize various types of content by giving it samples to look at. Once trained, you can use it to identify information for the application of Office sensitivity labels, Communications compliance policies, and retention label policies.

Source: Get started with trainable classifiers – Microsoft 365 Compliance | Microsoft Docs

The security component to complete the overall Microsoft suite was lacking but has been resolved by Microsoft releasing Microsoft Defender for EndPoint. Microsoft Defender for Endpoint integrates seamlessly with MCASB (Microsoft cloud app security broker) and enforces corporate security policies for devices that are not connected to the corporate LAN – which is a likely scenario, during the current Covid-19 Pandemic.