Azure Information Protection Custom Labels & Protection

I recently rolled out AIP in one my customer sites and they presented me with an interesting challenge. One of their departments wanted the option to choose whether or not to classify and protect data.

This has been made possible with custom configurations to the AIP client. At the time of writing this post there are 18 items that have custom configurations available.
More info HERE

The next part of this blog is a step by step guide on how to set up a custom label that will recommend that the user apply the label, protection.

  1. Login to the Azure Information Protection portal in Azure and create  a new label as per the image below.
  2. Select Protect and accept defaults and add the users assigned to the label or Security Group, as per image below
  3. Add a keyword condition, as per image below
  4. Select the protect option , accept the defaults and add the users or security group that the label will apply to, as per image below
  5. Save the configuration changes, next we will create a policy.
  6. Create a policy, I always match the name of the label that the policy will apply to, add the users or security group and accept defaults except for one item. Change the selection to recommended as per the image below
  7. Add the new label created in the previous section and ensure default label remains set to none
  8. The final piece is to modify the advanced settings of the policy, as per the image below
  9. Use the values specified in the image below
  10. Attempting to save a word document with the keyword specified, prompts the user as follows, giving the user a recommendation and not enforcing protection or classification
  11. When attempting to send an email which the key word specified, a pop up is presented from the AIP client as per the image below.

Notes:

  • The Azure Information Protection custom features,  is currently in PREVIEW
  • Always use the latest version of AIP client
  • If the label is not appearing in the Windows client , It may be due to too many Modern Authentication tokens in credential manager. This is something that happened on my laptop due to connecting to multiple Office365 tenants.
  • I will post some new blogs on more custom options,custom sensitive information types & AIP scanner.
  • When data is protected in the sample label above, Only users that are specified in the label and policy will be able to access the data.
  • Always ensure users that the label and policy applies to have an AIP license.


Microsoft Information Protection

What is Microsoft Information Protection. The Infograph displayed below , Shows all of the different areas covered by Microsoft Information Protection and it really is the fastest evolving suite of technologies in the Microsoft stack.

Microsoft recently announced two new Security SKUs which was a real sigh of relief to tell my customers that they no longer need to buy an Office365 E5 license to get all of these features.

Identity & Threat Protection—This new package brings together security value across Office 365, Windows 10, and EMS in a single offering. It includes best of breed for advanced threat protection services including Microsoft Threat Protection (Azure Advanced Threat Protection (ATP), Windows Defender ATP, and Office 365 ATP including Threat Intelligence), as well as Microsoft Cloud App Security and Azure Active Directory. This offer will be available for $12 per user per month.*

Information Protection & Compliance—This new package combines Office 365 Advanced Compliance and Azure Information Protection. It’s designed to help compliance and IT teams perform ongoing risk assessments across Microsoft Cloud services, automatically protect and govern sensitive data throughout its lifecycle, and efficiently respond to regulatory requests leveraging intelligence. This offer will be available for $10 per user per month.*

Securing Intune Enrolment

I have been working a lot with Intune for Android & IOS MDM. This post is focused on securing enrollment for Android & IOS devices. There are different methods available for Windows 10 devices which will be covered in a later post.

The Intune enrollment process can be secured via Conditional Access & Azure MFA and Microsoft have an article available HERE that describes how to secure the Intune Enrollment APP via Azure MFA.

But first we need to secure the Azure MFA registration process, If an attacker has obtained a user’s credentials and the user that has been compromised has not registered for MFA, the attacker could use his\her phone to register for MFA.

So there are 3 methods to secure the MFA registration process.

  1. Multi-factor authentication registration policy 
  2. User risk Sign In Policy
  3. Populating the phone numbers as described in this ARTICLE
If using method 3 and using a text message or call authentication process, The organisation admins can populate the mobile phone number per user and manage the MFA registration process.

Some helpful commands

##Using MSONLINE module, Query what the existing MFA auth method is
get-msoluser -UserPrincipalName sean@contoso.com | Select-Object -ExpandProperty StrongAuthenticationMethods

##Using MSONLINE module to cancel existing MFA Auth methods
set-msoluser -UserPrincipalName sean@contoso.com -StrongAuthenticationMethods $null

##Export all MFA enabled users to a csv
Get-MsolUser -All | where {$_.StrongAuthenticationMethods -ne $null} | Select-Object -Property UserPrincipalName | export-csv “CSV PATH”

Once we have followed the guidelines in the Microsoft article to secure the Intune enrollment process with MFA , We can proceed to create our policy for Android & IOS

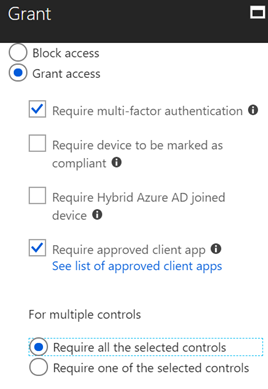
In the conditional access policy for Android & IOS devices, The final actions are listed below, Devices must be compliant but the compliance enrollment process is secured with MFA


How to lock down Office365 Global Admin access with managements scopes.

I have not posted a blog entry in quite some time, I have been crazy busy working for my new employer Evros and busy with my kids. I hope this blog will prove useful to anyone out there that follows my blog and promise a lot Blog posting to follow focusing on data protection, advanced threat analytics and AZURE

To help describe why an enterprise would like to lock down global admin access, I would like to describe a typical enterprise organisation and scenario.

Contoso.com is an enterprise organisation that consists of 15 companies. 
Contoso.com is the root AD Forest of the organisation and all other companies have their own child domains.
Contoso.com is the head office of the organisation and are responsible for data protection and governance within the organisation.
AD Connect synchronizes the root forests and child domains.

Contoso would like to remove global admin privileges from ICT Admin staff in one of the organisation’s companies Fabrikam and grant the ICT admin staff some custom Exchange Online administration privileges. The Fabrikam ICT admin staff must also have the ability to log Office365 service requests.

The following steps are required to lock down the Fabrikam ICT staff access to Office365 as per Fabrikam’s parent company Contoso’s new security and data protection policies.

#####################Exchange Management Shell############################
####Create Management Scope
New-ManagementScope -Name “EO-FABRIKAM” -RecipientRestrictionFilter {customattribute10 -like “FABRIKAM“}
####All mail enabled objects  in the Fabrikam child domain will have the value ‘Fabrikam’ added to Active Directory attribute: Extenstionattribute10
####Create a Role Group
New-RoleGroup -Name “EO-FABRIKAM” -Roles “User Options”, “Address Lists”, “Distribution Groups”, “Team Mailboxes”, “Mail Recipients”, “Reset Password”, “Mail Recipient Creation”, “Message Tracking”, “Move Mailboxes”,”Migration”,”Retention Management”,”UM Mailboxes”, “UM Prompts” , “Unified Messaging”    -Members “EO Fabrikam Admins” -CustomRecipientWriteScope “EO-FABRIKAM” -ManagedBy “Organization Management”

####Note: When assigning the members to a security group. The security group must be a mail enabled security group.

####################Windows Azure Active Directory###########################
 

Function

Commandlet

Import CSV

$Users = Import-Csv “CSV PATH“

Assign Role

$Users | ForEach-Object {Add-MsolRoleMember -RoleMemberEmailAddress $_.UserPrincipalName -RoleName “Service Support Administrator”}

####Note: It is not possible to assign service administrator roles per security group

############################Summary####################################

Fabrikam ICT admins can access the Exchange Online Control Panel via this URL: https://outlook.office365.com/ecp
Fabrikam ICT admins can log Office365 service request via this URL:

#############################Next Steps##################################
The next steps would be to create similar management scopes and role groups for SharePoint Online and Skype for Business. (New Blog Post to Follow)
Once Contoso have locked down access for all the companies within their organisation the next step will be developing compliance and governance policies in the Security and Compliance center in Office365


Outlook Security Warning when clicking on Lotus Notes Doc Links

After performing a migration from Lotus Notes to Exchange Online , Some users may see the following security pop ups when trying to click on doc links.

To resolve this issue the following items need to be added to a client machine’s registry.

1. Click Start, click Run, type regedit, and then click OK.
2. Locate the following registry subkey:
HKEY_CURRENT_USER\Software\Policies\Microsoft\Office\xx.0\Common\Security\Trusted Protocols\All Applications
Note In this subkey, replace “xx.0” with 15.0 for Outlook 2013
3. Click the All Applications subkey.
4. On the Edit menu, point to New, and then click Key.
5. Type the name of the protocol that you want to exclude. For example, to disable the display of a security warning for the “Notes:” protocol, type Notes:.

Note Make sure that you include the colon (:) character.
Then use Group Policy Preferences to push it out to machines.