Dynamically Assign AIP Policies

In a previous post on how to dynamically assign Intune licenses using Azure dynamic user security groups.

When an organisation has configured global labels like the default labels displayed below. An organisation can choose to apply a policy to all users or all Azure Information Protection Plan 1 licensed users or all Azure Information Protection Plan 2 licensed users.

Azure Information Protection Plan 1 Azure Security Group

Create an Azure Active Directory Dynamic User Security Group , Edit the query and enter the query below for Azure Information Protection Plan 1 licensed users.

user.assignedPlans -any (assignedPlan.servicePlanId -eq “6c57d4b6-3b23-47a5-9bc9-69f17b4947b3” -and assignedPlan.capabilityStatus -eq “Enabled”)

Azure Information Protection Plan 2 Azure Security Group

Create an Azure Active Directory Dynamic User Security Group , Edit the query and enter the query below for Azure Information Protection Plan 2 licensed users.

user.assignedPlans -any (assignedPlan.servicePlanId -eq “5689bec4-755d-4753-8b61-40975025187c” -and assignedPlan.capabilityStatus -eq “Enabled”)

If the during the creation of the group , it fails with an error , delete the “” that encapsulates the “guid” and “enabled” within the query and use your keyboard to replace the “” if you are copying them from this blog post.

So this solution enables administrators to apply policies to all AIP plan 1 and plan 2 licensed users and because it is dynamic , it will catch all new employees in the organisation.

Office365 & AIP Sensitive Information Types

  • Sensitive Information Types defined in Azure Information Protection are not visible in the Office365 Security Center
  • Sensitive Information Types defined in the Office365 Security and Compliance center are not visible in Azure Information Protection
  • So this means sensitive information types need to be defined in each service.
  • @MSignite2018 Microsoft announced a change in search technology in Exchange Online and Exchange 2019 , they will now use Bing technology. The front end of the Office365 Security and Compliance Center seems to be using SharePoint search technology. I would love Microsoft to enable Exchange Online, AIP, & Sharepoint Online to use the same search technology used in Azure Log Analytics.
  • Microsoft state that when creating custom sensitive information types via an XML file and then importing them into the Security and Compliance center that it is not possible to have multiple regex values. It is possible to combine multiple regex values by using the PIPE value |. When combining multiple regex values , they can be tested in Office365 and in RegEx101.com
  • Using multiple regex values in AIP can also be combined by using the PIPE value |
  • This is an example of a regex for different pattern types for Irish mobile phone numbers that could be used in the Security and Compliance center GUI or the AIP GUI when defining regex sensitive information types.
    08[3|5|6|7|8|9]\d{7}|3538[3|5|6|7|8|9]\d{7}|003538[3|5|6|7|8|9]\d{7},
    notice the | that defines the different type of patterns.

Azure Information Protection Custom Labels & Protection

I recently rolled out AIP in one my customer sites and they presented me with an interesting challenge. One of their departments wanted the option to choose whether or not to classify and protect data.

This has been made possible with custom configurations to the AIP client. At the time of writing this post there are 18 items that have custom configurations available.
More info HERE

The next part of this blog is a step by step guide on how to set up a custom label that will recommend that the user apply the label, protection.

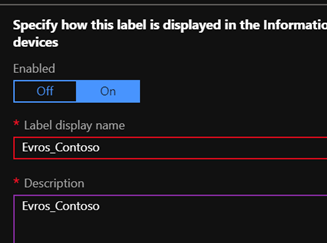
  1. Login to the Azure Information Protection portal in Azure and create  a new label as per the image below.
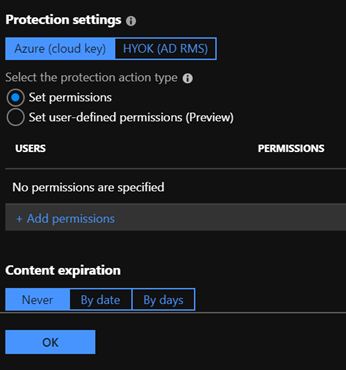
  2. Select Protect and accept defaults and add the users assigned to the label or Security Group, as per image below
  3. Add a keyword condition, as per image below
  4. Select the protect option , accept the defaults and add the users or security group that the label will apply to, as per image below
  5. Save the configuration changes, next we will create a policy.
  6. Create a policy, I always match the name of the label that the policy will apply to, add the users or security group and accept defaults except for one item. Change the selection to recommended as per the image below
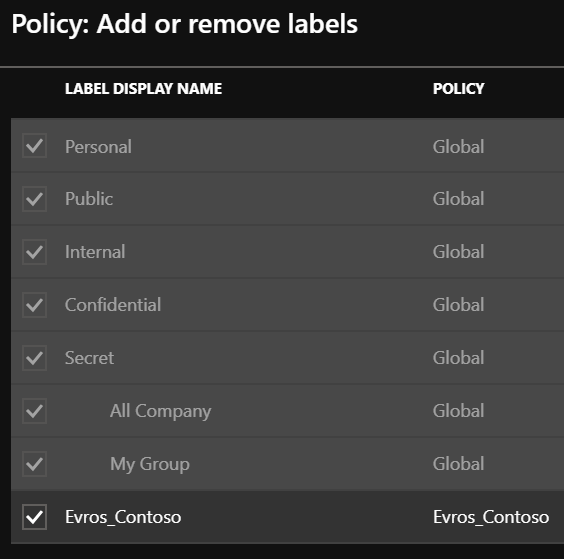
  7. Add the new label created in the previous section and ensure default label remains set to none
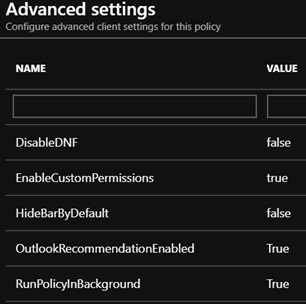
  8. The final piece is to modify the advanced settings of the policy, as per the image below
  9. Use the values specified in the image below
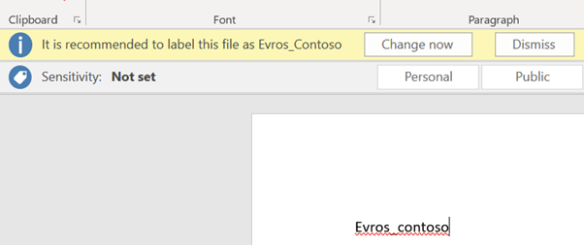
  10. Attempting to save a word document with the keyword specified, prompts the user as follows, giving the user a recommendation and not enforcing protection or classification
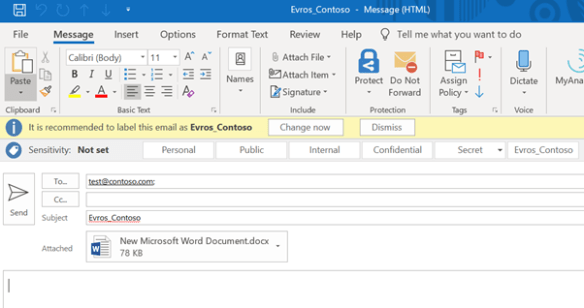
  11. When attempting to send an email which the key word specified, a pop up is presented from the AIP client as per the image below.

Notes:

  • The Azure Information Protection custom features,  is currently in PREVIEW
  • Always use the latest version of AIP client
  • If the label is not appearing in the Windows client , It may be due to too many Modern Authentication tokens in credential manager. This is something that happened on my laptop due to connecting to multiple Office365 tenants.
  • I will post some new blogs on more custom options,custom sensitive information types & AIP scanner.
  • When data is protected in the sample label above, Only users that are specified in the label and policy will be able to access the data.
  • Always ensure users that the label and policy applies to have an AIP license.


Microsoft Information Protection

What is Microsoft Information Protection. The Infograph displayed below , Shows all of the different areas covered by Microsoft Information Protection and it really is the fastest evolving suite of technologies in the Microsoft stack.

Microsoft recently announced two new Security SKUs which was a real sigh of relief to tell my customers that they no longer need to buy an Office365 E5 license to get all of these features.

Identity & Threat Protection—This new package brings together security value across Office 365, Windows 10, and EMS in a single offering. It includes best of breed for advanced threat protection services including Microsoft Threat Protection (Azure Advanced Threat Protection (ATP), Windows Defender ATP, and Office 365 ATP including Threat Intelligence), as well as Microsoft Cloud App Security and Azure Active Directory. This offer will be available for $12 per user per month.*

Information Protection & Compliance—This new package combines Office 365 Advanced Compliance and Azure Information Protection. It’s designed to help compliance and IT teams perform ongoing risk assessments across Microsoft Cloud services, automatically protect and govern sensitive data throughout its lifecycle, and efficiently respond to regulatory requests leveraging intelligence. This offer will be available for $10 per user per month.*

Using Azure RMS with Office365