Series:This is Part 5 of 7 in my series on Microsoft Purview Insider Risk Management. New to the series? Start with the series guide, which summarises every part.
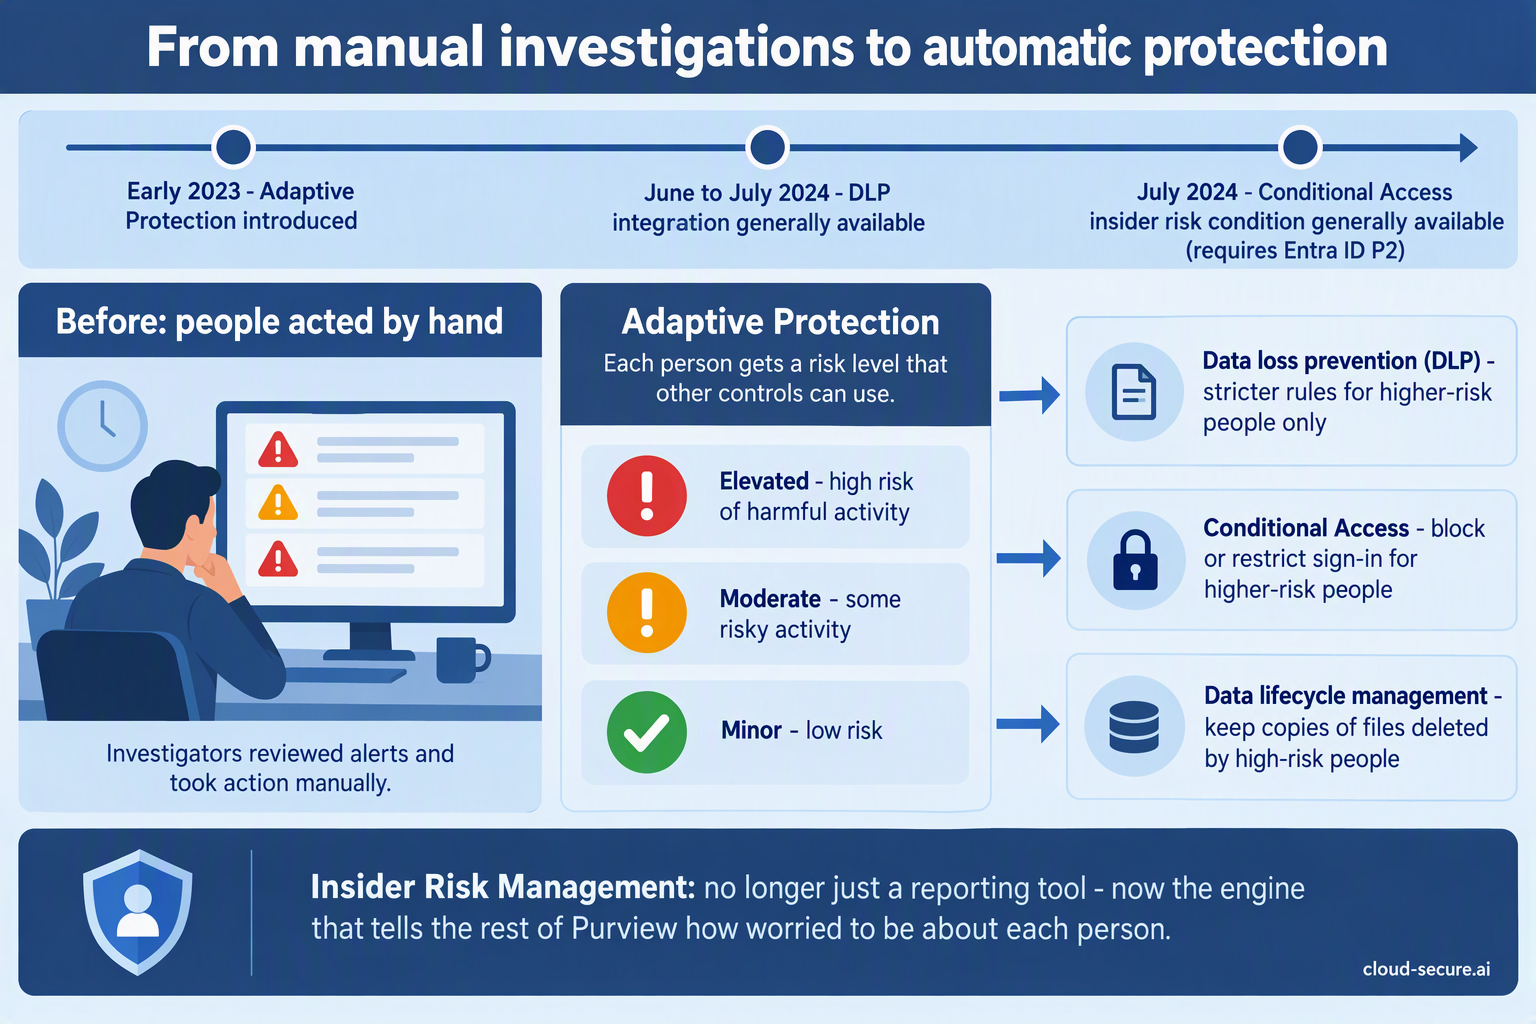
In Part 4 we built a policy that spots people taking data before they leave. On its own, that policy raises alerts – and then waits for a person to act. Adaptive Protection removes the wait. It turns each person’s insider risk into a level, and lets your other security controls tighten automatically for the few people who are genuinely risky, while everyone else carries on as normal.
This is the feature that turns Insider Risk Management from a reporting tool into protection. In this part I explain how it works in plain English, what quick setup creates for you, and how to roll it out without upsetting anyone.
What Adaptive Protection does
Most security controls treat everyone the same. A data loss prevention (DLP) rule that blocks copying to USB blocks it for the whole organisation, which frustrates the many to stop the few. So most organisations set their rules loosely – and the risky few get through.
Adaptive Protection fixes that. Insider Risk Management watches behaviour and gives each person a risk level. Other controls then read that level and act on it:
Data loss prevention – stricter rules for higher-risk people only.
Conditional Access – block or restrict sign-in for higher-risk people (covered in Part 7).
Data lifecycle management – keep copies of anything a high-risk person deletes.
Levels go up and down automatically as behaviour changes. Nobody has to remember to add someone to a “watch list” or take them off it again.
The three risk levels
Adaptive Protection uses three levels. Microsoft provides built-in definitions, which you can change:
Level
Built-in definition (simplified)
Typical response
Elevated
High-severity alerts, several high-severity sequences of risky activity, or a confirmed high-severity alert
Block
Moderate
Medium-severity alerts, or at least two high-severity data exfiltration activities
Warn, record, or require extra steps
Minor
Low-severity alerts, or at least one high-severity data exfiltration activity
Record only
Do not confuse the two: Alert severity (Low, Medium, High) helps analysts decide which alert to look at first. Insider risk levels (Minor, Moderate, Elevated) are what drive automatic protection. They are related, but they are not the same thing.
How long a level lasts
Risk level timeframe: a level lasts 7 days by default (you can choose between 5 and 30). If the person keeps meeting the criteria, it is extended.
Past activity detection: how far back Adaptive Protection looks at activity when assigning a level – also 7 days by default, between 5 and 30.
Automatic expiry: on by default. When the related alert is dismissed or the case is closed, the level is removed.
Manual reset: an investigator can expire a person’s level at any time under Adaptive Protection > Users assigned insider risk levels. Alerts and cases are kept.
Quick setup or custom setup?
Quick setup is the fastest way to start and needs no existing policies. It creates everything for you in a safe, test-only state:
What it creates
What it does
Starts as
Insider risk policy
Adaptive Protection policy based on the Data leaks template, covering all users
Active
DLP policy for laptops (Endpoint DLP)
Elevated: blocks USB copies, printing, uploads to unapproved cloud sites and more. Moderate and Minor: recorded only
Simulation (test mode)
DLP policy for Teams and Exchange
Elevated: blocks sharing sensitive content with people outside the organisation. Moderate and Minor: recorded only
Simulation (test mode)
Conditional Access policy
Blocks Elevated people from Office 365 apps
Report-only
Data lifecycle policy
Keeps deleted SharePoint, OneDrive and Exchange content from Elevated people for 120 days
Active
Quick setup can take up to 72 hours to finish, and you get an email when it is done. Do not turn Adaptive Protection off while it is still setting up.
Custom setup suits organisations that already have insider risk and DLP policies. You choose the insider risk policy, define the three levels yourself, add the risk level condition to your existing DLP and Conditional Access policies, then switch Adaptive Protection on. Results can take up to 36 hours to appear.
How DLP uses the risk level
Once Adaptive Protection is on, DLP policies gain a new condition: “Insider risk level for Adaptive Protection is”. You choose one, two or all three levels, then choose what happens. It works in DLP policies for Exchange email, Teams and devices (company laptops).
The pattern Microsoft uses in quick setup is a good starting point:
Where
Elevated
Moderate and Minor
Laptops
Block copying to USB and network shares, printing, copying to the clipboard, uploads to unapproved cloud sites and use by unapproved apps
Record the same activities, without blocking
Email and Teams
Block or encrypt sensitive content shared with people outside the organisation
Record external sharing, without blocking
For laptops: Adaptive Protection on devices needs either Advanced classification scanning and protection switched on, or the “File type is” condition in your DLP rule. If someone is covered by both an Adaptive Protection policy and another device DLP policy, the strictest one wins.
Who needs which role
Task
Role
Set up Adaptive Protection
Insider Risk Management or Insider Risk Management Admins
Edit DLP policies that use the risk level
Compliance Administrator, Compliance Data Administrator or DLP Compliance Management
Edit Conditional Access policies that use the risk level
Conditional Access Administrator or Security Administrator
See who has which risk level
Insider Risk Management, Analysts or Investigators – ideally your compliance officers through PIM, as described in Part 1
Rolling it out safely
Run quick setup and wait for the completion email.
Leave everything in simulation for two to four weeks. Review which people reach each level and what the DLP policies would have blocked.
Check for surprises. Are the right people reaching Elevated? Would any legitimate work have been blocked? Adjust the level definitions if needed.
Turn on blocking for Elevated only. Leave Moderate and Minor recording only.
Tell people. Your IT acceptable use policy and privacy notice should explain that controls can tighten automatically when risky activity is detected – see Part 6.
Review regularly. Look at who is assigned a level each week, and use manual expiry when an investigation clears someone.
Switching it off
If you ever need to, turn Adaptive Protection off in its settings. Levels stop being assigned and are reset within about six hours. Your insider risk, DLP, Conditional Access and data lifecycle policies are not deleted – they simply stop receiving risk levels.
Final thoughts
Adaptive Protection is where the investment in Insider Risk Management pays back. Instead of choosing between rules that are too strict for everyone or too loose to matter, you get strict rules for the few who need them and freedom for everyone else – automatically.
In Part 6 I tackle the question every data protection officer asks: is this something we are obliged to do?
Series:This is Part 6 of 7 in my series on Microsoft Purview Insider Risk Management. New to the series? Start with the series guide, which summarises every part.
This is the question security leaders and data protection officers ask me most: is insider risk management something we have to do by law, or is it just a service Microsoft provides?
The short answer
No law names it. No Irish or EU law says you must use Microsoft Purview Insider Risk Management, or any particular product. It is a Microsoft service.
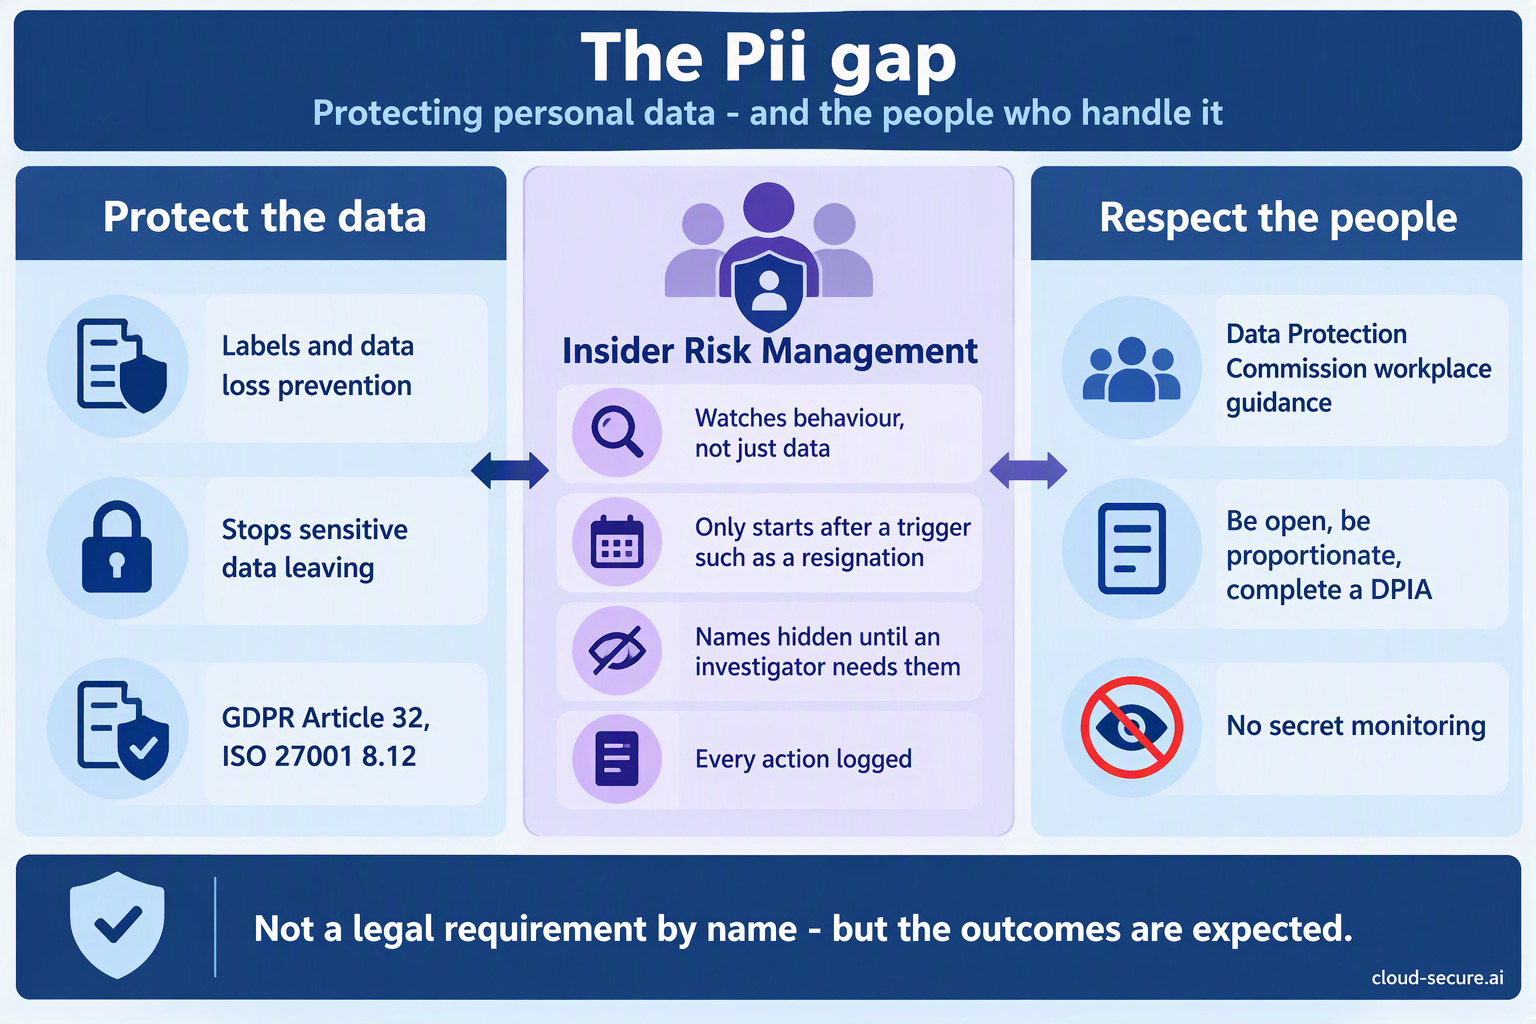
But the results it delivers are expected. The main rules and standards – GDPR, NIS2, DORA and ISO 27001 – all expect you to stop data leaking out, manage the security risk of people joining and leaving, and spot unusual activity. At the same time, data protection law sets strict rules on how you monitor employees. Insider Risk Management sits between those two pressures: protecting personal data, while respecting the privacy of the people who handle it.
Important: I am a security architect, not a lawyer. This section explains how the frameworks relate to Insider Risk Management. Get advice from your DPO and legal team on your own obligations.
What the laws and standards expect
Law or standard
What it expects
How Insider Risk Management helps
GDPR Article 32 (security of personal data)
Suitable technical and organisational measures to protect personal data, including from being shared without permission. Pseudonymisation is named as an example.
Spots insiders moving personal data out, and hides the identities of the people it monitors.
GDPR Articles 33 and 34 (breach reporting)
Tell the Data Protection Commission within 72 hours of becoming aware of a personal data breach, and tell the people affected if the risk to them is high.
Alerts and timelines tell you a breach has happened and show what left, when and how.
NIS2 Article 21(2)(i) (EU cybersecurity law)
Security around staff, control over who can access what, and managing company assets. Management boards are held accountable.
Links HR events such as resignations to data activity, and adjusts access automatically for risky people.
DORA (EU law for banks, insurers and other financial firms)
Managing IT risk, including quickly spotting unusual activity. Applies from January 2025.
Spots unusual behaviour and sends alerts to the security team.
ISO/IEC 27001:2022 (international security standard)
Controls 6.5 (security when people leave or change role), 8.12 (preventing data leaks) and 8.16 (monitoring for unusual activity).
Evidence for all three controls when auditors ask.
NIST SP 800-53 PM-12 (US government security standard)
An insider threat programme – one of the few standards that asks for one by name. Relevant if you supply the US government.
Provides the technology at the heart of an insider threat programme.
NIS2 in Ireland: NIS2 is an EU cybersecurity law that Ireland has not yet written into Irish law. A draft outline of the National Cyber Security Bill was published in August 2024, and in July 2026 the European Commission took Ireland to the EU Court of Justice over the delay. The National Cyber Security Centre is set to be the main regulator. The obligations are coming, and organisations it will apply to should be preparing now.
The PII gap
PII stands for personally identifiable information – anything that identifies a person, such as a name, address or PPS number. Most Purview projects focus on protecting that data directly: finding it, labelling it and stopping it leaving with DLP. That protects the data. It does not tell you when a trusted person, who is allowed to see that data, starts behaving in a way that puts it at risk. That is the gap Insider Risk Management fills.
But there is a second side to the gap. Monitoring employees means collecting information about them, which is itself covered by data protection law. The Data Protection Commission’s 2023 guidance for employers makes four points clear. Workplace monitoring must be open and proportionate – no more than is needed. Employers will find it hard to justify monitoring simply because it is in their business interest (known as “legitimate interests”). A data protection impact assessment (DPIA) – a written assessment of the privacy risks – is essential before monitoring starts. And secret monitoring should be avoided wherever possible. European court rulings point the same way: employees should be told in advance that monitoring may take place.
This is where Insider Risk Management is genuinely different from a surveillance tool. Its design lines up closely with those principles:
Data protection principle
How Insider Risk Management supports it
Transparency – be open about it
Policies watch activities you can describe to staff in your IT acceptable use policy and privacy notice. Built-in notice templates help you communicate with them.
Proportionality – no more than needed
People are only scored after an event such as a resignation. Policies can be limited to specific groups.
Pseudonymisation – hide identities
On by default. Names are only revealed to authorised investigators.
Limit who can see what
Separate role groups for the people who set it up, review alerts, investigate and audit.
Accountability – keep a record
Every action inside Insider Risk Management is logged, and a dedicated Auditors role group can review that log.
Purpose limitation – only use it for the stated reason
Each policy template has one clear purpose – data theft, data leaks, security breaches or risky AI use.
No secret monitoring by default
It uses activity that is already recorded, such as audit logs. It does not record keystrokes. Forensic evidence (screen recording) is optional and needs approval – treat it with particular care in your DPIA.
What you need to do
Complete a DPIA before switching on Insider Risk Management, and update it when you add new policies or features.
Write down your legal basis – the legal reason you are allowed to do this – and, if it is legitimate interests, show how you weighed your needs against employees’ privacy.
Update your IT acceptable use policy and employee privacy notice so staff know what activity may be monitored and why.
Involve HR, legal, the DPO and employee representatives early. The HR connector makes HR a stakeholder anyway.
Keep pseudonymisation on and keep the Investigators role group small.
Set retention for alerts and cases in line with your records policy.
Link it to the standards you follow – for example ISO 27001 controls 6.5, 8.12 and 8.16, NIS2 Article 21 and DORA – so the evidence is ready when auditors ask.
My view
No regulator will ask you whether you have switched on Insider Risk Management by name. But every standard above expects you to spot and deal with the risk it covers, and data protection law expects you to do it fairly and proportionately. Few tools do both as well.
And here is the uncomfortable question: after a departing employee walks out with a customer database, how do you explain to the Data Protection Commission that the control designed to catch it was already licensed, already paid for – and switched off?
Series:This is Part 7 of 7 in my series on Microsoft Purview Insider Risk Management. New to the series? Start with the series guide, which summarises every part.
This is the final part of the series, and it brings everything together. Insider Risk Management spots risky behaviour. Adaptive Protection turns it into a risk level. In this part, that risk level reaches the front door – sign-in – and an AI assistant helps your compliance team deal with the alerts.
Part A: Insider risk in Conditional Access
Conditional Access is the set of rules in Microsoft Entra ID that decides who can sign in to what, from where and on which device. Most organisations already use it – for example, to require multi-factor authentication. Since July 2024, it can also use a person’s insider risk level as a condition.
That means the same risk level that tightens DLP in Part 5 can also block or restrict someone’s access to Microsoft 365 apps. You need Microsoft Entra ID P2, which is included in E5, and Adaptive Protection switched on.
What Microsoft recommends for each level
Level
Recommended Conditional Access response
Effect on the person
Elevated
Block sign-in to Microsoft 365 apps, block access to specific labelled SharePoint sites, or block downloads from cloud apps
Cannot reach the data at all
Moderate
Require them to accept Terms of Use when signing in to admin portals
A reminder of their obligations, with no loss of access
Minor
Run a policy in report-only mode
None – you just gain visibility
The Copilot angle: Blocking an Elevated person from specific labelled SharePoint sites also stops Microsoft 365 Copilot generating answers from those sites for them. A risky person cannot use Copilot as a back door to sensitive content.
Creating the block policy for Elevated risk
If you ran Adaptive Protection quick setup in Part 5, a policy called “1-Block access for users with Insider Risk” already exists in report-only mode. To create one yourself, sign in to the Microsoft Entra admin center as at least a Conditional Access Administrator and:
Go to Entra ID > Conditional Access > Policies and select New policy.
Users: include All users. Exclude your emergency access (break-glass) accounts and guest or external user types.
Target resources: include All resources.
Conditions: select Insider risk, set Configure to Yes, and tick Elevated.
Grant: select Block access.
Enable policy: set it to Report-only and select Create.
Review the report-only results for a few weeks, then switch the policy to On.
Never skip report-only: Blocking sign-in is the strongest action in this series. Run it in report-only first, check exactly who would have been blocked, and always exclude your emergency access accounts so a mistake cannot lock everyone out.
Part B: The Data Security Triage Agent
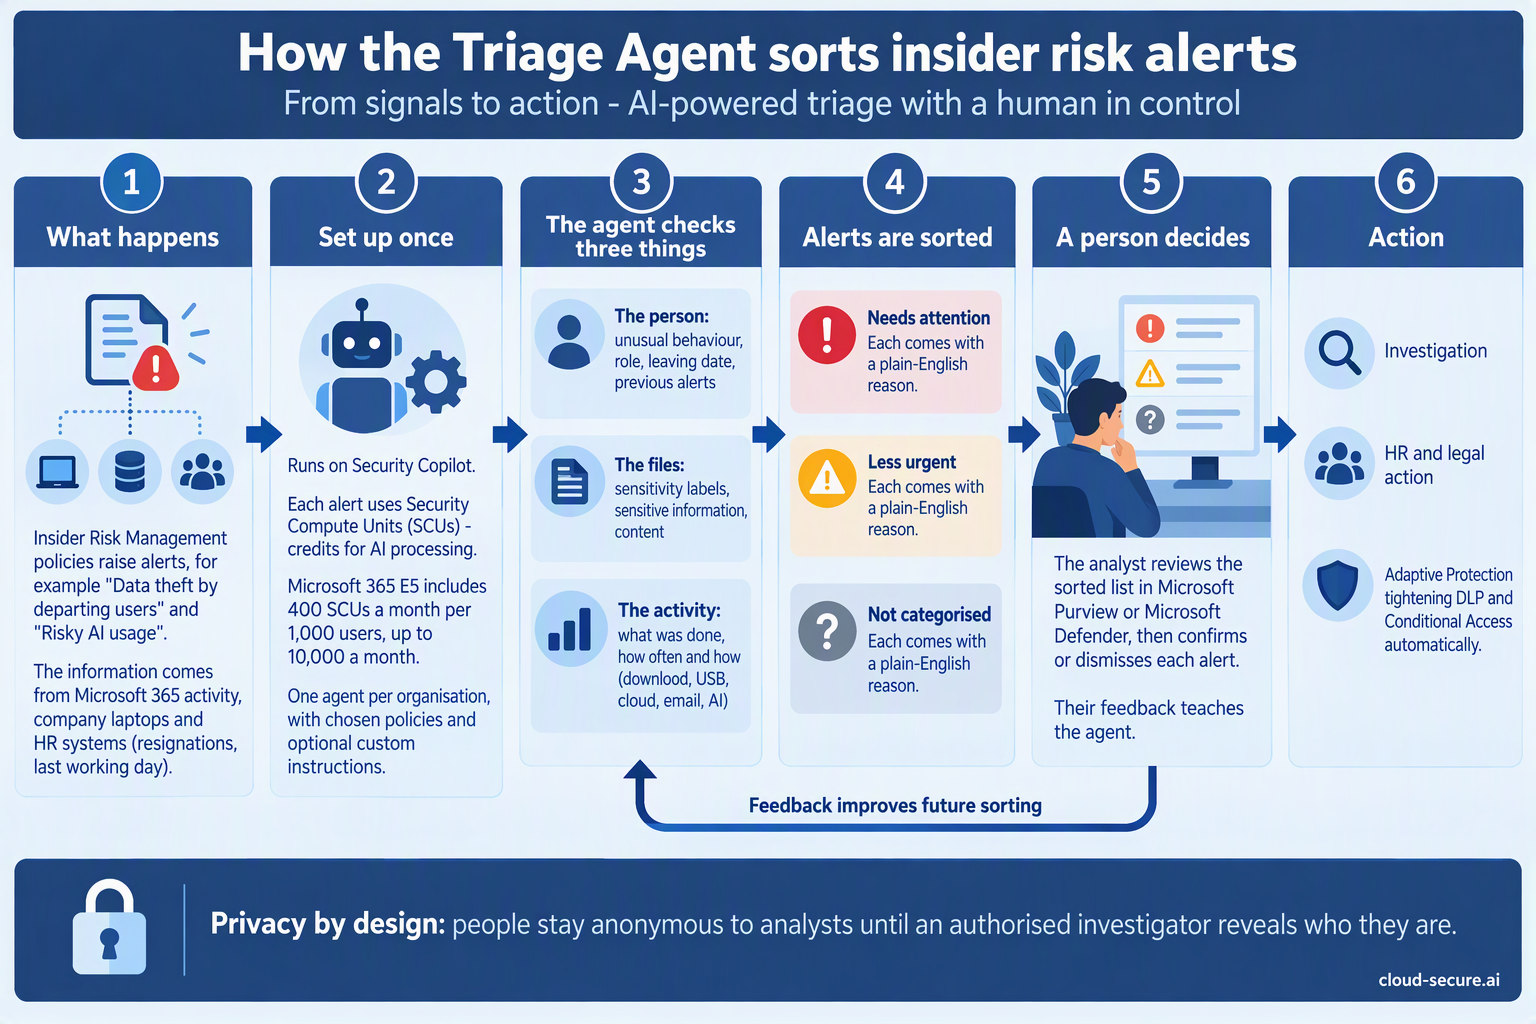
Every insider risk policy produces alerts, and someone has to look at them. On a busy day that queue can be long, and the most important alert can sit behind dozens of harmless ones. The Triage Agent is an AI assistant, built on Security Copilot, that reads each alert first and sorts the queue so your compliance team starts with what matters.
It does not investigate, decide or take action. It sorts and explains. A person still makes every decision.
How it sorts alerts
Category
What it means
Needs attention
The alerts the agent judged highest risk. Start here.
Less urgent
Lower-risk alerts to review when you have capacity.
Not categorized
Alerts the agent could not assess – for example, unsupported activity or an error. These still need a person to look at them.
For each alert, it weighs up the person (for example, whether they are a priority user and how many cases they already have open), the activity (how likely it is to be data leaving the organisation) and the content involved, and writes a short plain-English explanation of its decision.
How it runs and what it costs
Scope: you choose which insider risk policies it covers, and whether it looks only at new alerts or also at alerts from up to 30 days back.
Schedule: it can run automatically on a schedule, or an analyst can run it on one alert at a time.
Cost: each alert it processes uses Security Compute Units (SCUs). Microsoft 365 E5 includes 400 SCUs a month for every 1,000 users, up to 10,000 a month – see Part 3.
Feedback: analysts can give feedback on its decisions, which it takes into account when it triages future alerts.
Getting started well
Tune noisy policies first. The agent sorts what your policies produce – and every alert costs credits.
Start with new alerts only, then widen the lookback once you trust the results.
Compare for two weeks. Have your compliance team triage as normal and compare their view with the agent’s.
Check Not categorized every day. Those alerts have not been assessed by anyone yet.
Watch your SCU usage in Security Copilot, so the monthly allowance is not used up by one noisy policy.
The people reviewing the sorted queue need the same Insider Risk Management roles as before – Analysts or Investigators, through PIM. Setting up the agent needs additional Purview agent and Security Copilot roles.
Bringing it full circle
Over seven parts, we have gone from a licence sitting on the shelf to a joined-up system:
Insider Risk Management spots risky behaviour, starting with people who are leaving.
Adaptive Protection turns that behaviour into a risk level.
DLP and Conditional Access tighten automatically for the few who need it.
The Triage Agent helps your compliance team deal with the alerts.
Compliance officers, not IT, own the process, with access controlled through PIM.
And all of it is included in the Microsoft 365 E5 licence many organisations already pay for.
Final thoughts
If you take one thing from this series, make it this: if you have E5 and no insider risk policies, you are paying for protection you are not using. Start small – one departing users policy, a few compliance officers, quick setup in simulation – and build from there. The scripts and KQL queries from Part 4 will help you prove it works.
Thank you for following the series. If you have questions or want to talk about your own deployment, get in touch through cloud-secure.ai.
What can DLP protect if nothing has been classified?
Very little. A DLP policy is only as good as the sensitive information types and labels behind it. If Contoso has never defined what its sensitive data looks like, DLP has nothing to look for.
Out of the box, Purview DLP recognises what Microsoft has already classified for every tenant: credit card numbers, PPSNs, IBANs, passport numbers, credentials. Useful, but none of it is Contoso’s. Not one built-in SIT knows what a Contoso project code, design specification, customer list or product roadmap looks like. Without classification, a DLP policy is left with two options:
Match on Microsoft’s built-in types only. Personal and financial data is protected; Contoso’s intellectual property walks straight past every rule.
Fall back on context alone. Block every attachment to an external domain, every upload to an AI app, every file copied to USB. That stops IP, and it stops the business with it. Users find a workaround within a week, and the policy is rolled back to audit within a month.
Blind or blunt: the policy either misses what matters or blocks everything. Classification is what gives it a third option – block what is sensitive and let everything else through.
The same applies to every control I have written about this month. I have blocked unsanctioned MCP servers, inspected traffic to AI apps, governed agents in Agent 365 and stopped credentials leaking from Exchange and Teams. Each of those posts answers the question where is this data allowed to go? None of them can answer the question that has to come first: what is this data? A network indicator blocks a destination whatever is sent to it. A Copilot policy can only exclude content that carries a label. Inline DLP can only block a prompt that matches a SIT.
The credentials post came closest to saying this. It works because Microsoft has already done the classification for you: the All Credential Types SIT ships ready-made, so the policy simply has to be switched on. Intellectual property gets no such head start.
This post covers the classification methods Microsoft Purview offers, the different types of DLP that act on them, where you can find sensitive data already sitting at rest, and how to put it all together around the asset that is hardest to protect and most damaging to lose: Contoso’s intellectual property.
Key terms
If you are new to Purview, these are the terms the rest of the post relies on:
DLP (data loss prevention) – policies that detect sensitive content and audit, warn or block when someone tries to move it.
SIT (sensitive information type) – a pattern Purview recognises, such as a credit card number: usually a regular expression (regex) plus supporting keywords.
Confidence level – how sure Purview is that a SIT match is real: Low (65), Medium (75) or High (85). More supporting evidence means higher confidence.
Proximity – how close, in characters, a supporting keyword must be to the pattern to count as evidence.
Sensitivity label – a tag such as Highly Confidential written into a file or email, which can also encrypt it.
EDM (exact data match) – matching on the actual values in your own data, such as real customer account numbers, rather than on a pattern.
Document fingerprint – a SIT built from a blank form or template, which matches any document written on it.
Trainable classifier – a machine learning model that recognises a type of document, such as source code or a patent.
Inline DLP – DLP applied to web traffic as it leaves, either inside Edge for Business or at the network through Global Secure Access (GSA), Microsoft’s cloud network security service.
MCP server – a service an AI agent connects to for extra tools or data.
Why the earlier controls worked
It is worth looking back at why the earlier posts produced clean blocks, because the answer is classification every time.
Post
What made it work
What it cannot see without classification
Stopping leaked credentials
Microsoft ships the All Credential Types SIT, with checksums and patterns already built
Anything that is not a credential
Entra Internet Access inline DLP
A custom SIT for Contoso project references, imported before the policy was built, with a supporting keyword required within 300 characters for a High confidence match
A design document or roadmap that contains no project reference
Parts 4 and 5: MCP server blocking
Defender indicators block the destination outright
What the agent sends to an approved server
Part 6: Agent 365 governance
Approval, ownership and Conditional Access for agents
Which content an approved agent can ground on
The pattern is clear. Destination controls are binary: a server is allowed or it is not. Once a destination is approved, whether that is a sanctioned MCP server, Copilot or an external partner, the only thing that can stop the wrong content reaching it is a control that knows what the content is.
Why intellectual property is the hard case
Most DLP deployments start with personal and financial data because it is easy. A credit card number has a checksum. A PPSN has a fixed format. Microsoft ships hundreds of SITs for these, and a policy can be live in an afternoon.
Intellectual property has none of that. There is no built-in SIT for Contoso’s product roadmap, a formulation, a tender response or the code behind Contoso’s custom-developed pricing application. IP is defined by what a document is and who it belongs to, not by a pattern inside it. That makes it the case where classification matters most, and the one most organisations never get to.
Contoso’s crown jewels
Before choosing a classification method, list what actually needs protecting. For Contoso, whose flagship R&D programme – codename Project Halcyon – is the running example in this post:
IP asset
What it looks like
Best classification method
Project and product codes
CONTOSO-FIN-204815-K in specs, emails and chats
Custom SIT (regex and keywords)
Patent drafts and design specifications
Written on a standard Contoso template
Document fingerprinting
Custom-developed applications
The source code, scripts and configuration behind Contoso’s in-house apps, in any language
Pretrained Source Code classifier
Customer and supplier lists
Real names and account numbers from the CRM
Exact data match (EDM)
Strategy, M&A and roadmaps
Free-form documents and slide decks
Pretrained or custom trainable classifier, plus a manual label
Everything on the Engineering site
Whatever the team saves there
Default sensitivity label on the site library
No single method covers the list. That is the point of this post: IP protection is built from several classification methods layered together, then enforced by several types of DLP.
Key risks of losing Contoso’s intellectual property
Scenario
What could happen
Risk level
The departing engineer
Design files and the code of Contoso’s custom-developed apps copied to USB or a personal cloud account in the weeks before a resignation.
● Critical
Pasted into an AI app
A roadmap or specification pasted into a consumer AI tool to summarise it, where it may be retained or used for training.
● Critical
Sent to an AI agent’s tools
A coding agent passes the code of a custom-developed Contoso app to an approved MCP server, which logs it.
● High
Oversharing through Copilot
Copilot grounds an answer on an M&A document a user could technically open but should never have seen.
● High
External sharing
A patent draft emailed to an external partner before filing, or shared through an “anyone” link.
● Critical
Loss of trade secret status
Information only qualifies as a trade secret where reasonable steps were taken to keep it secret. Unclassified, unprotected IP weakens that position in any dispute.
● High
The last row deserves attention. Under the EU Trade Secrets Directive, transposed in Ireland by the European Union (Protection of Trade Secrets) Regulations 2018, information is protected only where its holder took reasonable steps to keep it secret. Classification and DLP are not legal advice, but they are evidence of exactly those steps. Discuss the specifics with your legal team.
Methods of classification
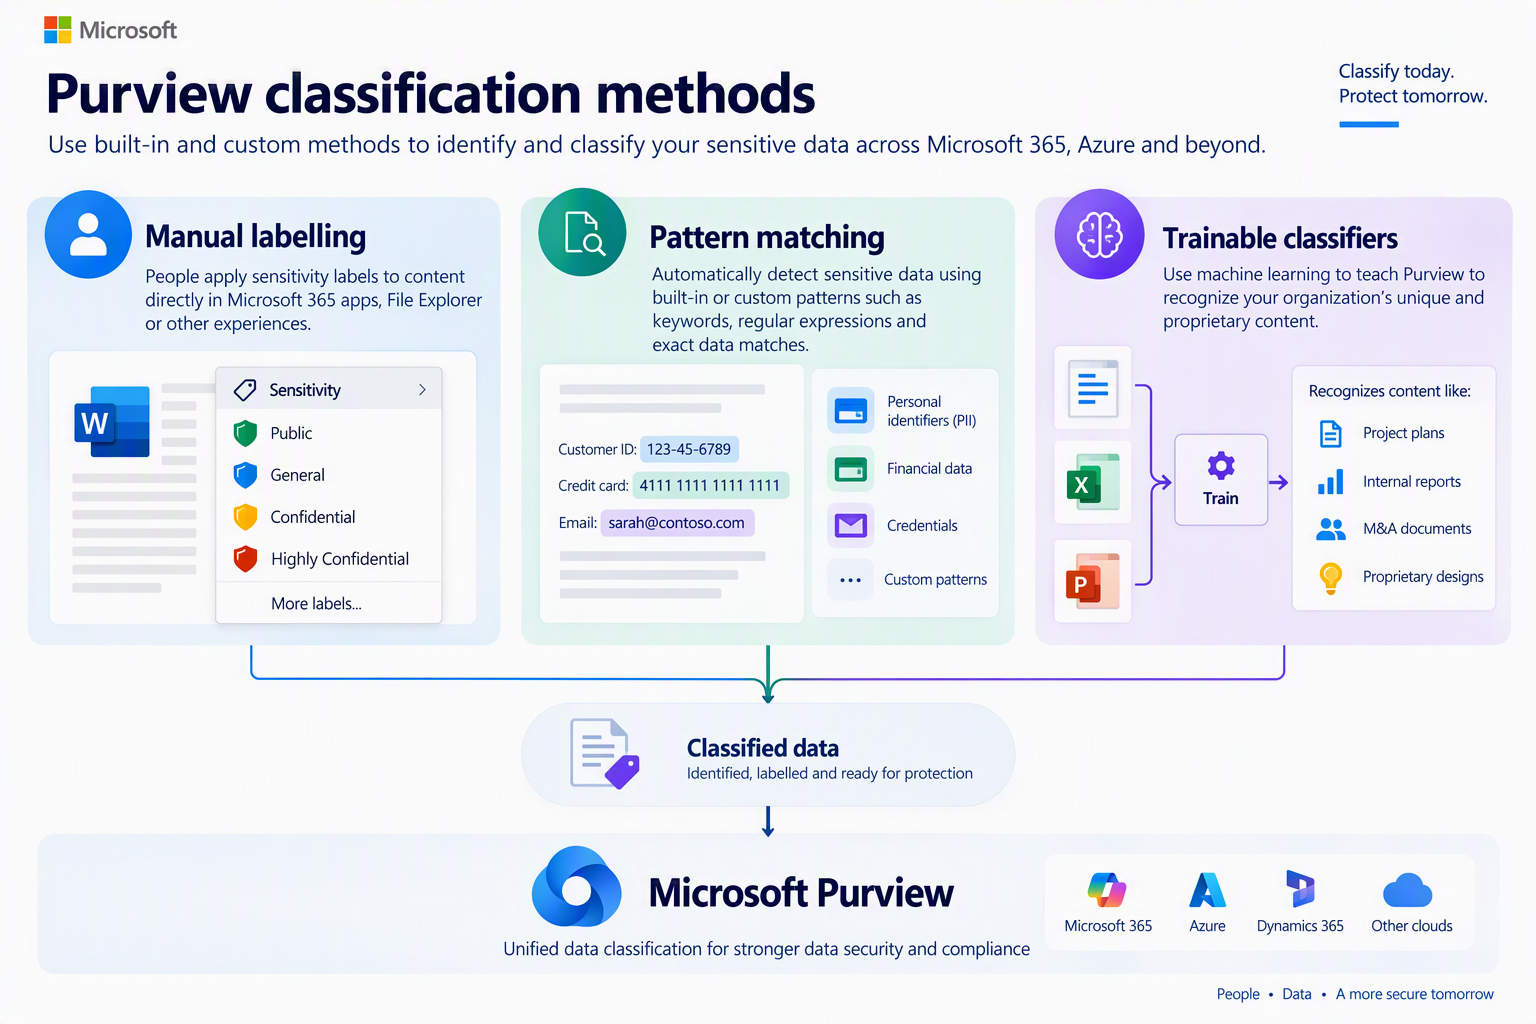
Microsoft Purview classifies content in three ways: manually, by automated pattern matching, and with trainable classifiers. In practice those break down into the methods below.
Method
How it decides
Strong for
Weak for
Manual sensitivity labels
The author decides
Strategy and M&A, where context matters
Consistency at scale
Default labels
Where the file is saved, or who created it
Engineering and R&D sites
Content that leaves that location
Built-in SITs
Microsoft patterns, checksums and keywords
Credentials, PII, financial data
Anything unique to Contoso
Custom SITs
Your own regex and keywords
Project codes, part numbers
IP with no identifier in it
Exact data match
Hashed values from your own source table
Customer lists, product catalogues
Unstructured documents
Document fingerprinting
Similarity to a standard template
Patent and design specification forms
Documents not written on the template
Pretrained classifiers
Machine learning on what the item is
Source code, IP, M&A, business plans
Precision; encrypted items
Custom trainable classifiers
Machine learning trained on your own samples
A document category only Contoso has
Non-English content; quick wins
Rule of thumb: if the IP carries an identifier, use a custom SIT. If it lives in a table, use EDM. If it is written on a standard template, use a fingerprint. If it is none of those, use a trainable classifier. And label anything only a person can judge.
One place to manage all of this.MC1486289 introduces a unified Classification Management experience in the Purview portal. It brings sensitive information types, Exact Data Match, trainable classifiers and document fingerprinting into one view, with search, filters and guidance in the creation flow on which method suits your scenario – the same decision the table above walks through. Public preview began in October 2026, with general availability scheduled from mid to late November 2026. Portal paths in this post may change as it rolls out.
Sensitivity labels: manual, default and automatic
A sensitivity label is the only classification that travels with the file. Every other method detects content each time it is evaluated; a label is written into the file’s metadata, stays with it wherever it goes, and can apply encryption that keeps working outside Contoso entirely.
Manual. The author chooses. Best where only a person can judge sensitivity, such as a board paper or an acquisition target.
Default. A label applied by policy or by a SharePoint document library. Everything saved to the Contoso R&D library is Highly Confidential – Contoso IP unless someone changes it.
Automatic. Client-side auto-labelling recommends or applies a label in the Office apps as a user works. Service-side auto-labelling applies labels to content already at rest in SharePoint, OneDrive and Exchange. Both use the SITs, fingerprints and classifiers described below as conditions.
Labels matter most once content is encrypted. Trainable classifiers only work on items that are not encrypted, so once a label encrypts a file, content-based detection can no longer read it. From that point on, the label is the only thing downstream controls can recognise, which is why label-based DLP conditions are not optional.
Sensitive information types
A SIT is a pattern, usually a regular expression, supported by keywords, checksums and a proximity window, with confidence levels for how much evidence was found. Microsoft ships several hundred. The credentials post used the bundled All Credential Types SIT, and it belongs in any IP policy too: source code and configuration files are where secrets hide.
For Contoso’s own identifiers you write a custom SIT. The project reference SIT used in the inline DLP post is a good model:
\bCONTOSO-[A-Z]{3}-\d{6}-[A-Z]\b
High confidence (85) – the pattern plus a keyword such as “project reference” or “confidential project” within 300 characters.
Medium confidence (75) – the pattern on its own.
The fixed CONTOSO- prefix means it cannot collide with any built-in type, and the next two sections explain why that matters. The New-ContosoSIT.ps1 script in the inline DLP repository builds and imports the rule package in one run, and takes -Prefix and -DisplayName parameters so it can be reused for any client.
A regex is not a SIT
regex101.com is the best place to build the pattern. Paste a candidate regex and a block of sample text and it highlights every match as you type, explains each token in plain English, and lets you keep a set of test strings that should and should not match. For Contoso, that is where you prove \bCONTOSO-[A-Z]{3}-\d{6}-[A-Z]\b matches CONTOSO-FIN-204815-K and rejects a five-digit number, a missing prefix or a reference glued to another word – before it goes anywhere near Purview.
What regex101 cannot tell you is everything else the pattern will match across Exchange, SharePoint, OneDrive and Teams. Purview’s regex engine is not one of regex101’s flavours either, so a pattern that works there still has to be proved in Purview. regex101 proves the pattern; it does not prove the SIT.
A loose pattern such as \d{6} or [A-Z]{3}-\d{6} will happily match phone numbers, dates, order numbers, postcodes and invoice references, and it will overlap with a large share of Microsoft’s built-in SITs, most of which are numeric identifiers. Deploy it in a blocking DLP rule and the service desk will know about it within the hour.
To see how many built-in SITs your tenant has for a new pattern to collide with, run:
What turns a regex into a usable SIT is the evidence around it:
A distinctive primary element. The fixed CONTOSO- prefix rules out almost every accidental match before anything else is checked.
Supporting keywords within a proximity window. “Project reference”, “codename” or “confidential project” within 300 characters is what lifts a match to High confidence. A string that merely looks like a reference stays at Medium.
Confidence levels in the policy. Block on High; use Medium for audit or a policy tip while you tune.
Testing against real content. The Test option on the SIT, fed with samples that should and should not match, is where false positives show up. regex101 proves the pattern; the Test option proves the SIT.
Inside the Contoso SIT: how proximity decides
A custom SIT is defined in an XML rule package and imported into Purview. This is the core of the Contoso Project Reference SIT used in the inline DLP post. Three parts of it do the work:
The regex is the primary element. Nothing is evaluated unless the text contains CONTOSO-, three letters, six digits and a check letter, bounded by word breaks. Purview matches it without regard to case.
The keywords are supporting evidence. On their own they match nothing. They only matter when they appear near a project reference, and matchStyle="word" means they must be whole words: “codename” counts, “codenames” does not.
The proximity window is 300 characters.patternsProximity="300" sets it: A keyword counts only if it falls within 300 characters of the reference. Inside the window, the match is High confidence (85). Outside it, or with no keyword at all, the match drops to Medium (75).
The DLP rule in the inline DLP post blocks at High confidence only. That one setting is what keeps false positives down: a reference has to look like a Contoso project code and be described as one before anything is blocked. A Medium match is still recorded, so it can drive an audit rule or a policy tip while you tune.
Here is how that plays out for prompts typed into an AI app, with the policy blocking at High confidence:
Prompt
SIT match
Blocked?
Why
“Summarise the risks on project reference CONTOSO-FIN-204815-K for the board”
High (85)
Yes
Pattern plus keyword in the same sentence
“Codename CONTOSO-RND-550731-H: draft a launch plan for this product”
High (85)
Yes
Pattern plus keyword
“Rewrite this update – Contoso project CONTOSO-OPS-118204-M is three weeks late”
High (85)
Yes
Pattern plus keyword
“Here is the spec for confidential project CONTOSO-ENG-904117-P. Find the weaknesses”
High (85)
Yes
Pattern plus keyword
“project code: contoso-hrs-300221-b – turn this into a job description”
High (85)
Yes
Case does not matter to the regex or the keywords
A pasted document with “Project ref” in the heading and CONTOSO-FIN-204815-K two paragraphs (under 300 characters) later
High (85)
Yes
Keyword inside the proximity window
“Is CONTOSO-FIN-204815-K a valid format for our tracker?”
Medium (75)
No – audit
Pattern with no supporting keyword
A long paste where “project reference” appears more than 300 characters from CONTOSO-FIN-204815-K
Medium (75)
No – audit
Keyword outside the proximity window
“Our codenames list starts with CONTOSO-RND-550731-H”
Medium (75)
No – audit
“codenames” is not the whole word “codename”
“Project reference CONTOSO-FN-204815-K”
None
No
Two letters, not three – the regex fails
“Project reference CONTOSO-FIN-20481-K”
None
No
Five digits, not six
“Project reference XCONTOSO-FIN-204815-K”
None
No
No word boundary before the prefix
“Project reference FABRIKAM-FIN-204815-K”
None
No
Wrong prefix
“What is our project code policy?”
None
No
A keyword on its own never matches
The last row is the important one. The keyword list contains everyday phrases that appear in thousands of emails and chats. On their own they do nothing; they only raise the confidence of a real project reference. That is the difference between a SIT and a keyword list, and it is why this SIT can block at High confidence without flooding the alert queue.
Prove it before you block. Paste these examples into a text file and run them through the Test option on the SIT. The results should match the table: six High, three Medium, five with no match. Purview lists a High match under Medium and Low as well, so seeing a value more than once is expected.
Custom SITs only find IP that carries an identifier. A design document that never mentions its project code passes straight through, which is why the next methods exist.
Exact data match
Exact data match (EDM) detects the actual values in your own data rather than a pattern that looks like them. You export a table, for example Contoso’s customer list with account numbers and contact names, hash it and upload the hashes. Purview then matches on those exact values, so a twelve-digit number only fires if it is a real Contoso customer account.
EDM gives the lowest false-positive rate of any method and suits structured IP: customer and supplier lists, a bill of materials, a product price book. The original data never leaves Contoso in clear text. The cost is operational: the source table has to be refreshed on a schedule as the data changes.
Document fingerprinting
Document fingerprinting is the most underused method for IP, and the best fit for any organisation that writes its IP on standard forms. You upload a blank template, such as Contoso’s patent disclosure form or design specification, and Purview converts its word pattern into a SIT. Any document written on that template then matches, whatever has been filled in.
Only a hash is stored; the original template cannot be reconstructed from it. Partial matching lets you set what percentage of the template text must be present for low, medium and high confidence, or select Exact to match only identical text.
Create it in the Purview portal under Information Protection > Classifiers > Sensitive info types > Create Fingerprint based SIT, or in Security & Compliance PowerShell:
$template = [System.IO.File]::ReadAllBytes('C:\Demo\Contoso-Design-Specification.docx')

New-DlpSensitiveInformationType -Name 'Contoso Design Specification' `
    -FileData $template `
    -ThresholdConfig @{ low = 40; medium = 60; high = 80 } `
    -IsExact $false `
    -Description 'Documents written on the Contoso design specification template'
Limits worth knowing before you promise it to anyone:
The template needs at least 256 characters of extracted text, and embedded documents in it are ignored.
It does not detect password-protected files, image-only files, files larger than 4 MB, or documents missing some of the template text.
Fingerprints share a 300 KB rule pack, which allows roughly 100 per tenant.
On devices, Advanced classification scanning and protection must be turned on in Endpoint DLP settings.
Trainable classifiers
Trainable classifiers identify an item by what it is rather than what it contains. For IP that is the only method that works on free-form documents with no identifiers and no template.
Pretrained classifiers are ready to use. Several map directly onto IP, including Source Code, Intellectual Property, Patents, Mergers and Acquisitions, and business and marketing plans. Check the current list in your tenant under Information Protection > Classifiers > Trainable classifiers, as it grows.
Custom trainable classifiers are trained on Contoso’s own documents. You provide a set of samples that definitely are the category, such as past tender responses, and a set that definitely are not. Purview trains on them, you review its predictions, and publish when the accuracy is acceptable.
Classifiers only work on items that are not encrypted.
Custom classifiers support English only.
Published custom classifiers cannot be retrained. To improve one, remove it and start again with larger sample sets.
The Source Code classifier fires when the bulk of the text is code, not on snippets pasted into a document or chat.
If you create a new SharePoint site for seed data, allow at least an hour for it to be indexed before training.
Precision versus coverage: EDM and exact fingerprints rarely misfire but only catch what they were built from. Classifiers catch far more but will produce false positives. Use the precise methods to block, and the broad ones to label, audit and warn while you tune.
The types of DLP
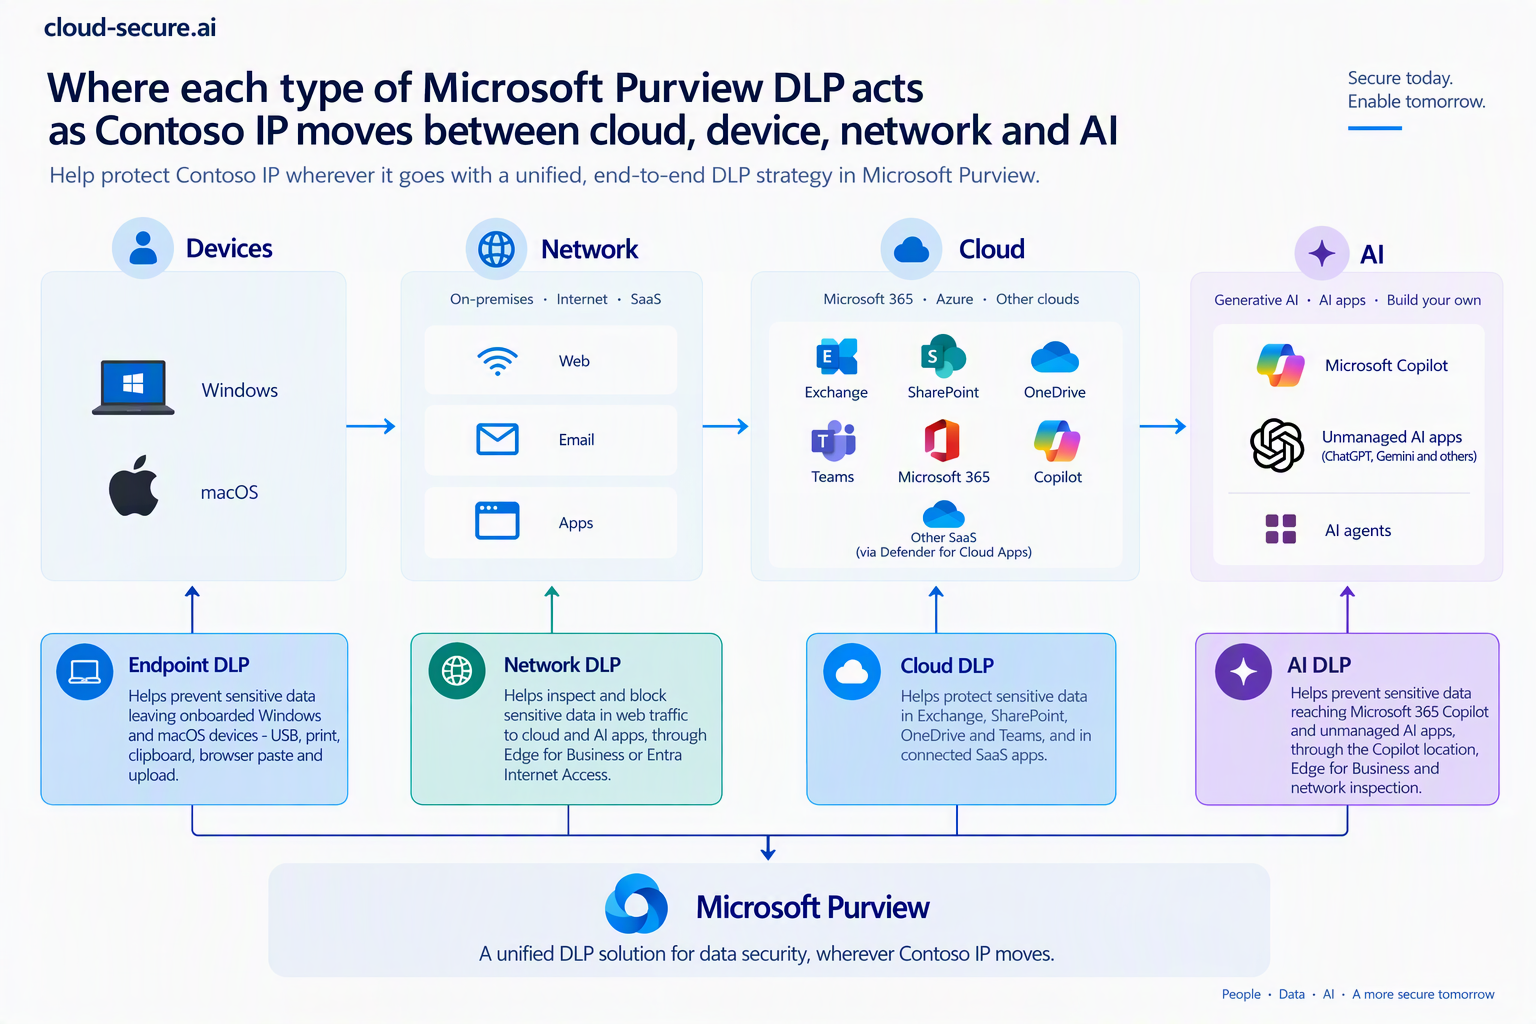
Classification decides what is sensitive. DLP decides what happens when that content moves. Purview DLP is not one control but a family, split into two policy scopes in the portal: Enterprise applications & devices and Inline web traffic. Each location sees a different part of the journey and offers different actions.
There are a lot of locations, and the table below lists them all for completeness. For the purposes of this post, the next sections focus on the route keeping most security teams awake: Contoso’s IP finding its way into generative AI.
Type of DLP
Where it acts
What it stops for Contoso IP
Microsoft 365 workloads
Exchange, SharePoint, OneDrive, Teams chat and channel messages
Patent drafts emailed externally, design files shared with guests or “anyone” links, project codes posted to external Teams chats
Endpoint DLP
Onboarded Windows and macOS devices
Copy to USB, print, upload to unallowed domains or personal cloud, copy to clipboard, access by unallowed apps – the departing engineer scenario
Microsoft 365 Copilot and Copilot Chat
Prompts, grounding content and agent interactions
Copilot processing labelled IP in its responses, and sensitive data typed into prompts
Inline web traffic – Edge for Business
Inside the managed browser
Pasting or uploading IP to unmanaged AI apps, with an in-page policy message
Inline web traffic – Network
Entra Internet Access, or a supported non-Microsoft SASE
IP sitting in sanctioned non-Microsoft cloud storage
On-premises repositories
File shares and SharePoint Server, through the Information Protection scanner
Legacy engineering shares nobody has migrated
Fabric and Power BI
Semantic models, lakehouses and warehouses
Pricing and product data uploaded to analytics workspaces
Protecting generative AI: where each type of DLP helps
AI reaches Contoso’s IP through several routes: a user pastes it into a prompt, uploads a file, asks Copilot a question that grounds on it, or lets an agent read it. No single DLP location covers all of them. Together they do:
Control
AI route it covers
What it does for Contoso IP
Microsoft 365 Copilot and Copilot Chat location
Copilot grounding, prompts and prebuilt agents in Copilot
Stops Copilot using content labelled Highly Confidential – Contoso IP in its responses, so a user who can open a file still cannot have Copilot summarise it
Endpoint DLP
Paste and upload into AI websites from managed devices, and desktop AI apps reading files
Blocks or warns on paste to browsers, upload to AI sites grouped as sensitive service domains, and access to labelled files by unallowed apps
Inline web traffic – Edge for Business
Typed and pasted prompts in Edge
Inspects the prompt in real time and blocks it before it leaves the browser, with a policy message the user can read
Inline web traffic – Network
Any browser, plus apps, APIs and add-ins, through Entra Internet Access or a supported SASE
Covers the browsers Edge for Business cannot – see the inline DLP post for tested results by app
Sensitivity labels with encryption
Any AI app, managed or not
Non-Microsoft AI apps cannot decrypt Purview-encrypted content, so a labelled file uploaded to them is unreadable
Exchange, SharePoint, OneDrive and Teams
AI-generated content shared onwards
A Copilot-drafted summary of Halcyon is still checked for SITs and labels when it is emailed or shared externally
Defender for Cloud Apps adds visibility of how Copilot is used and alerts on risky interactions, and DSPM for AI shows which AI apps are in use and what sensitive data reaches them. Neither blocks on its own; both tell you where to point the controls above.
Where Endpoint DLP protects
Endpoint DLP runs on Windows and macOS devices onboarded to Purview, and it is the control closest to the user. It acts on the actions people take with a file, wherever the file came from:
Activity
Contoso scenario it stops
Upload to cloud service domains
Design specification uploaded to a personal cloud drive or an AI website
Paste to supported browsers
Code from a custom-developed app pasted into a consumer AI chat
Copy to clipboard
Halcyon content copied out of a labelled document into an unmanaged app
Copy to removable USB device
The departing engineer’s copy of the project folder
Copy to network share
IP moved to an unmonitored file share before it leaves
Print
Patent drafts printed and walked out of the building
Transfer using Bluetooth
Files sent to a personal phone
Copy to remote desktop session
Data moved into a session on a machine Contoso does not manage
Access by unallowed apps
A labelled file opened by an unsanctioned desktop AI app or sync client
Each activity can be set to audit, block with override or block. Two settings matter for IP: Advanced classification scanning and protection must be on for fingerprint SITs to work on devices, and sensitive service domain groups let you treat AI websites differently from the rest of the internet.
Not every location understands every classifier
This is where classification and DLP design meet, and where most policies quietly fail. Locations support different conditions, and when you combine locations in one policy you keep only the conditions they all share.
Copilot acts on sensitivity labels for grounding content. Its location is only available in the Custom template and cannot be combined with any other location in the same policy. No label, no protection.
Fabric and Power BI support sensitivity labels and only a subset of SITs.
Inline web traffic classifies what it can parse. As the inline DLP post showed, a prompt sent in a binary format passes without a verdict, however good the classifier.
Encrypted content cannot be read by classifiers anywhere, so the label condition has to carry it.
The practical rule: build separate policies per location, and make sure every critical IP category is recognisable by a label as well as by content. Labels are the one classification every DLP location understands.
Where Global Secure Access prompt injection protection fits
Global Secure Access has a second AI control that is easy to confuse with inline DLP: prompt injection protection, configured as a prompt policy under Global Secure Access > Secure > Prompt policies and linked to the same security profile and Conditional Access policy as the content policy. It sits on the same TLS-inspected traffic path, but it answers a different question. Inline DLP asks is Contoso data leaving? Prompt injection protection asks is this prompt an attack on the model?
What it provides
What it does not provide
Blocks adversarial prompts and jailbreak attempts before they reach the model
Any recognition of Contoso IP. It has no SITs, labels, fingerprints or classifiers – a roadmap pasted politely passes straight through
Network-level enforcement with no change to the app, in any browser on a device running the Global Secure Access client
Inspection of files. It covers text prompts only
Preconfigured conversation schemes for ChatGPT, Claude, Cohere, DeepSeek, Gemini, Grok, Meta AI, Mistral, Perplexity, Pi and Qwen
Coverage of apps that do not send prompts as JSON, or of any app whose endpoint is missing from the conversation scheme
Custom schemes for in-house or other JSON-based AI apps, defined by endpoint URL and the JSON path to the prompt
Protection without TLS inspection, or for QUIC traffic. Untrusted certificates or QUIC left on means the prompt is never seen
A Block action. Allow with Always log lets you measure impact first, but blocks nothing
Inspection of prompts beyond 64,000 characters – longer prompts are truncated – and scanning is rate limited
Prompt activity recorded in the Generative AI Insights logs
Protection for local agents talking to their own tools or MCP servers – that is Defender AI agent runtime protection, covered in Parts 1 to 5
The two controls are complementary, not alternatives. Prompt injection protection stops someone attacking the model through Contoso’s network; inline DLP stops Contoso’s IP reaching the model in the first place. Only the second depends on classification, which is why this post exists. Deploy both on the same security profile, and do not present prompt injection protection to a customer as a data protection control.
Test each app yourself. Claude is in the preconfigured list, yet in the inline DLP lab Claude sent typed prompts as binary Protocol Buffers rather than JSON. Check the request content type in the traffic logs before claiming coverage for any app, exactly as the inline DLP validation method describes.
Data at rest versus data in motion: eDiscovery and DLP
DLP stops sensitive content moving from now on. It does not tidy up what is already there. The credentials post made the same point: the connection string emailed eight months ago is still sitting in a mailbox. Finding IP that is already at rest is a separate job, and the tools behave differently by workload.
Location
Finding it at rest (eDiscovery search)
Stopping it leaving (DLP)
Exchange Online
Searchable with SensitiveType, evaluated against the message body and indexed attachments when the item was indexed. A SIT created or changed later does not match older mail until it is reindexed. Images, scanned PDFs and partially indexed items are not evaluated
Evaluated as mail is sent and received. Exchange DLP is event-driven, not a scanner of mail already in the mailbox
SharePoint Online
Searchable with SensitiveType, including count and confidence ranges such as SensitiveType:"Credit Card Number|5..25"
Evaluates files at rest and when they are shared, and can restrict access to them
OneDrive
As SharePoint
As SharePoint
Teams chat and channel messages
Limited. Messages are stored in user and Teams mailboxes and evaluated on message text only, with lower accuracy for short messages. Files shared in Teams follow the SharePoint and OneDrive rules
Evaluated as messages are sent. Files shared in Teams are covered by the SharePoint and OneDrive locations
Microsoft 365 Groups
The group mailbox follows the Exchange rules; the group site follows the SharePoint rules
Covered through the Exchange, SharePoint and OneDrive locations
Two consequences matter for Contoso:
Create custom SITs early. A Contoso Project Reference SIT published today will not find project codes in mail indexed last year until those items are reindexed. Every week of delay is a week of email that a search will miss.
Search before you enforce. Run an eDiscovery search for the custom SIT, the fingerprint SITs and All Credential Types across all workloads first. It tells you how much IP is already exposed and gives the DLP policy a realistic baseline.
DLP is the opposite side of the same coin. It reads SITs, labels, fingerprints and classifiers in every location it covers – Exchange, SharePoint, OneDrive and Teams, plus devices, Copilot, inline web traffic, Defender for Cloud Apps instances, on-premises repositories and Fabric – and it is the only control that acts at the moment content leaves.
Putting it together for Contoso
Here is how everything above combines around one asset: Project Halcyon, Contoso’s flagship R&D programme.
Layer 1 – Classify
Component
Configuration
Label
Highly Confidential – Contoso IP, encrypting content and limiting access to the R&D group
Default label
Applied to the Project Halcyon SharePoint library
Custom SIT
Contoso Project Reference, at High confidence
Fingerprint SIT
Contoso Design Specification and Contoso Patent Disclosure templates
Classifiers
Pretrained Source Code (for Contoso’s custom-developed apps) and Patents
Auto-labelling
Client-side recommendation and service-side policy apply the label when any of the SITs or classifiers above match
Layer 2 – Enforce
Policy
Condition
Action
DLP-IP-M365
Label, project SIT or fingerprint SIT, shared outside Contoso
Block, with override and business justification for Legal
DLP-IP-Endpoint
Label, Source Code classifier or fingerprint SIT
Block USB, print and upload to personal cloud; audit clipboard
DLP-IP-Copilot
Highly Confidential – Contoso IP label
Prevent Copilot from processing content
DLP-IP-AIApps
Project SIT or Source Code classifier, to All unmanaged AI apps
The Defender and Agent 365 controls from the series sit on top: unsanctioned MCP servers blocked by indicators, agents approved before use, runtime protection inspecting what agents read, and GSA prompt injection protection blocking attacks on browser AI apps. They decide which doors exist; the first two layers decide what is allowed through them.
Now replay the risks. The departing engineer’s USB copy is blocked by Endpoint DLP because the files carry the label or match the Source Code classifier. The roadmap pasted into ChatGPT is blocked inline. Copilot will not ground answers on Halcyon documents. A patent draft emailed to a partner is stopped at Exchange. Every one of those outcomes depends on Layer 1.
Handling the alerts: the Triage Agent in DLP
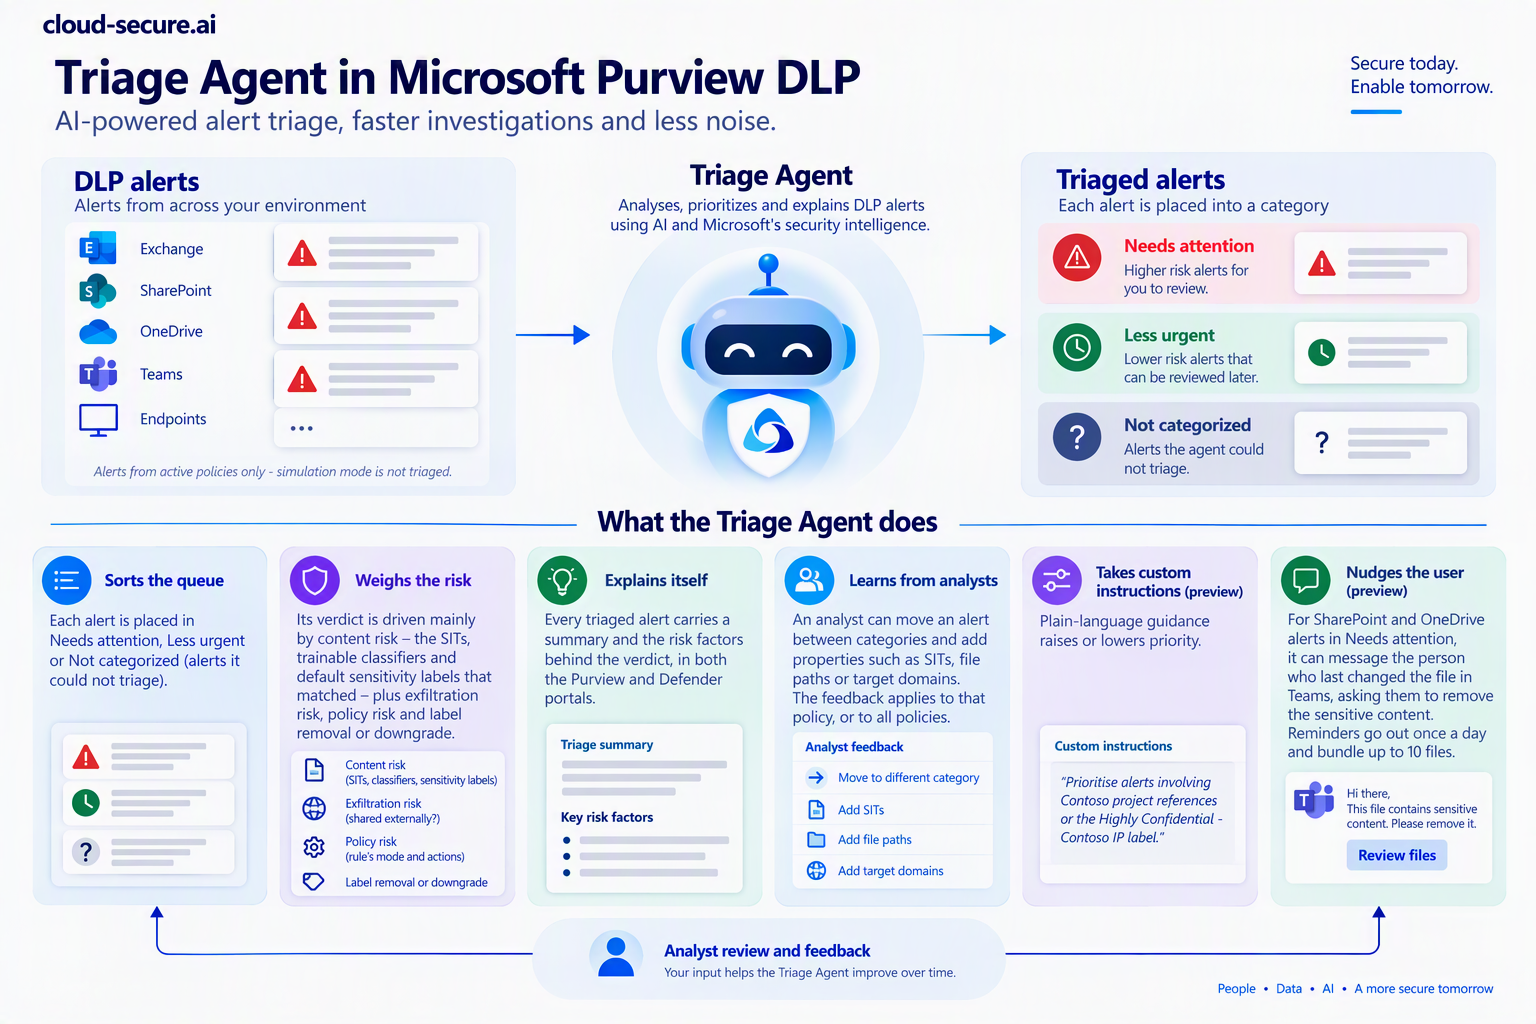
Layering classifiers has a cost: alerts. A Source Code classifier and a broad fingerprint will produce far more matches than a credential SIT, and a security team that cannot keep up with the queue will eventually stop reading it. The Triage Agent in DLP, a Security Copilot agent in the Purview portal, is Microsoft’s answer to that problem.
What it does
Sorts the queue. Each alert is placed in Needs attention, Less urgent or Not categorized (alerts it could not triage).
Weighs the risk. Its verdict is driven mainly by content risk – the SITs, trainable classifiers and default sensitivity labels that matched – plus exfiltration risk (was the data shared externally?), policy risk (the rule’s mode and actions) and label removal or downgrade.
Explains itself. Every triaged alert carries a summary and the risk factors behind the verdict, in both the Purview and Defender portals.
Learns from analysts. An analyst can move an alert between categories and add properties such as SITs, file paths or target domains. The feedback applies to that policy, or to all policies.
Takes custom instructions (preview). Plain-language guidance raises or lowers priority.
Nudges the user (preview). For SharePoint and OneDrive alerts in Needs attention, it can message the person who last changed the file in Teams, asking them to remove the sensitive content. Reminders go out once a day and bundle up to 10 files.
How it benefits Contoso
Halcyon alerts first. A custom instruction such as “Prioritise alerts involving Contoso Project Reference, the design specification fingerprint or the Highly Confidential – Contoso IP label” puts IP at the top of the queue, above the noise from built-in PII types.
Tuning without rewriting policies. When the Source Code classifier fires on a harmless script, analyst feedback teaches the agent to rank it lower, rather than someone weakening the rule.
Oversharing fixed at the source. The Teams reminder asks the engineer who left a design file in an open site to clean it up, without a ticket.
Evidence for the board. The Needs attention count is a cleaner measure of real IP risk than raw alert volume.
What to know before you switch it on
It only triages alerts from policies scoped to Exchange, Teams, OneDrive, SharePoint and devices. Alerts from the Copilot and inline web traffic policies – the AI routes above – are not triaged.
It ignores policies in simulation mode, so it adds nothing until a policy is turned on.
It analyses files up to 2 MB, and for alerts with 10 or more files it looks at the top 10 only. Device alerts need evidence collection for file activities turned on.
It looks back at most 30 days from the day it is enabled. Allow up to two hours for the first pass.
It runs on Security Copilot and consumes SCUs (Security Compute Units) in proportion to alert volume, so provision capacity and watch usage. It also needs Purview pay-as-you-go billing alongside per-seat DLP licensing.
Several capabilities are in preview. Confirm the current status in your tenant.
A practical sequence
Find what you have. Data explorer and Activity explorer show where existing SITs and labels already occur and how content moves, before any policy exists. DSPM shows the same through a risk lens, and an eDiscovery search for your custom SITs shows what is already sitting in mailboxes and sites.
Agree the crown jewels with the business. R&D, Legal and Product decide what counts as IP. Security cannot classify what nobody has defined.
Keep the label taxonomy short. Four or five labels people understand beat twelve they ignore.
Build classifiers per asset type, using the crown jewels table: custom SITs for identifiers, fingerprints for templates, EDM for structured lists, classifiers for the rest.
Test before you trust. Use the Test option on each SIT with samples that should and should not match, and check classifier predictions before publishing.
Auto-label in simulation first. Review what service-side auto-labelling would label before letting it apply encryption at scale.
Run DLP in simulation, then with policy tips, then block. Tips teach users what is sensitive; blocks without them generate tickets.
Switch on the Triage Agent once policies are live, with a custom instruction that puts Contoso IP first.
Review regularly. New projects need new codes, templates change, and classifiers drift as the business does.
Limits to know
Classification is never complete. Some IP will always be unlabelled and undetectable. Destination controls remain the backstop.
Encryption and detection pull in opposite directions. Encrypt too early and content classifiers go blind; rely on the label from that point.
Machine learning makes mistakes. Start classifier-based rules in audit or warn mode.
Licensing varies by method and location. Several capabilities in this post need E5, E5 Compliance or pay-as-you-go billing. Confirm against your own licence position before designing around them.
Features move quickly. Copilot and inline web traffic locations have changed repeatedly in 2026. Verify current behaviour in your tenant.
Wrapping up
Every control in this series is only as good as its ability to recognise what it is protecting. Destination controls decide where data can go; classification decides what the data is; DLP joins the two at every point data moves. For credentials and personal data Microsoft has done most of the classification work for you. For intellectual property, you have to do it yourself, with labels, custom SITs, fingerprints, EDM and classifiers layered together. Do that first, and every other control you have deployed starts to mean something.
In this post:why every licensed Microsoft 365 tenant should block credentials with Purview DLP, what a single leaked secret can lead to, a step-by-step build in the Purview portal, and a PowerShell script that deploys the same policy in one run.
Credentials end up in places they were never meant to be. A connection string pasted into a Teams chat to unblock a colleague. An API key in a config file uploaded to a project site. A service account password emailed to a contractor. Each copy outlives the conversation that created it - it is indexed, searchable, synced to devices and retained for years.
Secrets are different from most sensitive data. A leaked customer record exposes information; a leaked credential hands over access. Most secrets - storage keys, SAS tokens, client secrets, personal access tokens - are accepted on their own. There is no MFA prompt, no Conditional Access check and often no sign-in log to give the game away.
This policy belongs in every licensed tenant
There is no reason for any organisation whose Microsoft 365 subscription includes credential scanning sensitive information types not to have this policy configured and turned on. It costs nothing extra, takes minutes to deploy and protects every user in every Microsoft 365 workload. The risks in the table below make the case on their own.
Key risks of leaked credentials
Credential leaked
What an attacker gets
Business impact
Severity
User login credentials and passwords
Direct sign-in as the user, and often to other services where the password is reused
Account takeover and further phishing from a trusted mailbox
● Critical
Azure storage account key or SAS token
Read, write and delete access to the storage account data, with no MFA or Conditional Access check
Data theft, tampering, and deletion of data and backups held in storage
● Critical
Azure SQL connection string
Direct access to the database
Bulk exfiltration of customer and business data
● Critical
Client secret or API key
The ability to act as the application, with every permission it has been granted
Tenant-wide data access where the app holds broad Microsoft Graph permissions
● Critical
X.509 private key or management certificate
The ability to impersonate a service or authenticate as an app
Persistent access that survives user password resets
● Critical
GitHub personal access token
Source code, pipelines and the secrets stored in them
Supply chain compromise
● High
Slack, Google and other third-party tokens
Access to partner and SaaS platforms
Exposure that spreads beyond Microsoft 365
● High
Any of the above
A foothold for privilege escalation and lateral movement
Ransomware, and GDPR notification to the Data Protection Commission within 72 hours where personal data is put at risk
● Critical
Scenario: a phished mailbox
Picture a common incident. A finance user falls for a phishing email, an attacker steals their session token and gets into their mailbox. The first thing many attackers do with mailbox access is search it - for terms such as password, AccountKey= or connection string.
Now picture what they find: an email from eight months ago in which a developer sent an Azure Storage connection string to unblock a data upload. That single line contains the storage account name and its access key.
The key works on its own. No MFA, no Conditional Access, no sign-in risk policy stands between the attacker and the data.
The blast radius is the whole storage account. Every container, file share, queue and table in it can be read, altered or deleted.
It stays valid until someone rotates it. Resetting the phished user’s password and revoking their sessions does nothing to the key.
It may go unnoticed. Key-based access does not appear in Entra ID sign-in logs, and storage diagnostic logging is often not enabled.
A mailbox compromise that should have been contained to one user becomes a data breach. With this policy enforced, that email is blocked at the moment it is sent, so the key never lands in the mailbox for an attacker to find.
Existing secrets are still there. DLP stops new credentials being shared. It does not remove the ones already sitting in mailboxes, sites and chats - use the Data Security Posture Agent or a content search to find them, then rotate every one.
Why DLP is the right control
Secret scanning in code repositories and threat detection in Defender both matter, but neither stops a person sharing a secret in email or Teams. A Purview DLP policy acts at the moment of sharing, across the Microsoft 365 workloads where most collaboration happens, and applies whether the leak is careless or deliberate.
Blocking is not revocation. If the policy fires, the credential has already been typed or pasted somewhere. Treat every alert as a prompt to rotate the secret, not just as a blocked message.
Credential protection in 2026
Microsoft’s credential scanning sensitive information types (SITs) have been in Purview since 2022 (MC402123, roadmap 88941), with All Credential Types as the bundled detection. What has changed in 2026 is how much further Microsoft is taking credential detection:
Credential scanning in the Data Security Posture Agent (MC1259828). LLM-powered detection of exposed credentials, including Entra ID credentials, private keys and API tokens, across selected data locations, with risk scores and AI-generated insights. Public preview began in late March 2026; general availability is rolling out from early October to early November 2026.
SIT testing in DLP (MC1235742, February 2026). Upload a file of up to 2.5 MB and test it against one SIT or all of them before building a policy - a quick way to confirm your credential samples are detected.
The two work together. The posture agent finds credentials already sitting in your data estate; the DLP policy in this post stops new ones being shared. Roadmap dates move and features roll out in waves, so confirm availability in your own tenant.
The All Credential Types SIT
All Credential Types is a bundled SIT. Rather than matching a single pattern, it fires when any of its underlying credential SITs matches, using checksums or keyword and pattern combinations. Detections include:
Azure storage account access keys and shared access signatures
Azure Service Bus, Event Grid, SignalR and Function keys
Client secrets and API keys
Amazon S3 client secret access keys
GitHub personal access tokens, Google API keys and Slack access tokens
HTTP authorisation headers
X.509 certificate private keys
User login credentials and general passwords (English keywords only)
Prerequisites
Requirement
Detail
Licensing
Microsoft 365 E5, E5 Compliance or E5 Information Protection & Governance - required for credential scanning SITs
Purview role group
Compliance Administrator, Compliance Data Administrator, Information Protection Admin or Security Administrator - or a custom role group with DLP Compliance Management for least privilege
Alert recipients
Users, groups or mail contacts that already exist in the tenant. External addresses need a mail contact first
PowerShell (script only)
Windows PowerShell 5.1 or PowerShell 7, with ExchangeOnlineManagement 3.2.0 or later
Policy design
Setting
Value
Why
Policy name
Block Credentials and Secrets
Clear purpose in alerts and reports
Locations
Exchange, SharePoint, OneDrive, Teams
Where credentials are most often shared
Scope
All users (full directory)
Secrets leak from every team, not just IT
Condition
All Credential Types, Medium confidence, 1+ instances
Broad coverage with a sensible false-positive balance
Action
Block everyone
A secret shared internally is still a leaked secret
Select Create policy, then Enterprise applications & devices. Under Categories choose Custom, select Custom policy and then Next.
Step 3 - Name the policy
Name the policy Block Credentials and Secrets, add a description and select Next. On Assign admin units, leave Full directory and select Next.
Step 4 - Choose the locations
Make sure Exchange email, SharePoint sites, OneDrive accounts and Teams chat and channel messages are ticked. Untick Devices, Instances and On-premises repositories - the portal ticks these by default, and they need extra configuration this policy does not cover.
Step 5 - Add the credential condition
On Define policy settings, choose Create or customize advanced DLP rules and select Next. Select Create rule and name it Block credentials and secrets.
Under Conditions, choose Add condition > Content contains > Add > Sensitive info types, tick All Credential Types and select Add. Leave Medium confidence and an instance count of 1 to Any.
Step 6 - Block everyone
Under Actions, choose Add an action > Restrict access or encrypt the content in Microsoft 365 locations. The default is Block only people outside your organization - change it to Block everyone.
Step 7 - Configure alerts
Under Incident reports, set the severity to High, keep Send an alert to admins when a rule match occurs on, and use Add or remove users to add your security team. If you turn on email incident reports, leave out the matched and original content so the alert never carries the secret.
Step 8 - Turn the policy on
Select Save, then Next. On Policy mode, choose Turn the policy on immediately - the default is simulation mode. Select Next, review the summary and select Submit.
Allow up to an hour for the policy to sync to all four locations before testing.
Automating it with PowerShell
The companion script New-CredentialDlpPolicy.ps1 builds the same policy and rule in one run. It lists the required privileges and licensing before it starts, prompts for the tenant ID, admin UPN and alert recipients, and then:
Confirms the tenant ID exists, and that you signed in to that tenant, before changing anything
Checks your account holds DLP management permissions
Creates the policy and rule idempotently, with -WhatIf support and a confirmation before enforcing
Keeps the credential itself out of incident report emails
New-DlpCompliancePolicy-Name'Block Credentials and Secrets'`-ExchangeLocationAll-SharePointLocationAll`-OneDriveLocationAll-TeamsLocationAll-ModeEnableNew-DlpComplianceRule-Name'Block credentials and secrets'`-Policy'Block Credentials and Secrets'`-ContentContainsSensitiveInformation@{Name='All Credential Types';minCount='1';confidencelevel='Medium'}`-BlockAccess$true-BlockAccessScopeAll`-GenerateAlert'secops@contoso.com'`-GenerateIncidentReport'secops@contoso.com'`-IncidentReportContentTitle,DocumentAuthor,Service,Severity,RulesMatched`-ReportSeverityLevelHigh
Check the policy has synced:
Get-DlpCompliancePolicy-Identity'Block Credentials and Secrets'|Select-ObjectName,Mode,DistributionStatus
Testing and tuning
Use synthetic credentials only. A fake GitHub token or an Azure storage connection string with a made-up key is enough to trigger the rule. Never test with a live secret.
Validate detection first. Use the Test option under Sensitive info types to confirm your samples match before you send them.
Watch the signals. Check Data loss prevention > Alerts and Activity explorer after each test.
Tune General Password if it is noisy. It relies on English password keywords and is the most likely source of false positives. Raise the confidence level or handle it in a separate rule.
Rotate, then investigate. Every true positive means a secret has been exposed. Rotate it, then find out how it got there.
The script
The script is in the GitHub repository with its README. It contains no tenant-specific IDs.
Creates the Block Credentials and Secrets policy and rule, with tenant, permission and licensing checks
Wrapping up
A leaked credential is not a data protection problem waiting to happen - it is access already handed over. If your licensing includes credential scanning SITs, this policy should be on. It takes minutes in the portal or one run of the script, it covers every user across Exchange, SharePoint, OneDrive and Teams, and it turns the next pasted connection string from a breach into a blocked message and an alert.