Azure AD Combined security information registration

One of the glaring holes in the SSPR and MFA registration process was when bad actors that had compromised credentials could register for SSPR or MFA if the compromised account had not already registered.

One of my customers highlighted this to me and the way we overcame the vulnerability was to populate Active Directory with mobile numbers and through powershell force the authentication method to text message and not give an end user the choice.

Finally Microsoft have released a feature that can lock down the SSPR an MFA registration process to a corporate ip or ip ranges, the following slides show how we enable this in a conditional access policy.

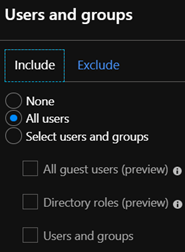
  1. Select all users and exclude the tenant Office365 admin breakglass account.
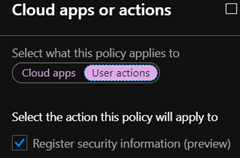
  2. Select cloud apps or actions and select the ‘Register Security information (preview)’ option.
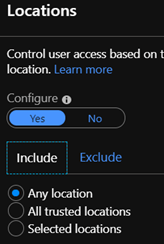
  3. In location select from any location
  4. Exclude all trusted locations
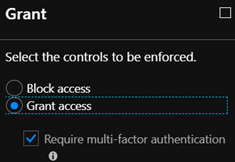
  5. In the controls section , Select ‘Grant Access’ and ‘Require multi-factor authentication.

Reference: https://techcommunity.microsoft.com/t5/Azure-Active-Directory-Identity/Conditional-access-for-the-Azure-AD-combined-MFA-and-password/ba-p/566348

Hybrid Azure AD Joined Devices

Anyone familiar with conditional access, will have noticed this access control in Conditional Access policies. So what does it mean , How can I enable this, Is this a good feature.

This is not a good feature, it is an excellent feature. The best way to describe this control requirement is as follows. DO NOT GRANT access unless the machine is DOMAIN JOINED. Many enterprise companies have corporate wifi rolled out and only permit access to the corporate wifi via credentials and a machine certificate issued by the local certificate authority.

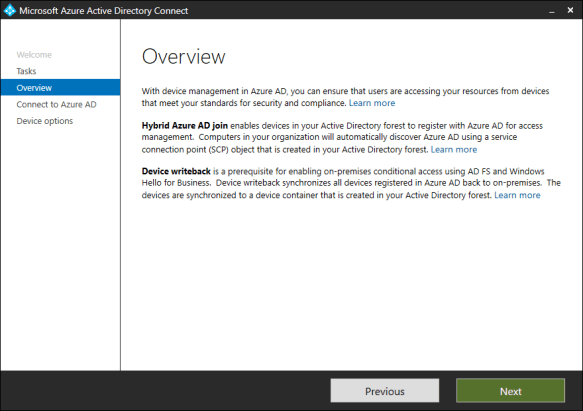
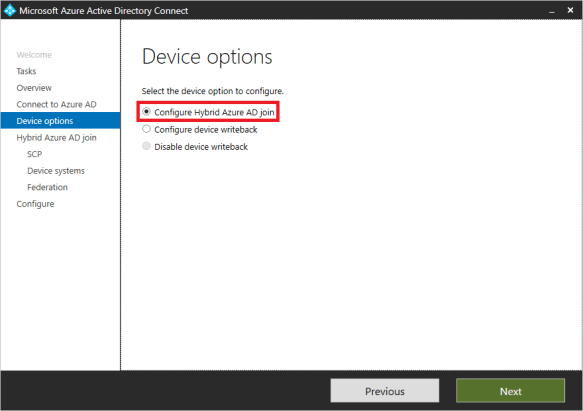
AD Connect keeps getting better and better and Microsoft have made it so easy to enable this feature. The following screenshots ill demonstrate how easy it is to enable this feature.

Modify the configuration of AD Connect and select ‘Configure Device Options’
Enter Azure AD Credentials
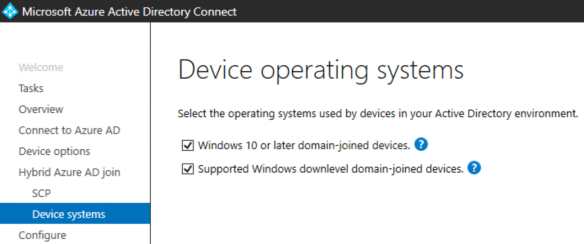
Note: Only select the second option ‘Supported Windows domain level domain-joined devices if you are using Azure Seamless Sign On, Azure Seamless Sign on provides the functionality to support Windows 7 and above operating systems.

Then enter enterprise admin on-premise credentials as per the image below.

Download and run the PowerShell script using on-premise enterprise admin credentials that AD Connect has prepared as per image above.

Next step is to follow this Microsoft Article : To enable auto enrollment of Windows Devices.

Now that we have enabled device auto enrollment into Intune, What are the benefits?

  • Intune Device Management – Intune can manage 5 devices per user license
  • Conditional Access Policy Control : Hybrid Azure AD objects
  • Intune – Bitlocker Management
  • Azure Dynamic Machine groups can be a useful method for managing global or large enterprise organisations.
  • Windows 10 Security Base Lines
  • Intune integration with Windows Defender ATP

These are just a small number of benefits , Open to comments on more benefits.

Update: 24.05.2019

Follow THIS Microsoft guide and block downloading from SharePoint Online on no domain joined devices

Azure Privileged Identity Management – Office365 Roles

Privileged Identity Management is an amazing new service that Microsoft has made available via the following licensing skus.

  • Enterprise Mobility + Security (EMS) E5
  • Microsoft 365 M5
  • Azure Active Directory Premium Plan

This blog post is related to Office365 roles.

I will create a new blog for using PIM with Azure resources, an example could be a workflow that requires financial approval to deploy virtual machines.

When I first set this up I followed the Microsoft guide lines but found it hard to understand how to start protecting privileged roles with PIM
This blog post will outline the steps required to manage some specific Office365 roles.

FIRST STEPS to enable Azure PIM 

Browse to this Microsoft Site – Getting started  with Azure PIM
Complete the following two sections
Enable PIM
Sign up PIM for Azure AD roles

It is critical for an Azure PIM administrator to be  a member of the ‘Privileged Role Administrator’ role so that the admin can assign users for eligibility to relevant roles.

Azure PIM sample use cases with Office365 

Global Administrator
License Administrator
Compliance Administrator ( This is probably the best use case for Azure PIM in Office365)
Exchange Administrator
Sharepoint Administrator
Service Administrator
(Office365 Premier Support tickets now need to be logged through the Office365 admin portal. Support staff only need this role and not global admin)

Add eligible users to privileged roles

The next steps will look at how we can make a user eligible for  privileged role access and some of the options available.

  1. Assigning  a user for eligibility to privileged roles, Browse to the manage section and select settings and then roles
  2. Select the roles that you want to assign eligible users to
  3. Select the options displayed in the image below and add approval users. Not all rules may require MFA enforcement. But some will, like the Global Admin or Compliance Admin Role.
  4. Add Approval Users
    Most admin accounts do not have a license and therefore have no mailbox and cannot receive a mail notification for a request to approve access. It is possible to add approval accounts to ‘Privileged Authentication Administrator’ role and this enables the approval hyperlink within email notification to be re-directed to the Azure PIM request approval portal and approve the request. When Azure Seamless sign on is enabled the approver is directed to the Azure PIM request portal with single sign on and the process can be very quick.

The next steps demonstrate an end user or external guest account requesting access to the Office365 licensing portal.

  1. The user requesting access would click on this URL
  2. The user will then be presented with an Azure page that he\she can request access to their eligible roles.
  3. Then click on the next Activation link
  4. Then fill in the details for the request and select activate
  5. This will then submit an email to a defined approval user, and the approval user will receive an email notification displayed in the image below
  6. The approval user will then be directed to the Azure PIM request portal and can then choose to approve or deny the request.

Auditing

The final section to note is – Azure PIM auditing  is excellent and when Azure PIM is enabled it will send out notifications when users privileges have been elevated in the Office365 portal or Office365 service like Exchange Online or Sharepoint Online. Once PIM is in place the only place roles should be elevated is in Azure PIM and never never use generic admin accounts.


Azure Information Protection Custom Labels & Protection

I recently rolled out AIP in one my customer sites and they presented me with an interesting challenge. One of their departments wanted the option to choose whether or not to classify and protect data.

This has been made possible with custom configurations to the AIP client. At the time of writing this post there are 18 items that have custom configurations available.
More info HERE

The next part of this blog is a step by step guide on how to set up a custom label that will recommend that the user apply the label, protection.

  1. Login to the Azure Information Protection portal in Azure and create  a new label as per the image below.
  2. Select Protect and accept defaults and add the users assigned to the label or Security Group, as per image below
  3. Add a keyword condition, as per image below
  4. Select the protect option , accept the defaults and add the users or security group that the label will apply to, as per image below
  5. Save the configuration changes, next we will create a policy.
  6. Create a policy, I always match the name of the label that the policy will apply to, add the users or security group and accept defaults except for one item. Change the selection to recommended as per the image below
  7. Add the new label created in the previous section and ensure default label remains set to none
  8. The final piece is to modify the advanced settings of the policy, as per the image below
  9. Use the values specified in the image below
  10. Attempting to save a word document with the keyword specified, prompts the user as follows, giving the user a recommendation and not enforcing protection or classification
  11. When attempting to send an email which the key word specified, a pop up is presented from the AIP client as per the image below.

Notes:

  • The Azure Information Protection custom features,  is currently in PREVIEW
  • Always use the latest version of AIP client
  • If the label is not appearing in the Windows client , It may be due to too many Modern Authentication tokens in credential manager. This is something that happened on my laptop due to connecting to multiple Office365 tenants.
  • I will post some new blogs on more custom options,custom sensitive information types & AIP scanner.
  • When data is protected in the sample label above, Only users that are specified in the label and policy will be able to access the data.
  • Always ensure users that the label and policy applies to have an AIP license.