

How to Deploy Office365ProPlus & OneDrive for Business Click to Run


When I first began to work with Office365 ProPlus click to run I couldn’t get my head around how to deploy Office in a software as a service model and to deploy it in bulk in Enterprise organisations.

It really is quite simple and I hope this post will help people to deploy Office365 ProPlus and OneDrive for Business with ease. 

So to create two distribution points for Office365 Pro Plus and OneDrive for Business we do the following.

Download the Office Deployment tool for Click to Run HERE
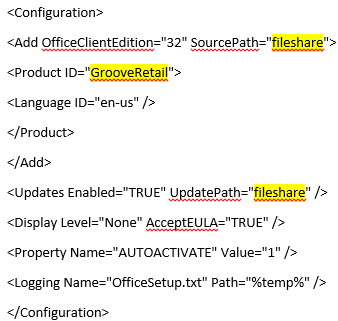
We then need to create a configuration file.

#This is the configuration file for OneDrive for Business which will be saved as odfb.xml
#This is the configuration file for Office365 ProPLus which will be saved as office.xml
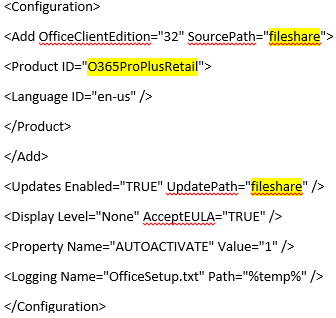
So we create a folder for each product that contains the Office Deployment tool and run the following command to download the source files.

#Office365 ProPlus
setup.exe /download office.xml

#OneDrive for Business
setup.exe /download odfb.xml

If you do not have Microsoft System Center Configuration Manager and want to deploy it via a batch file you could use a batch file like this.

@echo off
echo /******************************************
echo /* Installing Office 365
echo /******************************************
net use q: \\fileshare
q:
cd\
Setup.exe /CONFIGURE OFFICE.xml
c:
net use q: /delete /yes
pause

For people that are fortunate enough to have Microsoft System Center Configuration Manager. Here is a quick VIDEO on how to add Office365 ProPlus and OneDrive for Business into your Application Catalog.

Office365 WAAD not deleting filtered Organisational Units

If you you upgraded a Dirsync Server to the newer WAAD sync tool and the original configuration was syncing the full AD forest then when you upgrade to the newer version. You need to perform a full synchronisation with the complete AD Forest.
 
After the full sync completes , You can then filter the OU’s and they will be deleted from Syncing with Office365.
 
 
I recently had an issue whereby the objects in the OU’s that I had filtered were not getting removed from my Office365 tenant. So to resolve the issue , I performed the steps above.
 
Once complete , Run the powershell command below to clear out the Office365 recycle bin.
 
Get-MsolUser –all -ReturnDeletedUsers | Remove-MsolUser -RemoveFromRecycleBin -Force


Office365 Desktop Readiness & Server Patches/Utilities


Microsoft Office365 sign in assistant 

Microsoft Office 2013 Service Pack 1 x86

Microsoft Office 2013 Service Pack 1 x64

Microsoft Office 2010 Service Pack 2 x86

Microsoft Office 2010 Service Pack 2 x64

Microsoft Outlook 2010 SP2 February 2014 Cumulative Update

Microsoft Office 2007 Service Pack 3 x86

Microsoft Office 2007 Service Pack 3 x64

Microsoft Outlook 2007  Patch KB2596598

Microsoft Outlook 2007 Patch KB268704

Azure RMS Sharing Application

Lync2013 April 2014 Cumulative Update

Microsoft Exchange Server 2010 Service Pack 3

Microsoft Exchange Server 2010 Service Pack 3 Rollup 5

Windows Azure Active Directory Sync tool – 64 bit

IdFix DirSync Error Remediation Tool

Windows Azure Active Directory Module for Windows PowerShell (32-bit version)

Windows Azure Active Directory Module for Windows PowerShell (64-bit version) 

Windows Azure AD Rights Management Administration Tool

SharePoint Online Management Shell

Windows PowerShell Module for Lync Online

Microsoft Exchange Server 2013 Service Pack 1 (SP1)

Google Apps – Office365 email co-existence

I recently migrated a large Google Apps tenant to Microsoft Office365 (10k + users). Google require a verification code to set up forwarding to a user’s .onmicrosoft.com alias. Which means it is not possible to automate the forwarding from Google Apps to Office365.

So the way we enable co-existence is as follows.

Domain Name : Contoso.com 

  1. Add an alias domain into Google Apps. Relay.contoso.com. Google state that this can take up to 24 hours. I have seen it complete in 10 hours. This will add an alias to all Google Apps users  user@relay.contoso.com
  2. Export all Office365 user’s userprincipal names to a csv.
     
  3. Enable forwarding for all users in Office365 to their smtpaddress@relay.contoso.com. This is done by using the following powershell command in Exchange Online.
    Import-Csv “C:\Users\sofarrell\Desktop\RelayAddress.csv” | Foreach-Object{Get-Mailbox $_.DisplayName | Set-Mailbox -ForwardingSMTPAddress $_.MailAddress -DeliverToMailboxAndForward $true} -verbose
  4. When the last mailbox has migrated we then remove the forwarding and edit the delivertomailboxandforward value.
    Get-Mailbox | Set-Mailbox -ForwardingSmtpAddress $null -delivertomailboxandforward $false