Azure Privileged Identity Management – Office365 Roles

Privileged Identity Management is an amazing new service that Microsoft has made available via the following licensing skus.

  • Enterprise Mobility + Security (EMS) E5
  • Microsoft 365 M5
  • Azure Active Directory Premium Plan

This blog post is related to Office365 roles.

I will create a new blog for using PIM with Azure resources, an example could be a workflow that requires financial approval to deploy virtual machines.

When I first set this up I followed the Microsoft guide lines but found it hard to understand how to start protecting privileged roles with PIM
This blog post will outline the steps required to manage some specific Office365 roles.

FIRST STEPS to enable Azure PIM 

Browse to this Microsoft Site – Getting started  with Azure PIM
Complete the following two sections
Enable PIM
Sign up PIM for Azure AD roles

It is critical for an Azure PIM administrator to be  a member of the ‘Privileged Role Administrator’ role so that the admin can assign users for eligibility to relevant roles.

Azure PIM sample use cases with Office365 

Global Administrator
License Administrator
Compliance Administrator ( This is probably the best use case for Azure PIM in Office365)
Exchange Administrator
Sharepoint Administrator
Service Administrator
(Office365 Premier Support tickets now need to be logged through the Office365 admin portal. Support staff only need this role and not global admin)

Add eligible users to privileged roles

The next steps will look at how we can make a user eligible for  privileged role access and some of the options available.

  1. Assigning  a user for eligibility to privileged roles, Browse to the manage section and select settings and then roles
  2. Select the roles that you want to assign eligible users to
  3. Select the options displayed in the image below and add approval users. Not all rules may require MFA enforcement. But some will, like the Global Admin or Compliance Admin Role.
  4. Add Approval Users
    Most admin accounts do not have a license and therefore have no mailbox and cannot receive a mail notification for a request to approve access. It is possible to add approval accounts to ‘Privileged Authentication Administrator’ role and this enables the approval hyperlink within email notification to be re-directed to the Azure PIM request approval portal and approve the request. When Azure Seamless sign on is enabled the approver is directed to the Azure PIM request portal with single sign on and the process can be very quick.

The next steps demonstrate an end user or external guest account requesting access to the Office365 licensing portal.

  1. The user requesting access would click on this URL
  2. The user will then be presented with an Azure page that he\she can request access to their eligible roles.
  3. Then click on the next Activation link
  4. Then fill in the details for the request and select activate
  5. This will then submit an email to a defined approval user, and the approval user will receive an email notification displayed in the image below
  6. The approval user will then be directed to the Azure PIM request portal and can then choose to approve or deny the request.

Auditing

The final section to note is – Azure PIM auditing  is excellent and when Azure PIM is enabled it will send out notifications when users privileges have been elevated in the Office365 portal or Office365 service like Exchange Online or Sharepoint Online. Once PIM is in place the only place roles should be elevated is in Azure PIM and never never use generic admin accounts.


How to lock down Office365 Global Admin access with managements scopes.

I have not posted a blog entry in quite some time, I have been crazy busy working for my new employer Evros and busy with my kids. I hope this blog will prove useful to anyone out there that follows my blog and promise a lot Blog posting to follow focusing on data protection, advanced threat analytics and AZURE

To help describe why an enterprise would like to lock down global admin access, I would like to describe a typical enterprise organisation and scenario.

Contoso.com is an enterprise organisation that consists of 15 companies. 
Contoso.com is the root AD Forest of the organisation and all other companies have their own child domains.
Contoso.com is the head office of the organisation and are responsible for data protection and governance within the organisation.
AD Connect synchronizes the root forests and child domains.

Contoso would like to remove global admin privileges from ICT Admin staff in one of the organisation’s companies Fabrikam and grant the ICT admin staff some custom Exchange Online administration privileges. The Fabrikam ICT admin staff must also have the ability to log Office365 service requests.

The following steps are required to lock down the Fabrikam ICT staff access to Office365 as per Fabrikam’s parent company Contoso’s new security and data protection policies.

#####################Exchange Management Shell############################
####Create Management Scope
New-ManagementScope -Name “EO-FABRIKAM” -RecipientRestrictionFilter {customattribute10 -like “FABRIKAM“}
####All mail enabled objects  in the Fabrikam child domain will have the value ‘Fabrikam’ added to Active Directory attribute: Extenstionattribute10
####Create a Role Group
New-RoleGroup -Name “EO-FABRIKAM” -Roles “User Options”, “Address Lists”, “Distribution Groups”, “Team Mailboxes”, “Mail Recipients”, “Reset Password”, “Mail Recipient Creation”, “Message Tracking”, “Move Mailboxes”,”Migration”,”Retention Management”,”UM Mailboxes”, “UM Prompts” , “Unified Messaging”    -Members “EO Fabrikam Admins” -CustomRecipientWriteScope “EO-FABRIKAM” -ManagedBy “Organization Management”

####Note: When assigning the members to a security group. The security group must be a mail enabled security group.

####################Windows Azure Active Directory###########################
 

Function

Commandlet

Import CSV

$Users = Import-Csv “CSV PATH“

Assign Role

$Users | ForEach-Object {Add-MsolRoleMember -RoleMemberEmailAddress $_.UserPrincipalName -RoleName “Service Support Administrator”}

####Note: It is not possible to assign service administrator roles per security group

############################Summary####################################

Fabrikam ICT admins can access the Exchange Online Control Panel via this URL: https://outlook.office365.com/ecp
Fabrikam ICT admins can log Office365 service request via this URL:

#############################Next Steps##################################
The next steps would be to create similar management scopes and role groups for SharePoint Online and Skype for Business. (New Blog Post to Follow)
Once Contoso have locked down access for all the companies within their organisation the next step will be developing compliance and governance policies in the Security and Compliance center in Office365


Quest Powershell Script to change UPN for Office365

I normally use AD Modify to modify users’ UPNs. But it is only really practical when you are changing the UPN’s per OU. 

Lets say you were migrating from a different messaging platform , like Lotus Notes or GroupWise. But AD had the mailnickname attribute populated and the correct UPN added into your AD. To run the script you need to do the following

  • Create a csv mail.csv and place it in the root C:\mail.csv. The heading of the csv will be ‘mail’ and then all the mailnicknames like sean@contoso.com
  • On line 29 add in the distinguished name of the domain/forest scope
  • Create a folder C:\logs to analyse any errors
  • Watch out for ‘ which are acceptable characters in a smtp email address but unacceptable as a UPN in Office365.
  • The script can be downloaded HERE.
The author of the script is a colleague of mine Adam Smith

Converting Office365 Cloud Identities into Managed Identities

There are three core identity scenarios in Office365 as illustrated above. I created a previous blog post on how to covert cloud identities to federated identities which can be viewed HERE

To convert cloud identities to managed identities with password sync can be quite simple by changing the users UPN and also matching the user’s UPN with their primary smtp address.

However , How many time have you received the dreaded email from Microsoft like below

Sean
Ofarrell
Unable to update this object because the following attributes associated with this object have values that may already be associated with another object in your local directory services: [ProxyAddresses SMTP:sean.ofarrell@contoso.com]. Correct or remove the duplicate values in your local directory. Please refer to http://support.microsoft.com/kb/2647098 for more information on identifying objects with duplicate attribute values.

So you search active directory and exchange online for conflicts but cant find any which will probably drive you CRAZY. So here is how to fix it.

I will demonstrate how to fix it for one user
It is very important that WAAD is not running when running these powershell commands.

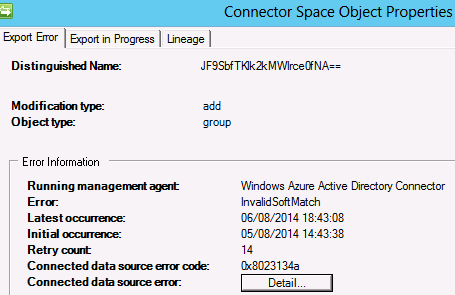
The image below is a synchronization error message from sean.ofarrell@contoso.com in WAAD

So to fix this we copy the distinguished name and run the following command.

set-MsolUser -UserPrincipalName sean.ofarrell@contoso.com -ImmutableID JF9SbfTKlk2kMWlrce0fNA==

Using Azure RMS with Office365