
Orphaned Exchange Online External Contacts preventing users account to sync to Exchange Online.

I recently had a problem with an Exchange Online tenant. There was an external mail contact which was previously synchronised from Active Directory to Exchange Online. So I had deleted the on-premise active directory mail contact but it still existed in Exchange Online. When I tried to delete the contact it gave the following errror message.

The action ‘Remove-MailContact’, ‘Identity’, can’t be performed on the object ‘Sean OFarrell ‘ because the object is being synchronized from your on-premises organization. This action should be performed on the object in your on-premises organization.

To trouble shoot this issue you can do a couple of things to ensure the external contact does not exist in your on premise Active Directory.

  1. Perform a custom search in ADUC: Search Syntax : proxyaddresses=SMTP:sean.ofarrell@contoso.com 
  2. Search the WAAD Mettaverse
  3. Run this command on the Exchange Onpremise management shell
    remove-mailcontact sean.ofarrell@contoso.com
So if after running all of the above steps you cannot find the external contact which is causing the issues. You do the following.
  1. In Exchange Online Run this command : get-mailcontact sean.ofarrell@contos.com | fl
  2. Take note of the attribute value: ExternalDirectoryObjectId
  3. In this example the externaldirectoryobjectid is 2cb3d9c7-cb29-439f-8174-6c80dd9fe6e8
  4. Then connect to Windows Azure Ad via Powershell and run this command
    get-msolcontact -objectid 2cb3d9c7-cb29-439f-8174-6c80dd9fe6e8 | remove-msolcontact
Problem solved. Now run a delta sync on your WAAD server and everything will work fine.
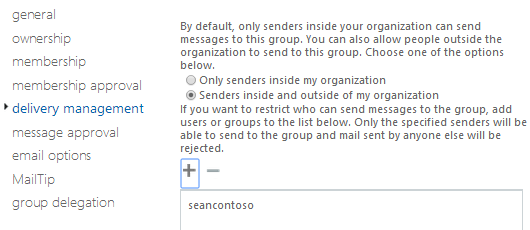

Exchange Online Distribution Group Delivery Management

I recently carried out a large migration and my customer had 700 Distribution Groups. My customer asked me to restrict delivery of emails to the groups by members only. So end users could not email the distribution group unless they were a member. 

So how do I do this for 700 users!! Powershell to the rescue.

Connect to Exchange Online via Powershell and run this command.

  1. Get-Distributiongroup | export-csv C:\users\disti.csv
  2. I then deleted all columns in the csv except for PrimarySmtpAddress and then renamed that column to distiname.
  3. Then run this command
    Import-Csv “C:\Users\sofarrell\Desktop\disti.csv” | Foreach-Object{get-distributiongroup $_.distiName | Set-distributiongroup -AcceptMessagesOnlyFromDLMembers $_.distiname}
  4. And then run this command
    Import-Csv “C:\Users\sofarrell\Desktop\disti.csv” | Foreach-Object{get-distributiongroup $_.distiName | Set-distributiongroup -AcceptMessagesOnlyFromSendersOrMembers $_.distiname}
Job done , Happy Customer.


Exchange Online Mailbox only has 25gb Storage Quota

Some of my customers mailboxes were still displaying 25gb as their mailbox storage quota size instead of 50gb. 


So the fix is quite simple.

Firstly connect to Exchange Online via Powershell.

1. Set-ExecutionPolicy unrestricted 

2. $LiveCred = Get-Credential 

3. $Session = New-PSSession -ConfigurationName Microsoft.Exchange -ConnectionUri https://ps.outlook.com/powershell/ -Credential $LiveCred -Authentication Basic -AllowRedirection 
4. Import-PSSession $Session
Then run the following CMDlet which will increase the size to 50gb for all user mailboxes:
Get-mailbox -resultsize unlimited | Set-Mailbox -ProhibitSendReceiveQuota 50GB -ProhibitSendQuota 49.75GB -IssueWarningQuota 49.5GB

Google Apps – Office365 email co-existence

I recently migrated a large Google Apps tenant to Microsoft Office365 (10k + users). Google require a verification code to set up forwarding to a user’s .onmicrosoft.com alias. Which means it is not possible to automate the forwarding from Google Apps to Office365.

So the way we enable co-existence is as follows.

Domain Name : Contoso.com 

  1. Add an alias domain into Google Apps. Relay.contoso.com. Google state that this can take up to 24 hours. I have seen it complete in 10 hours. This will add an alias to all Google Apps users  user@relay.contoso.com
  2. Export all Office365 user’s userprincipal names to a csv.
     
  3. Enable forwarding for all users in Office365 to their smtpaddress@relay.contoso.com. This is done by using the following powershell command in Exchange Online.
    Import-Csv “C:\Users\sofarrell\Desktop\RelayAddress.csv” | Foreach-Object{Get-Mailbox $_.DisplayName | Set-Mailbox -ForwardingSMTPAddress $_.MailAddress -DeliverToMailboxAndForward $true} -verbose
  4. When the last mailbox has migrated we then remove the forwarding and edit the delivertomailboxandforward value.
    Get-Mailbox | Set-Mailbox -ForwardingSmtpAddress $null -delivertomailboxandforward $false

PST Capture – no mailboxes found for exchange online

PST Capture 2.0 is a great tool from Microsoft and works really well when migrating PST files into Exchange Online. I recently had a problem when trying to select destination mailboxes , The solution is really simple. You need to get your tenant server name and you can do this by browsing to http://www.outlook.com/contoso.com and taking note of the server name and then entering it in the Exchange Online settings in PST capture as per the image below.


You can download PST Capture 2.0 HERE
PST capture requires Outlook 2010 x64
You can download Office 2010 x64 Service Pack 2 HERE
October 2013 Cumulative updates for Outlook 2010 can be downloaded HERE
Office365 Single Signin Assistant can be downloaded HERE