
Bulk activation of Office365 Users

When using DirSync and ADFS it can take a long time to activate thousands of users. So here is a really quick way of doing it.

Firstly HERE is a great article on msexchangeguru.com on dirsync filtering. So there are plenty of organisational units in Active Directory that do not need to be syncronised to Office365.

So I always filter the OU’s that are synchronized to Office365.

Within the organisation section of the Office365 portal make your external domain which has been verified the default domain.

Ensure all user’s have the correct User Principal Names as per one of my previous BLOGS 

So once all the user’s have been synced to Office365 , they need a license assigned to them.

So connect to Office365 via the Windows Active Directory Module for Windows Powershell and do the following.

connect-msolservice # and enter an Office365 Global Administrator’s credentials.

Get-MsolAccountSku  # this will tell you what office365 skus are available. For this example it will be EXCHANGESTANDARD


As all of the users are currently unlicensed , we will set a location for the users as per the command below and the location will be us.

Get-MsolUser -UnlicensedUsersOnly |Set-MsolUser -UsageLocation US

Then we will add a mailbox for all the users that were synced and we can do so with the following command.

Get-MsolUser -UnlicensedUsersOnly | Set-MsolUserLicense -AddLicenses “Contoso”:EXCHANGESTANDARD

Now all the users have a mailbox and can start using Exchange Online 🙂

Office365 ADFS 2.0 with full SQL Server

As per my previous post about DirSync for Enterprise organisations , We also need to install ADFS farms into SQL clusters for high availability and scalability. So below are the steps to install ADFS 2.0 into a SQL Cluster.

In this example on how to set this up for the purposes of this demo , Please take note of the following items.

Domain:contoso
ADFS Server : adfs.contoso.local
SQL Cluster: sqlclus
ADFS Service Account: contoso\adfs
ADFS Service Name: signin.contoso.com

  1. Download and install ADFS 2.0 RTW which you can download HERE The ADFS 2.0 installer installs the pre-requisites required for the software.
  2. Do not open the ADFS configuration wizard after the install has complete, Download and install ADFS 2.0 Rollup 3 which you can download HERE 
  3. Now get your trusted ssl certificate for your adfs service name ‘signin.contoso.com‘ and bind it to the default site. I always remove any http bindings for the default website on your adfs lan server.
  4. In certificate manager. Right Click on the trusted certificate ‘signin.contoso.com‘ and select all tasks\manage private keys and then add the contoso\adfs service account permissions ‘Full Control & Read’
  5. From a command prompt with elevated privileges make this the current directory  C:\Program Files\Active Directory Federation Services 2.0\
  6. Now we are ready to create the ADFS farm and we do so with the following command

    FSConfig.exe CreateSQLFarm /ServiceAccount “contoso\adfs” /ServiceAccountPassword “password” /SQLConnectionString “database=AdfsConfigurationServer;server=sqlclus;integrated security=SSPI” /port 443 /FederationServiceName “signin.contoso.com” /CleanConfig /AutoCertRolloverEnabled

    And you will see the following output from the command prompt window

  7. Ideally the lan adfs servers will be load balanced , If you need to use a sql cluster for your adfs deployment then there is a good chance the customer will have load balancers like F5, Netscaler or Kemp.My preference would be Kemp.So there will be a virtual ip for the ADFS Service name ‘signin.contoso.com‘
  8. To enable kerberos authentication to Outlook Wep App and Sharepoint , place the https://signin.contoso.com into the intranet settings in Internet explorer for clients via group policy.
  9. ADFS proxy servers will be in a DMZ or else TMG Servers can also act as adfs proxy servers and will point at the loadbalanced ‘signin.contoso.com‘ vip in the lan. 
  10. Cloudfloor DNS provide GEO dns routing. So for example they can direct traffic from iso country codes to a location of choice. For example us adfs requests can hit us adfs servers. Irish requests can hit Irish adfs servers etc… So a service like this can take care of the external load balancing.
  11. So now we have all this done , time to federate the onpremise domain name ‘contoso.com‘ with our Office365 tenant.
  12. Before we do this we need to ensure we have done the following.
    A: Verify ownership of contoso.com
    B:Activate Active Directory Synchronisation
    C: Download and install the Microsoft Single Sign in Assistant HERE
    D: Once the Single Signin Assistant has been installed , Download and install the Windows Azure Directory Module for Powershell HERE
  13. Now we are ready to run the commands to federate ‘contoso.com‘ with Office365 and we will do so with the following command
    $cred=Get-Credential

    Connect-MsolService –Credential $cred

    Set-MsolAdfscontext -Computer
    adfs.contoso.local  # then enter contoso\adfs credentials
     
    Convert-MsolDomainToFederated –DomainName contoso.com -SupportMultipleDomain
  14. You might have only one domain, But I always recommend using the -SupportMultipleDomain switch as it can future proof your adfs service. For example your customer could acquire a company.
  15. Finally we want to brand our ADFS Proxy pages with company logos and here is a great blog posting by Laurent Bel on how to customise the ADFS 2.0 login page HERE
  16. So now that we have created our first ADFS Server to connect to a SQL Cluster , How do we add more ADFS servers. We do so with the following command as per the original ADFS server setup.

    FSConfig.exe joinSQLFarm /ServiceAccount ‘contoso\adfs‘ /ServiceAccountPassword ‘password‘ /SQLConnectionString “database=AdfsConfigurationServer;server=sqlclus;integrated security=SSPI” 


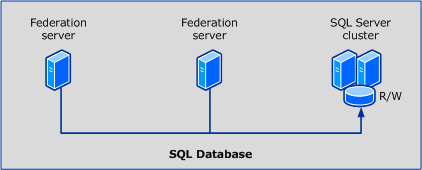
The term “primary federation server” does not apply when the AD FS configuration database is stored in a SQL database instance because all federation servers can equally read and write to the AD FS configuration database that is using the same clustered SQL Server instance, as shown in the following illustration 

I have not installed ADFS 2.1 on Windows Server 2012 into a SQL Cluster yet but I think it would be the exact same process. I will be doing this on a project coming up shortly and will create a new blog post for this. 

I hope people find this blog posting useful as it took me quite a bit of time to get ADFS right when I first started working with ADFS.

Sean 

Intsall DirSync into full SQL

Installing Dirsync is a requirement for enterprise directory synchronisation’s. When I say enterprise  i mean , directories with over 50,000 active directory objects or users. By using full sql server as apposed to the standard sql express , we can also make the database highly available via SQL clustering.

So to install it requires some small steps.

1. Open a command prompt with elevated privileges and make the directory where the dirsync.exe installation file is located the current directory. Then run this command ‘dirsync /fullsql’

2. This will install Dirsync without the standard SQL Express.

3. Next ,  browse to C:\program files\Microsoft Online Directory Sync\DirSyncInstallShell and follow the install syntax in this Microsoft Article 


4. Make Sure you are installing into a minimum of Server 2008R2 SP1 ideally SP2

5. IDFIX is a great utility recently released from Microsoft to troubleshoot DirSync errors which you can download HERE

SMTP relay to Office365

Microsoft have an article on how to setup smtp relay to Office365 KB2600912


An example of why would you would need this is whereby you need to continue to scan to email from your on-premise multi function printer.

Another way of doing this is by relaying through your isp’s smtp outbound mail server. For example UPC’s outgoing mail server is ‘smtp.upcmail.ie‘

But if you are using the new exchange online (tenant version 15) then it will get processed as spam.

So to fix this you simply need to create a rule, So below I will show some screenshots in whitelisting  scanner@contoso.com

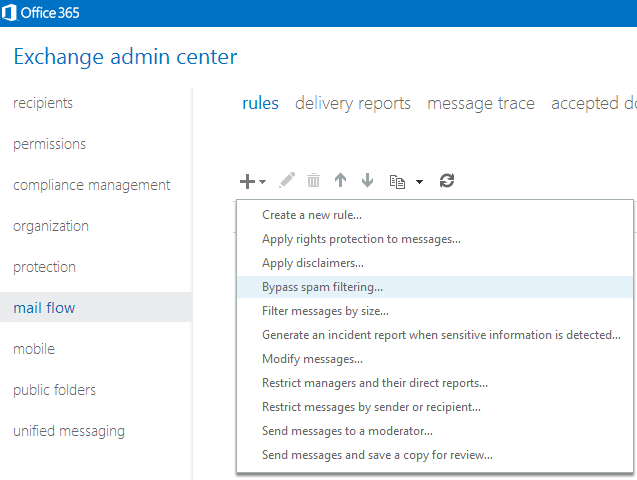
So you need to login to https://portal.microsoftonline.com  and in the top right hand corner , select exchange management.

Then go to mail flow and add a new rule as per the image below, selecting the bypass spam filtering rule template.

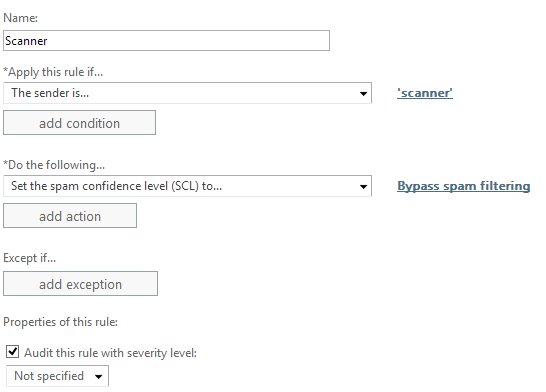
Then specify the sender as ‘scanner@contoso.com’ with the default options.


Now you can receive your scan to email documents 🙂

Office 365 Support for Windows Server 2012


I recently installed an ADFS Server farm on Windows Server 2012 but when I tried to federate to Office365 via the Microsoft Onlien Services Powershell Module it would not work!


The reason for the error is that in ADFS 2012 the cmdlets are surfaced by a module instead of a snapin, and the MSOnline cmdlets are hardcoded to load the old snapin which was available in ADFS 2.0. You can work around this issue by creating your own reference in the registry to the ADFS module as a snapin.
To do so, copy and paste the items below into notepad and save them as a .reg file and then execute.


Windows Registry Editor Version 5.00

[HKEY_LOCAL_MACHINE\SOFTWARE\Microsoft\PowerShell\1\PowerShellSnapIns\Microsoft.Adfs.PowerShell]
“ApplicationBase”=”C:\\Windows\\ADFS”
“Version”=”6.2.9200.0”
“AssemblyName”=”Microsoft.IdentityServer.PowerShell, Version=6.2.0.0, Culture=neutral, PublicKeyToken=31bf3856ad364e35”
“Description”=”This powershell snap-in contains cmdlets used to manage Microsoft Identity Server resources.”
“PowerShellVersion”=”1.0”
“ModuleName”=”C:\\Windows\\ADFS\\Microsoft.IdentityServer.PowerShell.dll”
“Vendor”=”Microsoft”

You can now use Windows Server 2012 for Single Sign on to Office365 🙂

Please note :  This solution is not supported by Microsoft. It is my understanding that a new Microsoft online services powershell module will be available for download when the new Office365 is generally available in Q1 of next year.