Bulk Uploading Mailboxes to Exchange Online and assigning licenses


Microsoft have made it really easy to perform bulk migrate migrations and assign licenses in Exchange Online.

You can export a csv and use it twice. The first csv will have the following headings

emailaddress
sean.ofarrell@contoso.com
ciaran.ofarrell@contoso.com
dean.jones@contoso.com
tecnicalfellow@contoso.com 

You can then upload the file then via the following option in Exchange Online 


And then to assign the licenses use the same csv but change the top heading to userprincipalname like below

userprincipalname
sean.ofarrell@contoso.com
ciaran.ofarrell@contoso.com
dean.jones@contoso.com
tecnicalfellow@contoso.com 

Connect to Office365 via the Windows Azure Active Directory Module for Windows PowerShell and do the following.


# First of all paste in the following variables

$AccountSkuId = “contoso:EXCHANGESTANDARD”
$UsageLocation = “IE”

# The paste the command in below with the correct CSV file path

$Users = Import-Csv “C:\Users\contoso\Desktop\Scripts\Import_users.csv”
$Users | ForEach-Object {
Set-MsolUser -UserPrincipalName $_.UserPrincipalName -UsageLocation $UsageLocation
Set-MsolUserLicense -UserPrincipalName $_.UserPrincipalName -AddLicenses $AccountSkuId
}

And if you wanted to assign Exchange Online P2 Licenses then run the following commands,

# First of all paste in the following variables

$AccountSkuId = “contoso:EXCHANGEENTERPRISE”
$UsageLocation = “IE”

# The paste the command in below with the correct CSV file path

$Users = Import-Csv “C:\Users\contoso\Desktop\Scripts\Import_users.csv”
$Users | ForEach-Object {
Set-MsolUser -UserPrincipalName $_.UserPrincipalName -UsageLocation $UsageLocation
Set-MsolUserLicense -UserPrincipalName $_.UserPrincipalName -AddLicenses $AccountSkuId
}

If you are using waad and want to assign a user with a P2 license an archive then you need to populate the AD attribute for the user “msExchRemoteRecipientType’ and change the value to 3. This can be done in bulk via ADMODIFY or Powershell
Replacing TMG with IIS ARR for an Exchange Hybrid

On September 12th 2012 Microsoft announced that the TMG Forefront 2010 product will be discontinued. Microsoft obviously had to replace this product with alternatives. 
One of those products is the Web Application Proxy feature in Microsoft Windows Server 2012 R2   Web Application Proxy Deployment Guide 
Another product which was was released was Microsoft Application Request Routing 3.0 
This product plugs into IIS and can act as a reverse proxy to publish Exchange 2013/2010.
The Exchange Team Blog have a three part article on how to set it up and install it
Part 1 , Part 2 , Part 3 

There is an excellent Article on the Office365 community site on how to configure TMG 2010 for an Exchange Hybrid scenario.

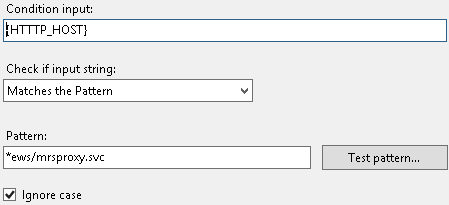
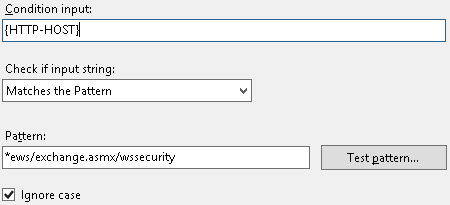
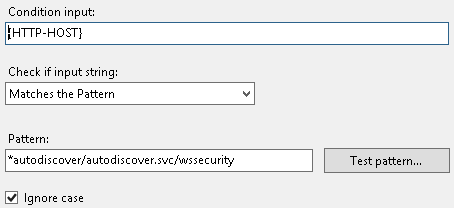
And the key paths that require publication from the Hybrid Server are 
  • /ews/mrsproxy.svc
  • /ews/exchange.asmx/wssecurity
  • /autodiscover/autodiscover.svc/wssecurity
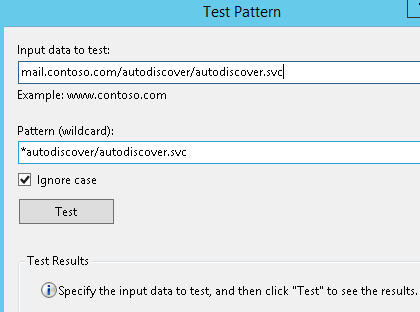
  • /autodiscover/autodiscover.svc
So how do we get these paths working in IIS ARR?????

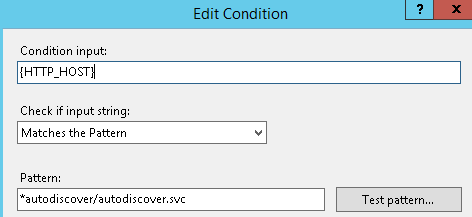
The following 4 images are how we add the paths into the https url re-write section of IIS ARR


And then finally to test the path you enter the public url as per the image above mail.contoso.com/autodiscover/autodiscover.svc and when we press test.
GREEN LIGHTS APPEAR 🙂 

The main purpose of this blog was to help people understand how to get different path types into IIS ARR as it took me a bit of time to configure. A server 2012 R2 server can be provisioned in minutes in the right environment. Publishing Exchange Hybrid services like this from a DMZ is in line with Microsoft Best Practices.

Orphaned Exchange Online External Contacts preventing users account to sync to Exchange Online.

I recently had a problem with an Exchange Online tenant. There was an external mail contact which was previously synchronised from Active Directory to Exchange Online. So I had deleted the on-premise active directory mail contact but it still existed in Exchange Online. When I tried to delete the contact it gave the following errror message.

The action ‘Remove-MailContact’, ‘Identity’, can’t be performed on the object ‘Sean OFarrell ‘ because the object is being synchronized from your on-premises organization. This action should be performed on the object in your on-premises organization.

To trouble shoot this issue you can do a couple of things to ensure the external contact does not exist in your on premise Active Directory.

  1. Perform a custom search in ADUC: Search Syntax : proxyaddresses=SMTP:sean.ofarrell@contoso.com 
  2. Search the WAAD Mettaverse
  3. Run this command on the Exchange Onpremise management shell
    remove-mailcontact sean.ofarrell@contoso.com
So if after running all of the above steps you cannot find the external contact which is causing the issues. You do the following.
  1. In Exchange Online Run this command : get-mailcontact sean.ofarrell@contos.com | fl
  2. Take note of the attribute value: ExternalDirectoryObjectId
  3. In this example the externaldirectoryobjectid is 2cb3d9c7-cb29-439f-8174-6c80dd9fe6e8
  4. Then connect to Windows Azure Ad via Powershell and run this command
    get-msolcontact -objectid 2cb3d9c7-cb29-439f-8174-6c80dd9fe6e8 | remove-msolcontact
Problem solved. Now run a delta sync on your WAAD server and everything will work fine.

Exchange Online Distribution Group Delivery Management

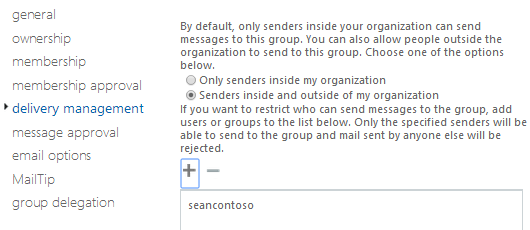
I recently carried out a large migration and my customer had 700 Distribution Groups. My customer asked me to restrict delivery of emails to the groups by members only. So end users could not email the distribution group unless they were a member. 

So how do I do this for 700 users!! Powershell to the rescue.

Connect to Exchange Online via Powershell and run this command.

  1. Get-Distributiongroup | export-csv C:\users\disti.csv
  2. I then deleted all columns in the csv except for PrimarySmtpAddress and then renamed that column to distiname.
  3. Then run this command
    Import-Csv “C:\Users\sofarrell\Desktop\disti.csv” | Foreach-Object{get-distributiongroup $_.distiName | Set-distributiongroup -AcceptMessagesOnlyFromDLMembers $_.distiname}
  4. And then run this command
    Import-Csv “C:\Users\sofarrell\Desktop\disti.csv” | Foreach-Object{get-distributiongroup $_.distiName | Set-distributiongroup -AcceptMessagesOnlyFromSendersOrMembers $_.distiname}
Job done , Happy Customer.


Exchange Online Mailbox only has 25gb Storage Quota

Some of my customers mailboxes were still displaying 25gb as their mailbox storage quota size instead of 50gb. 


So the fix is quite simple.

Firstly connect to Exchange Online via Powershell.

1. Set-ExecutionPolicy unrestricted 

2. $LiveCred = Get-Credential 

3. $Session = New-PSSession -ConfigurationName Microsoft.Exchange -ConnectionUri https://ps.outlook.com/powershell/ -Credential $LiveCred -Authentication Basic -AllowRedirection 
4. Import-PSSession $Session
Then run the following CMDlet which will increase the size to 50gb for all user mailboxes:
Get-mailbox -resultsize unlimited | Set-Mailbox -ProhibitSendReceiveQuota 50GB -ProhibitSendQuota 49.75GB -IssueWarningQuota 49.5GB