Raising a genuine Defender alert and incident on the lab device, without real malware.
With the lab onboarded, we need something for Defender to react to: an alert and an incident we can isolate on in Part 3. The trick is to generate a real detection that is also safe and repeatable.
Why not just run Mimikatz
The obvious move is to run a real tool such as Mimikatz. In practice that is awkward and beside the point. Defender does its job and quarantines the tool before it runs, so the session turns into a fight with your own defences instead of a demonstration of the response. Anyone who has tried to run an attack simulation on a protected machine knows the feeling.
For a repeatable walkthrough, and for anyone following along at home, benign and purpose-built triggers are the professional choice. We use two. The EICAR test file is the industry-standard string that every antivirus engine recognises as a test. Microsoft also publishes an endpoint detection test, a benign download-and-execute pattern that raises an EDR alert. Both produce a genuine alert and incident, and neither involves real malware.
The detection script
Invoke-DetectionTest.ps1, in the companion repo, does two things: it writes the EICAR string (assembled at runtime, so the script file itself is not quarantined) and it runs Microsoft documented detection test. Run it from an elevated PowerShell session on the lab VM.
# writes the EICAR test file, then runs the Microsoft detection test
.\Invoke-DetectionTest.ps1
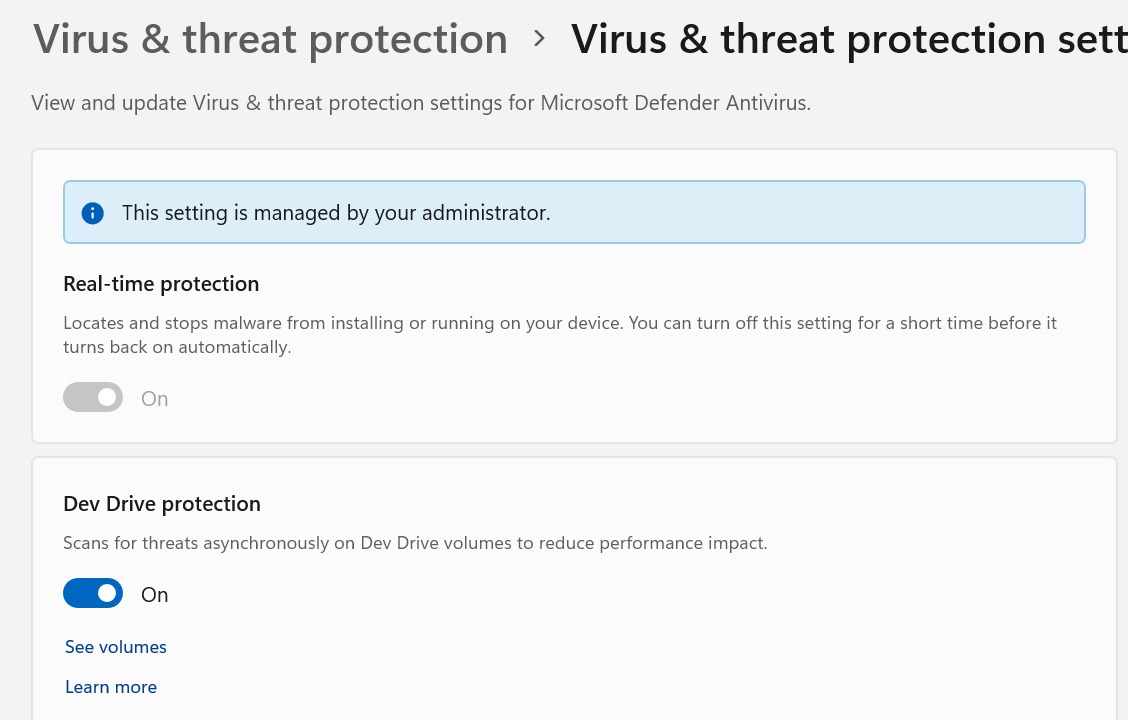
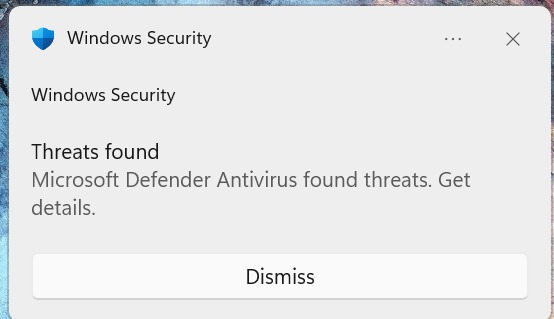
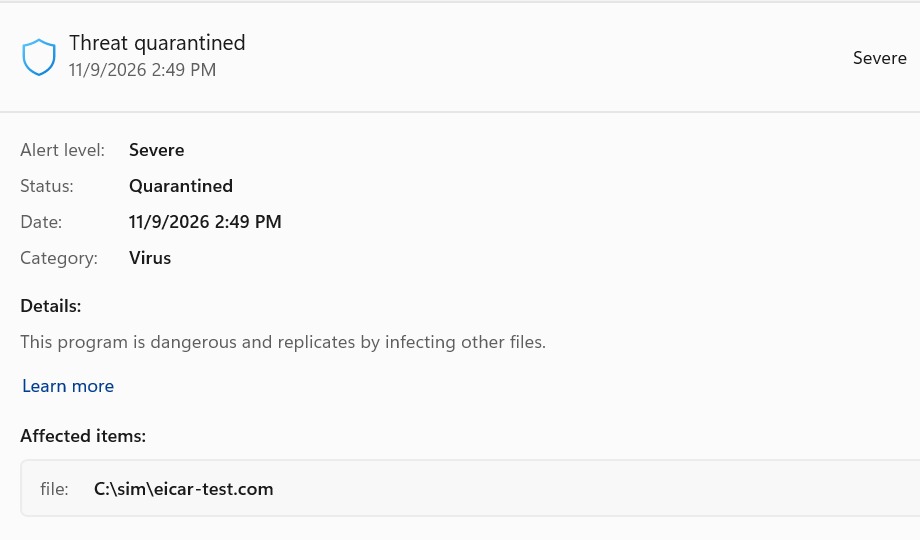
Windows Security – real-time protection on and managed by policyMicrosoft Defender – Threats found notificationProtection history – EICAR test file quarantined
When nothing fires
On the first run the EICAR file wrote to disk and nothing happened, which is worth dwelling on because it is exactly the situation a responder meets in the field. Real-time protection was on, confirmed on all four counts:
Two things explained it. The PowerShell session was not elevated, so the exclusions could not even be read (“Must be an administrator to view exclusions”), a reminder to triage from an elevated session. And an on-demand scan caught the file immediately:
The wider lesson is the one every responder learns the hard way: a forgotten exclusion, or a quiet gap in coverage, is exactly why a real threat sometimes never raises an alert. Checking Get-MpPreference exclusions belongs in your triage, not just your lab notes.
Re-running the test for this post hit the same trap. C:\sim had been added as an exclusion during the credential theft work and was never removed, so the EICAR file sat on disk untouched. Removing it with Remove-MpPreference -ExclusionPath ‘C:\sim’ brought back the toast and the quarantine straight away. Lab exclusions drift just like production ones – review them before you trust a quiet result.
The incident in the portal
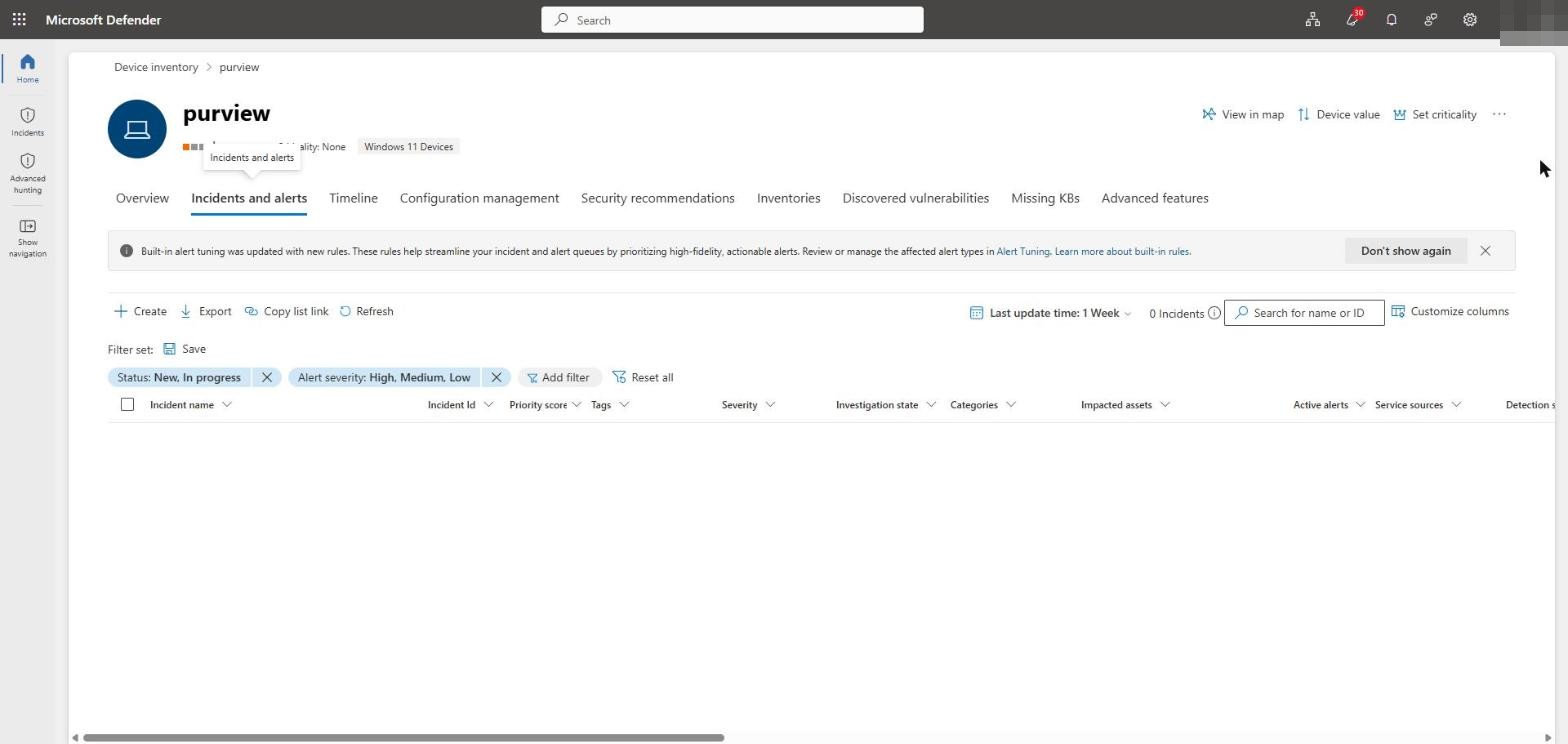
Before the test, the device queue was clean, which makes the new detection easy to spot.
Device incidents – clean baseline
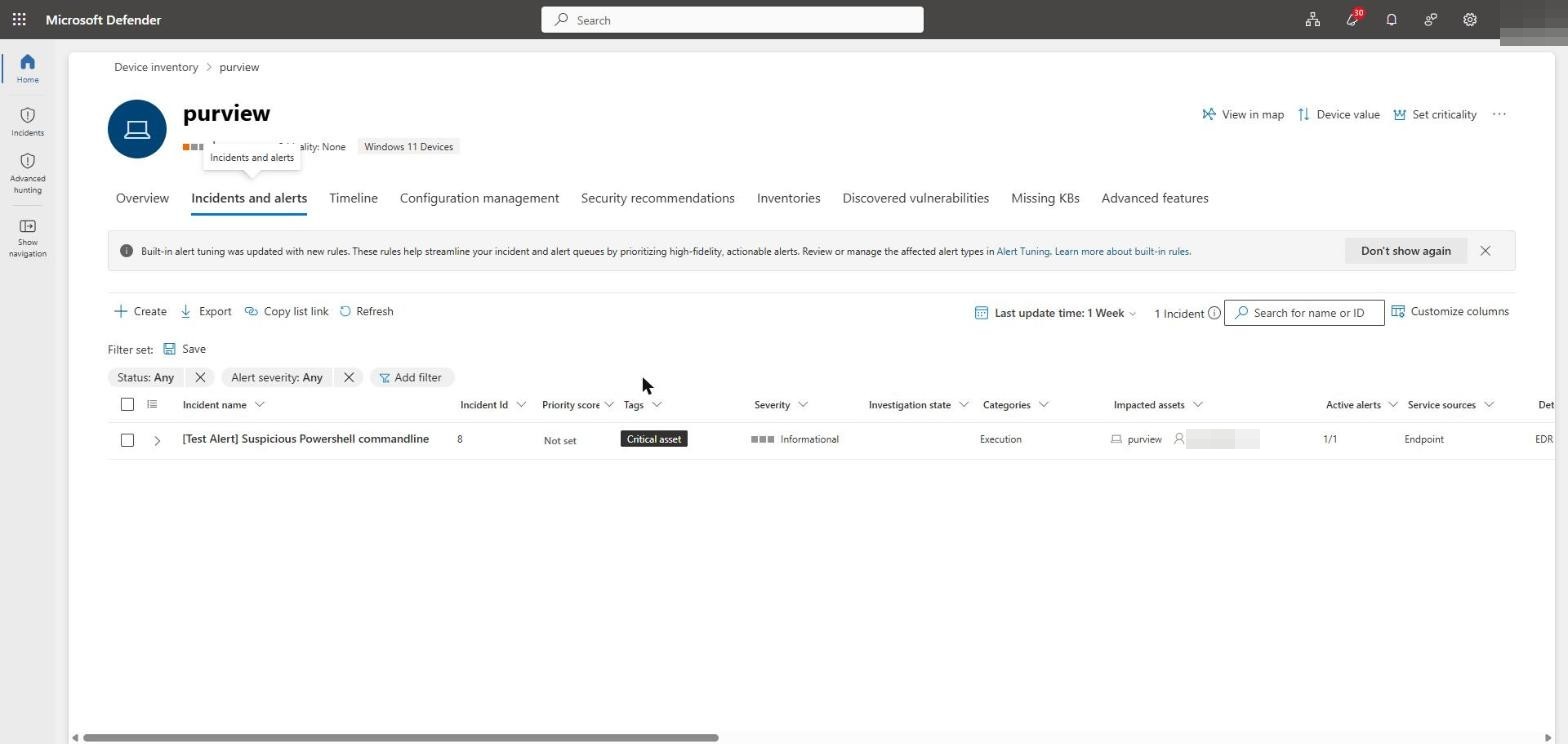
Within a minute the device carried a new alert and a new incident.
Device incidents – new incident
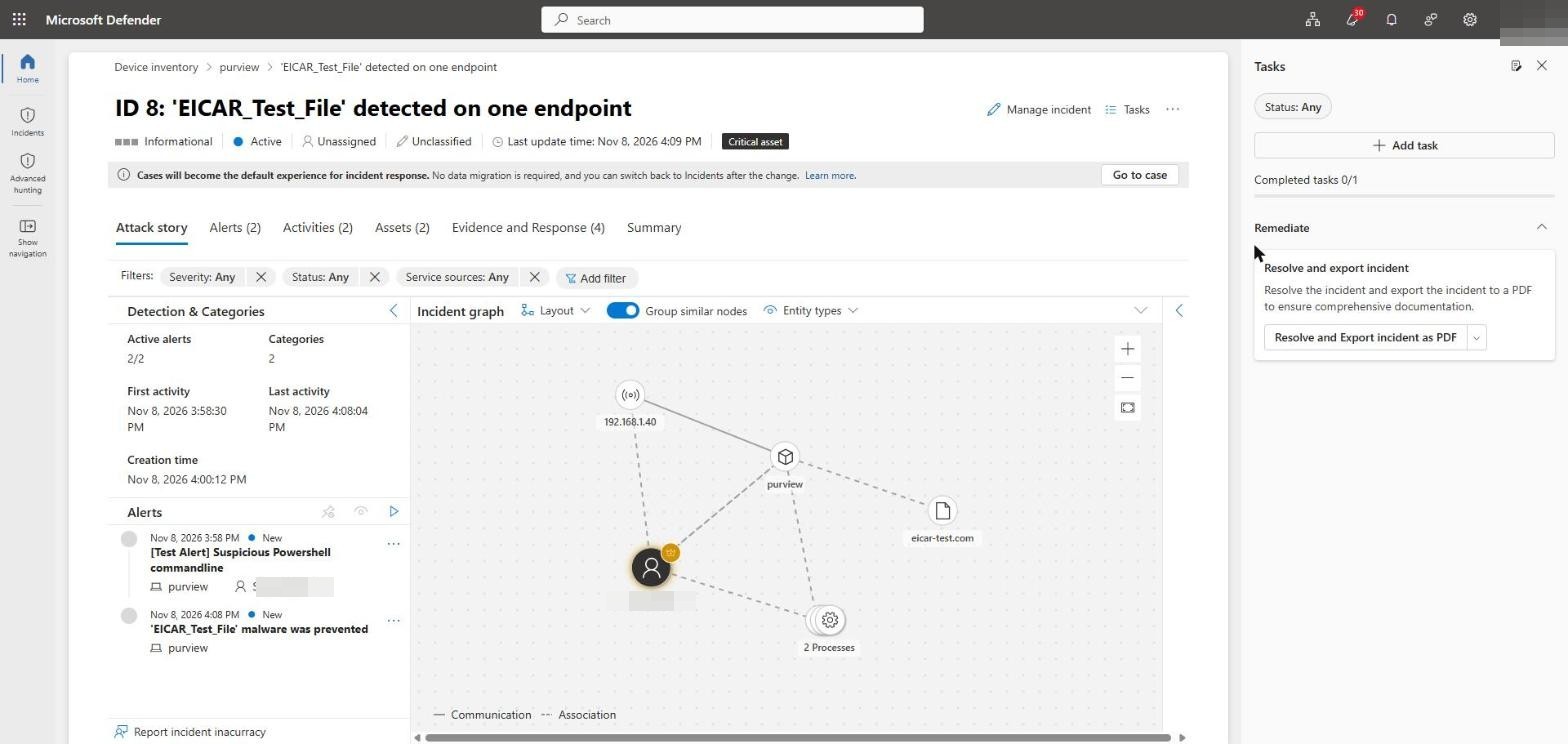
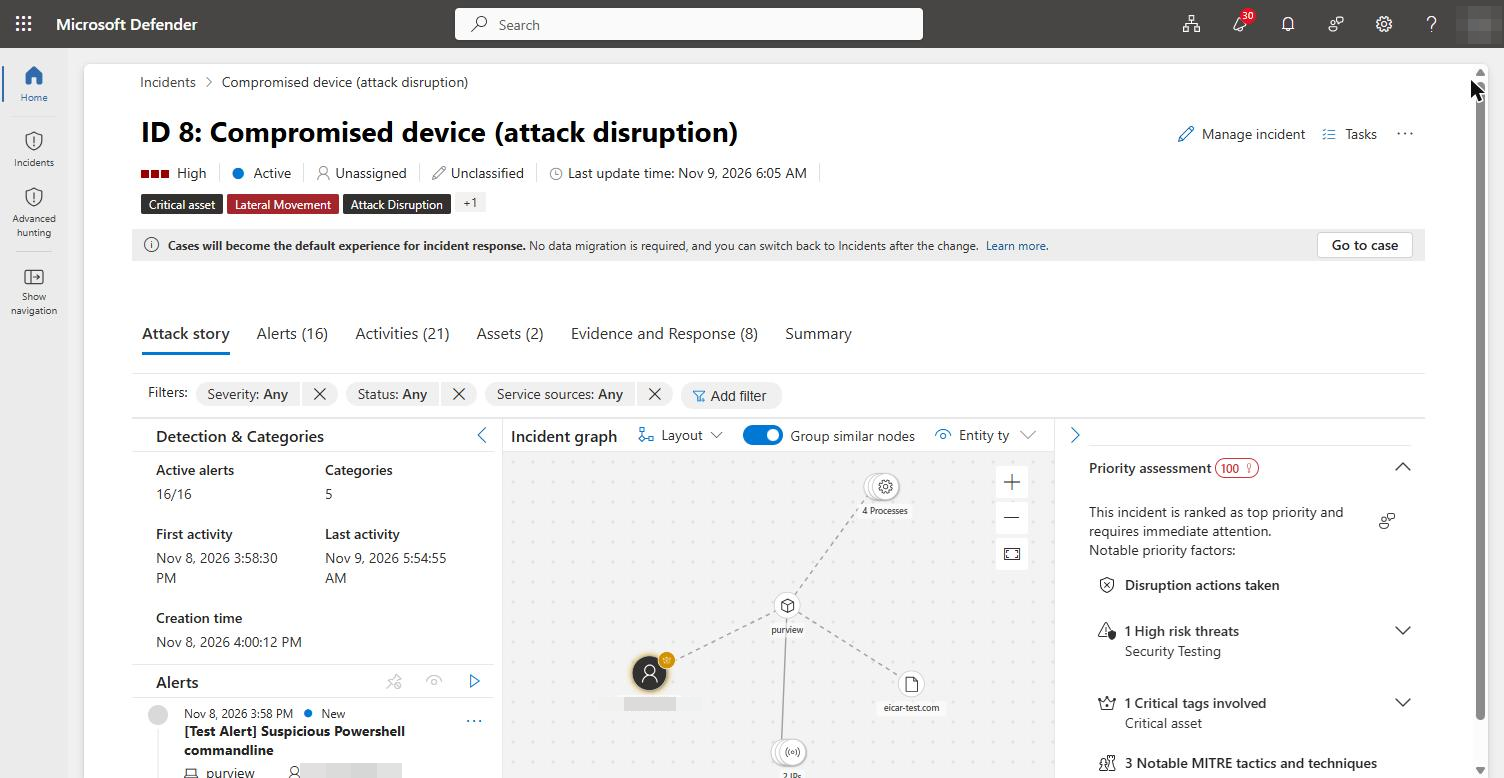
Defender correlated both triggers into a single incident, “EICAR_Test_File detected on one endpoint”, with two alerts (the EICAR detection and a suspicious PowerShell command line) and a full attack graph tying the device, the user, the test file and the processes together. That correlation is the point: one benign script, one coherent incident to respond to.
Incident attack story and graph
Hunting the activity
The same story is available in Advanced hunting. The companion repo includes three queries for this stage: the alerts and their evidence, the antivirus detections, and the credential-theft-style command lines. Set the DeviceNameFilter at the top of each query and run them.
Next
We now have a genuine incident on a healthy, onboarded device. Part 3 isolates that device and remediates it through Live Response, and drops our Remote Desktop session in the process.
Containing a compromised device and remediating it over the one channel the attacker cannot touch.
Part 2 left us with a genuine incident on the lab device. Now we contain it. Device isolation is the response most teams have never actually run, and it is worth understanding what it does before you reach for it in anger.
Isolation is the attacker’s own tactic, turned around
Attackers routinely cut off normal access to a device – disabling Remote Desktop, changing firewall rules, locking out administrators – while they keep their own foothold through a channel nobody is watching. Device isolation is the defender doing exactly that to the attacker. It severs the device from the network so the attacker loses their path in, while the SOC keeps one privileged, out-of-band channel: Live Response. Part 4 shows the attacker’s version of this; here we do it deliberately.
Isolating the device
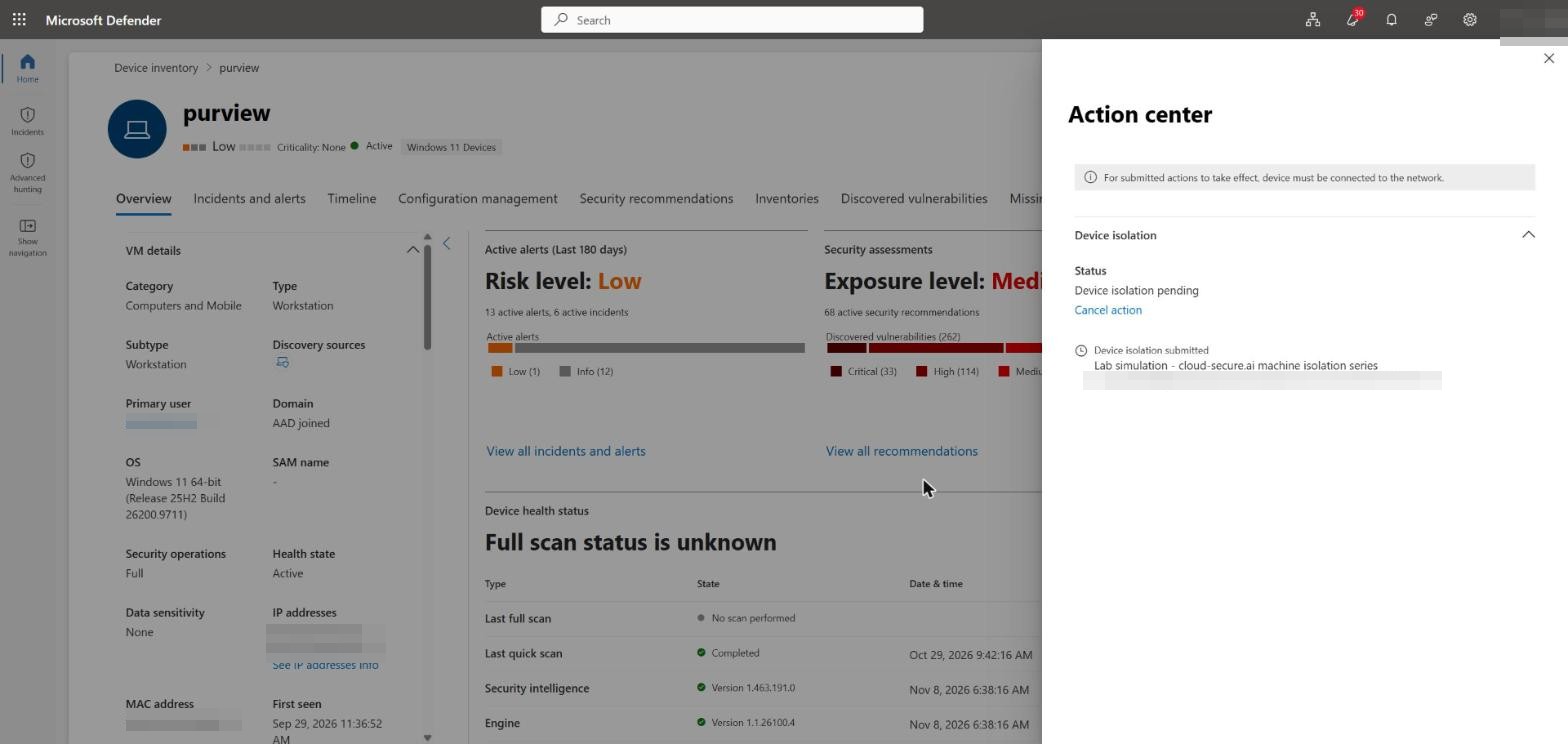
From the device page, choose Isolate device. Keep it a full isolation – do not tick “Allow Outlook, Teams and Skype”, which would leave those paths open. Add a comment for the audit trail and confirm.
Action centre – isolation pending
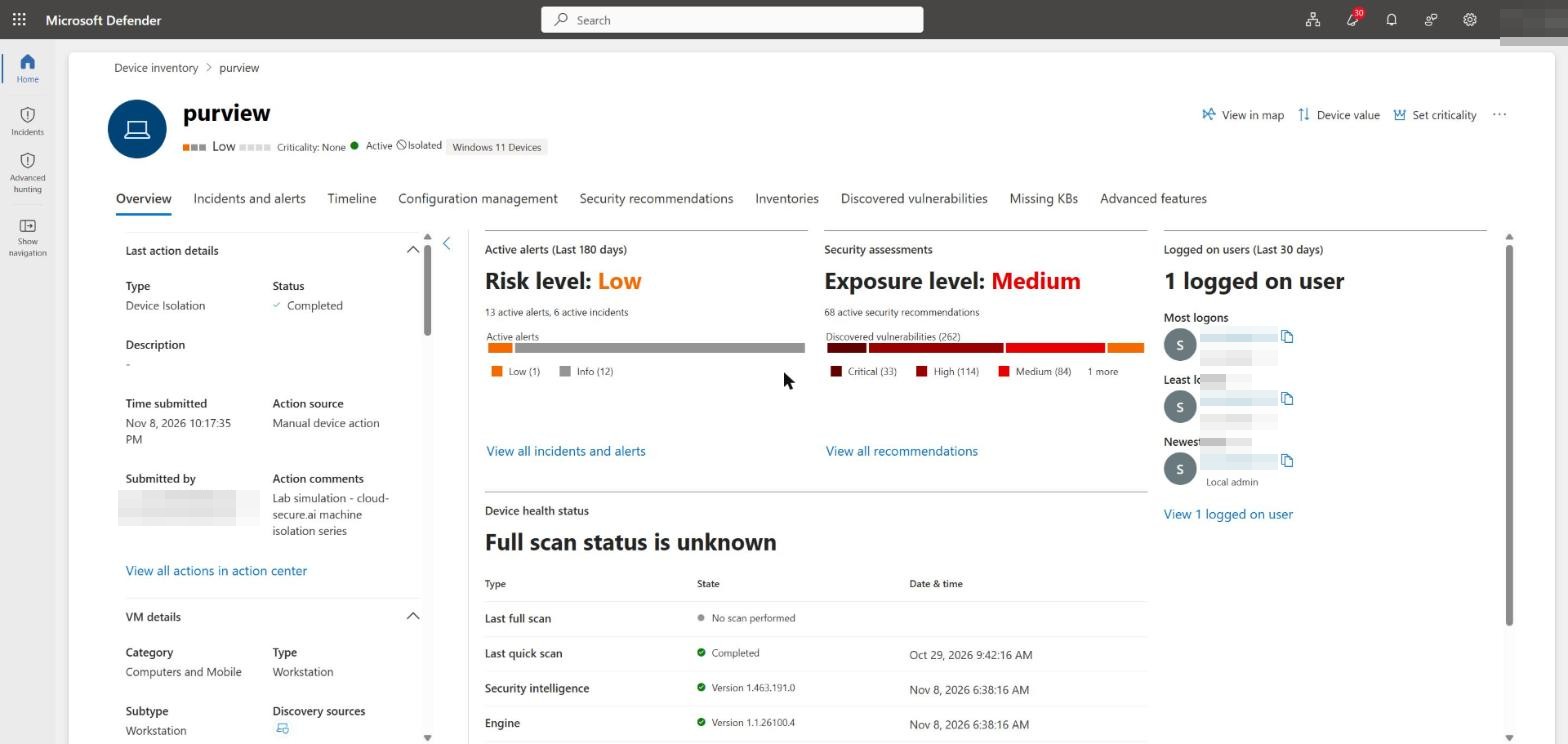
The action moves from pending to completed, and the device carries an Isolated badge. From this point the device can only reach the Defender service.
Device page – Isolated, action completed
Access goes dark
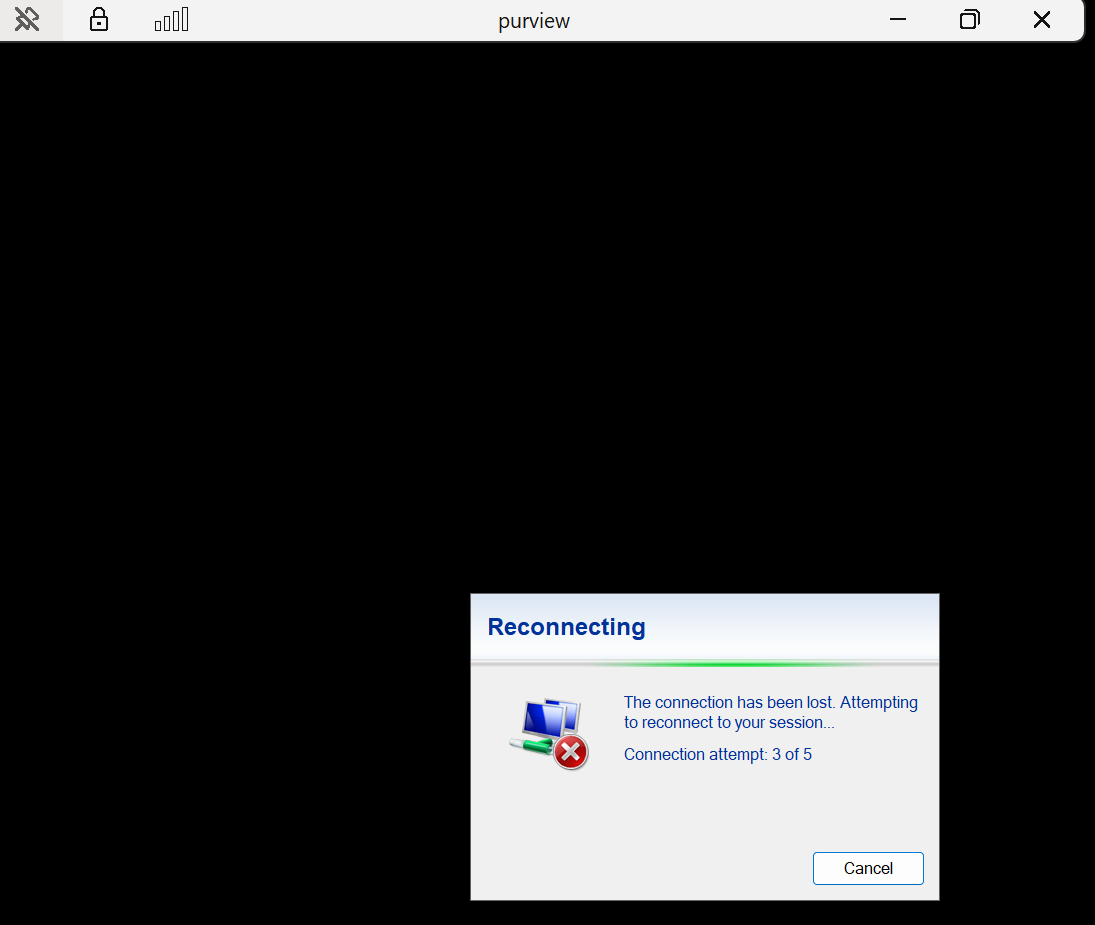
Being in Azure does not keep the device reachable. Within seconds of the isolation taking effect, the Remote Desktop session drops and will not reconnect. Bastion and every other inbound path go the same way.
RDP working, before isolationRDP connection lost after isolation
This is where the out-of-band view set up in Part 1 earns its place. The Azure boot diagnostics screenshot shows the device is alive and running, just unreachable – which an on-premises laptop could never show you.
Insert your Azure boot diagnostics console screenshot here.
Investigating over the isolated channel
Isolation keeps the device connected to the Defender service, so a Live Response session still works. From the device page, start Live Response – it connects even though nothing else can reach the box.
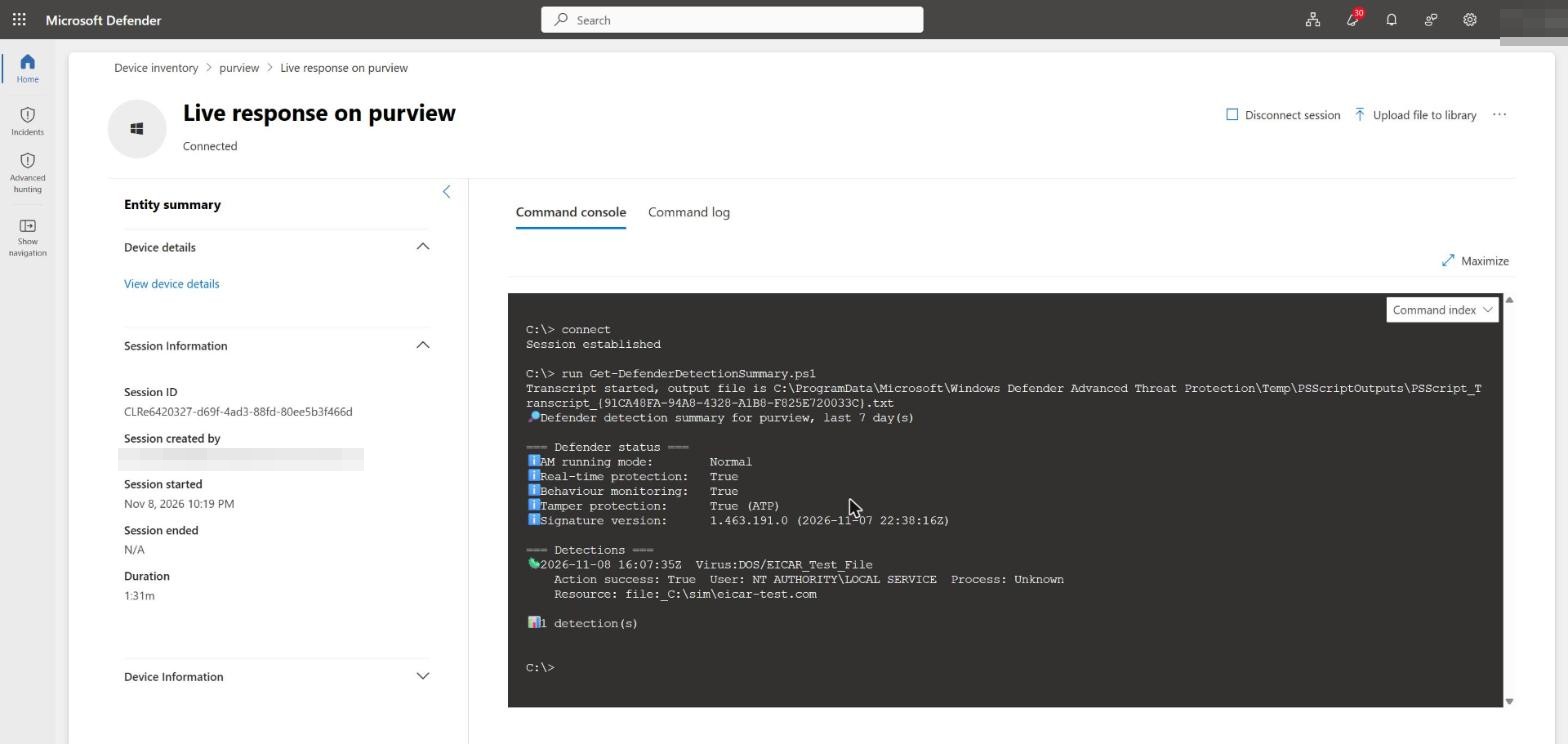
The scripts staged to the library in Part 1 are ready to run. Get-DefenderDetectionSummary.ps1 pulls the device’s protection state and recent detections, including the one from Part 2, from a device with no other network path.
Live Response – detection summary on the isolated device
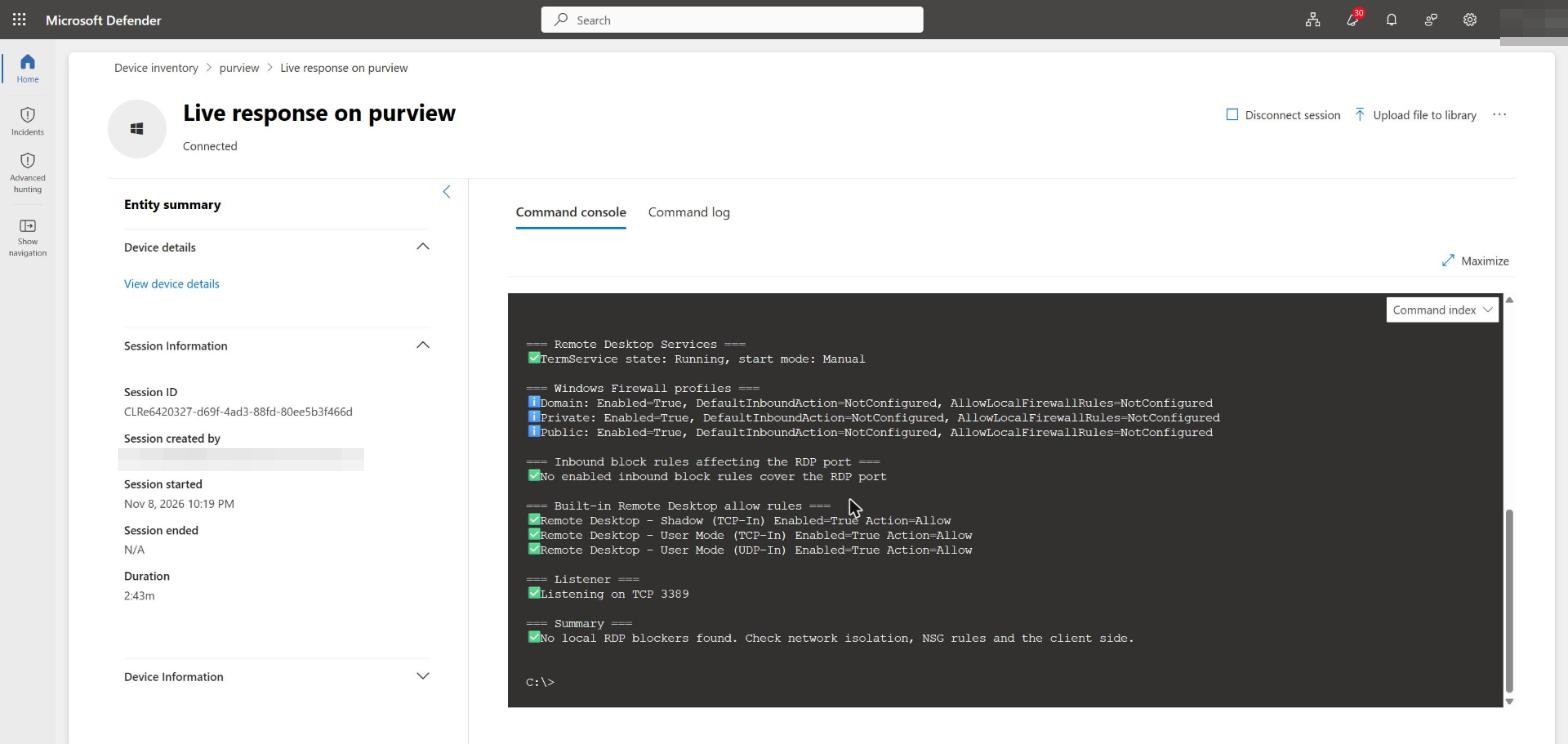
Get-RdpLockoutState.ps1 is worth running here too, because of what it does not find: no local blockers. The RDP failure is purely the network isolation, with nothing wrong on the device itself. Hold that thought – Part 4 is the mirror image.
Live Response – no local RDP blockers (isolation only)
Remediate, then release
Once the investigation is done and the device is clean, release it from the device actions menu with a comment. The network path returns and Remote Desktop reconnects. The whole arc – isolate, investigate over Live Response, release – takes minutes and never requires physical or network access to the machine.
Next
Part 4 turns this around: the attacker locks the device out of Remote Desktop locally, with the device still on the network, and we recover it over the same Live Response channel.
When the device is on the network but locked out locally, Live Response is the way back in.
Part 3 was the defender cutting a device off deliberately. Part 4 is the attacker’s version: blocking Remote Desktop on the device itself – firewall rules and a registry change – to lock administrators out while keeping their own foothold. The device stays on the network the whole time, which is exactly what makes Live Response the recovery route.
The lockout technique
Two changes lock a Windows device out of Remote Desktop:
An inbound firewall rule blocking the RDP port.
The fDenyTSConnections registry value set to 1, which disables Remote Desktop and tears down the listener.
Neither is covered by tamper protection. Tamper protection guards Defender’s own settings – virus and threat protection, real-time protection, behaviour monitoring – and not the Windows Firewall or the Remote Desktop registry. So a local administrator, or an attacker who has become one, can apply both with tamper protection fully on. The lab script Invoke-RdpLockoutSimulation.ps1 makes exactly these changes, and refuses to run without an explicit confirmation switch.
Insert your -WhatIf preview and the real lockout run from the VM here.
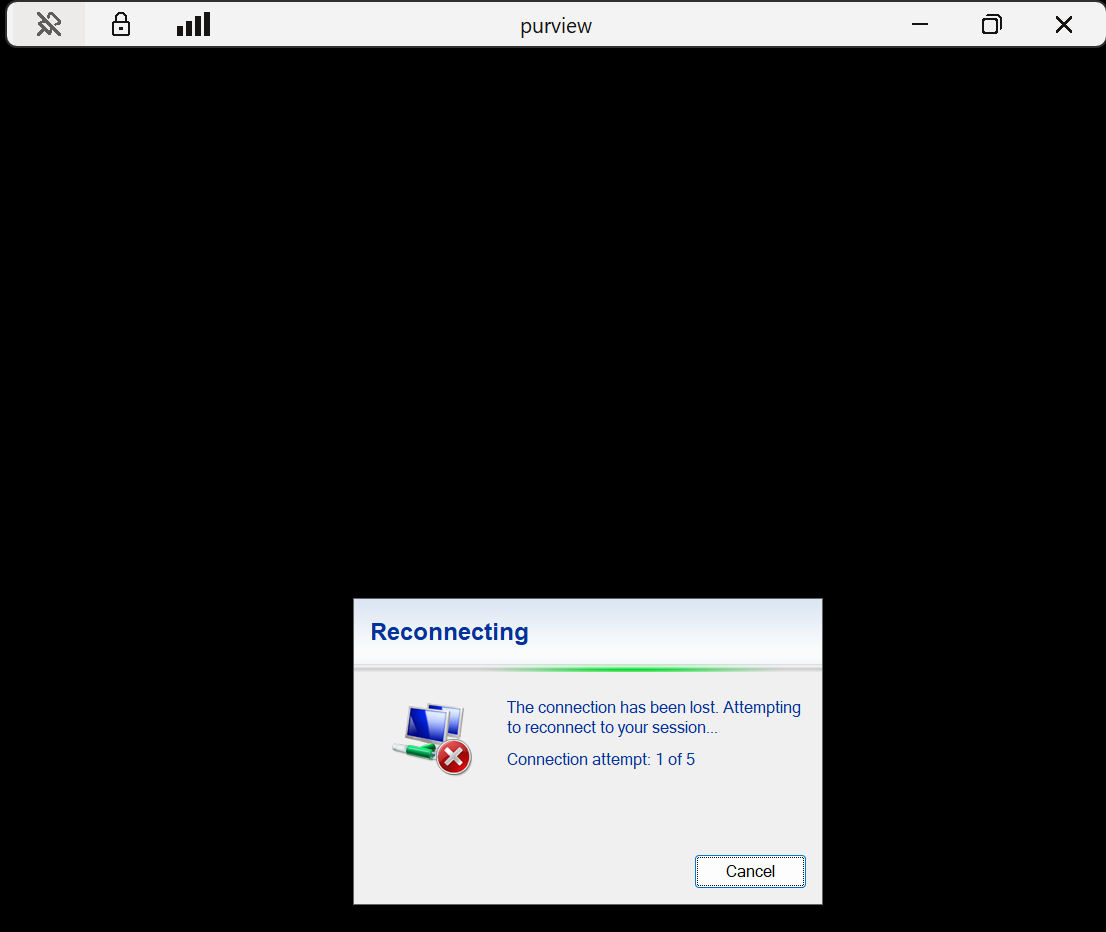
Running it from an elevated session enables the firewall, adds the block rule and sets fDenyTSConnections to 1. The Remote Desktop session drops on that last step.
RDP lost after the local lockout
The crucial difference from isolation
The device is not isolated. It is still on the network, still reporting to Defender – it is just locked out locally. The Defender sensor talks outbound to the service, which the inbound RDP block does not affect, so a Live Response session connects normally. That is the whole recovery route.
Finding the blockers
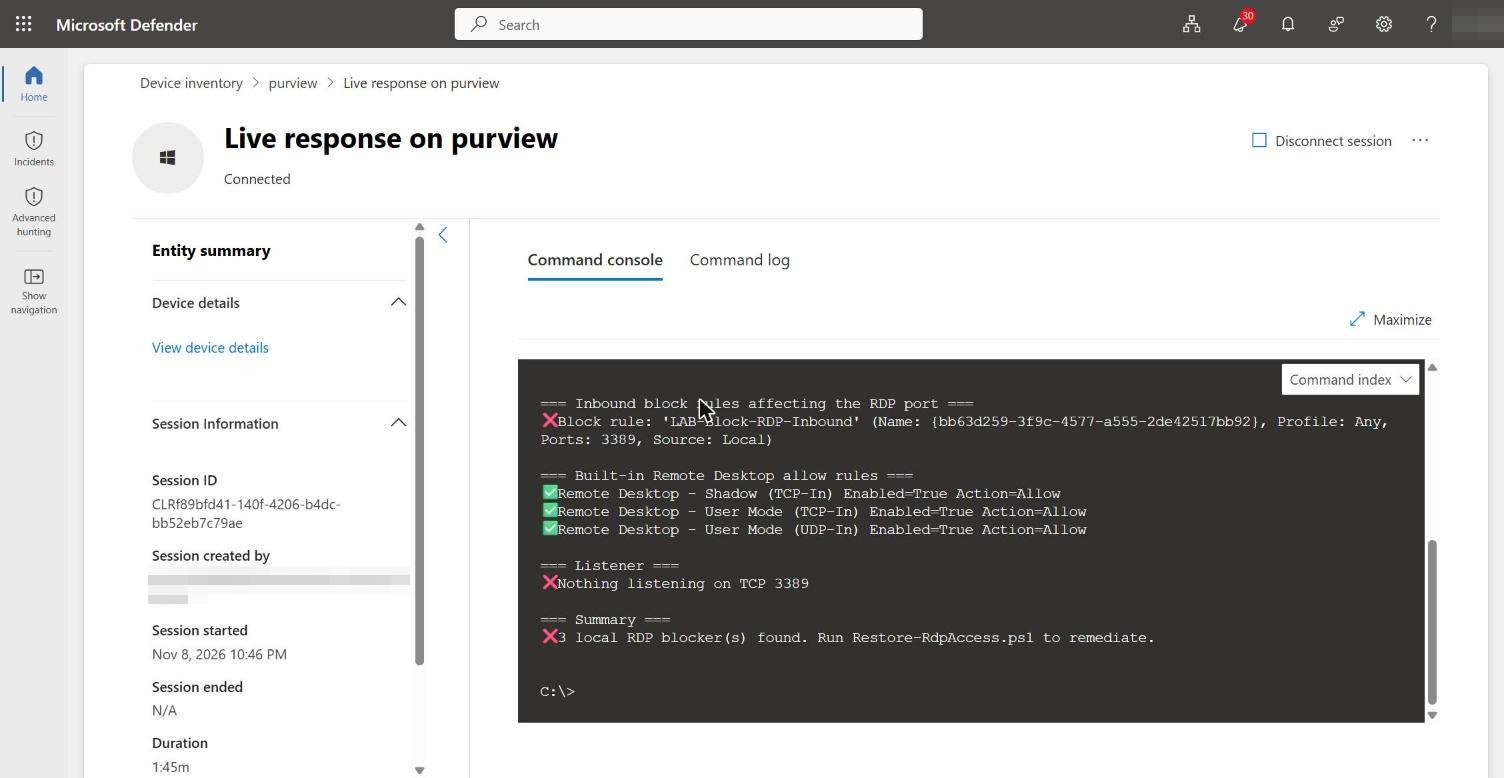
Get-RdpLockoutState.ps1 over Live Response now finds what it could not in Part 3. It reports the LAB-Block-RDP-Inbound firewall rule, that nothing is listening on the RDP port, and a clear count of local blockers pointing at the remediation script.
Live Response – local RDP blockers found
Recovering the device
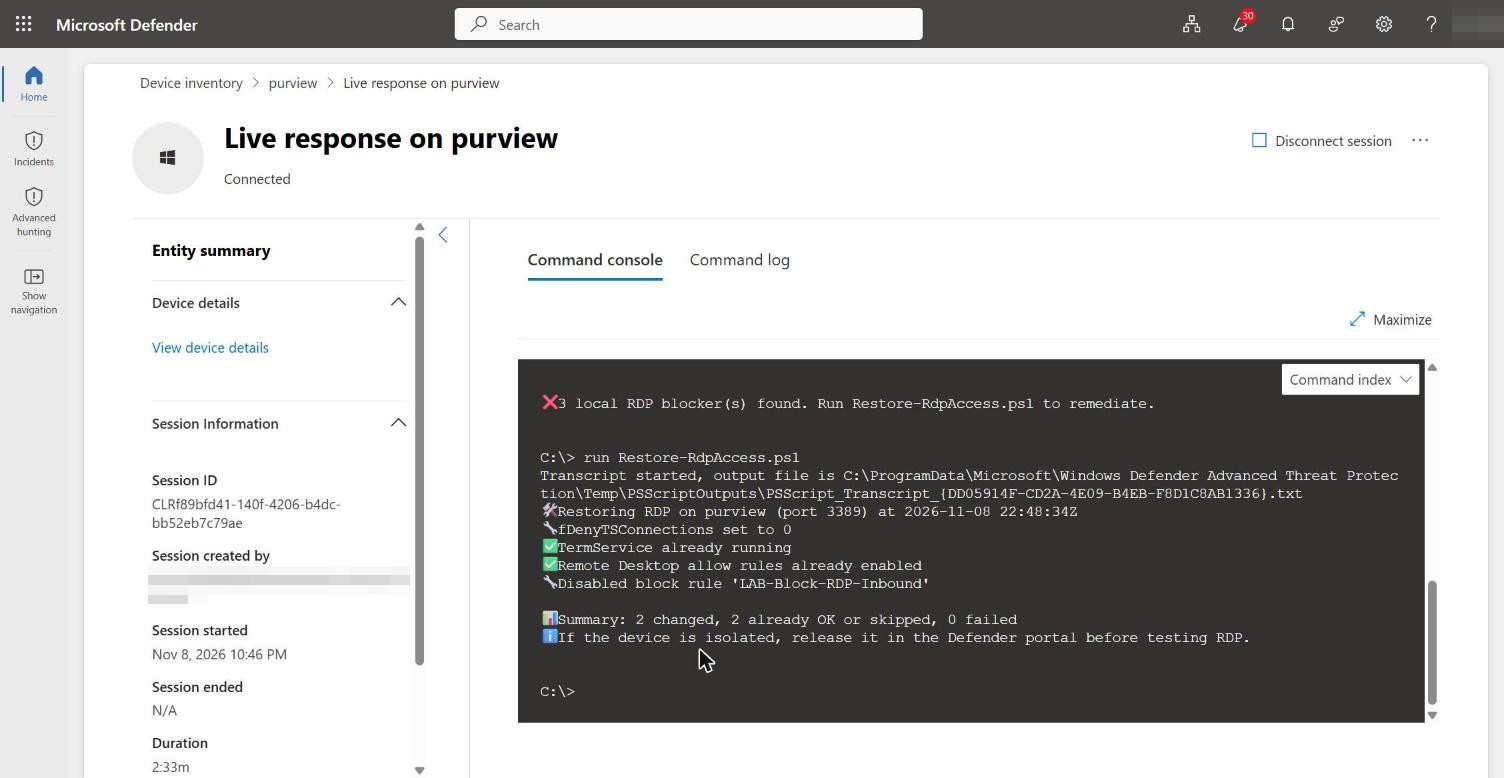
Restore-RdpAccess.ps1, run over the same channel, clears them: it sets fDenyTSConnections back to 0, confirms the Remote Desktop services and allow rules, and disables the block rule. It supports -WhatIf for a dry run, and reports a summary of what it changed.
Live Response – RDP access restored
Remote Desktop reconnects. A device that locked everyone out was recovered without network or physical access, through a channel the lockout never touched.
Insert your successful RDP reconnection here to close the sequence.
Next
The lockouts in Parts 3 and 4 both start with an attacker getting a foothold, and credential theft is how that usually happens. The next post looks at defending the credentials themselves.
The technique attackers use for the foothold, and the layered defences that stop it – with the nuance Microsoft documents but few people read.
The lockouts in this series both assume an attacker who has already gained a foothold. Credential theft is how they usually get it, and the Local Security Authority Subsystem Service (LSASS) is the target. Tools in the Mimikatz family read credentials straight out of LSASS memory. This post is about the defence, not the tool – so no attack tooling is provided here – and about a nuance in how those defences interact that is easy to get wrong.
The layers that defend LSASS
Defender for Endpoint stops LSASS credential theft at several layers:
Antivirus quarantines known credential-theft binaries on write or execution, usually before they run at all.
The attack surface reduction (ASR) rule “Block credential stealing from the Windows LSASS subsystem” blocks processes from reading LSASS memory.
LSA protection (RunAsPPL) runs LSASS as a protected process, so non-protected processes cannot read it.
Credential Guard uses virtualisation-based security to isolate the secrets entirely, out of reach even of a process that opens LSASS.
The lab’s posture
The lab VM is already hardened to the recommended baseline. RunAsPPL is enabled, and both Credential Guard and memory integrity are running under virtualisation-based security.
LSA protection (RunAsPPL) stateDeviceGuard and VBS status
A detail worth a line: Credential Guard shows as running but not explicitly configured by policy, because it is enabled by default on Windows 11 Enterprise when the hardware supports it. On this device, a Mimikatz run gets nowhere – the binary is quarantined by antivirus, and even past that, RunAsPPL and Credential Guard protect the secrets.
The nuance: use one, not both
Here is the part that trips people up. When LSA protection is enabled, Microsoft’s own documentation states the ASR rule is not required, gives no additional protection (the two work the same way), and is reported as “not applicable” in the Defender portal. The ASR rule is positioned as the fallback for environments that cannot enable LSA protection or Credential Guard – not as a second layer to stack on top.
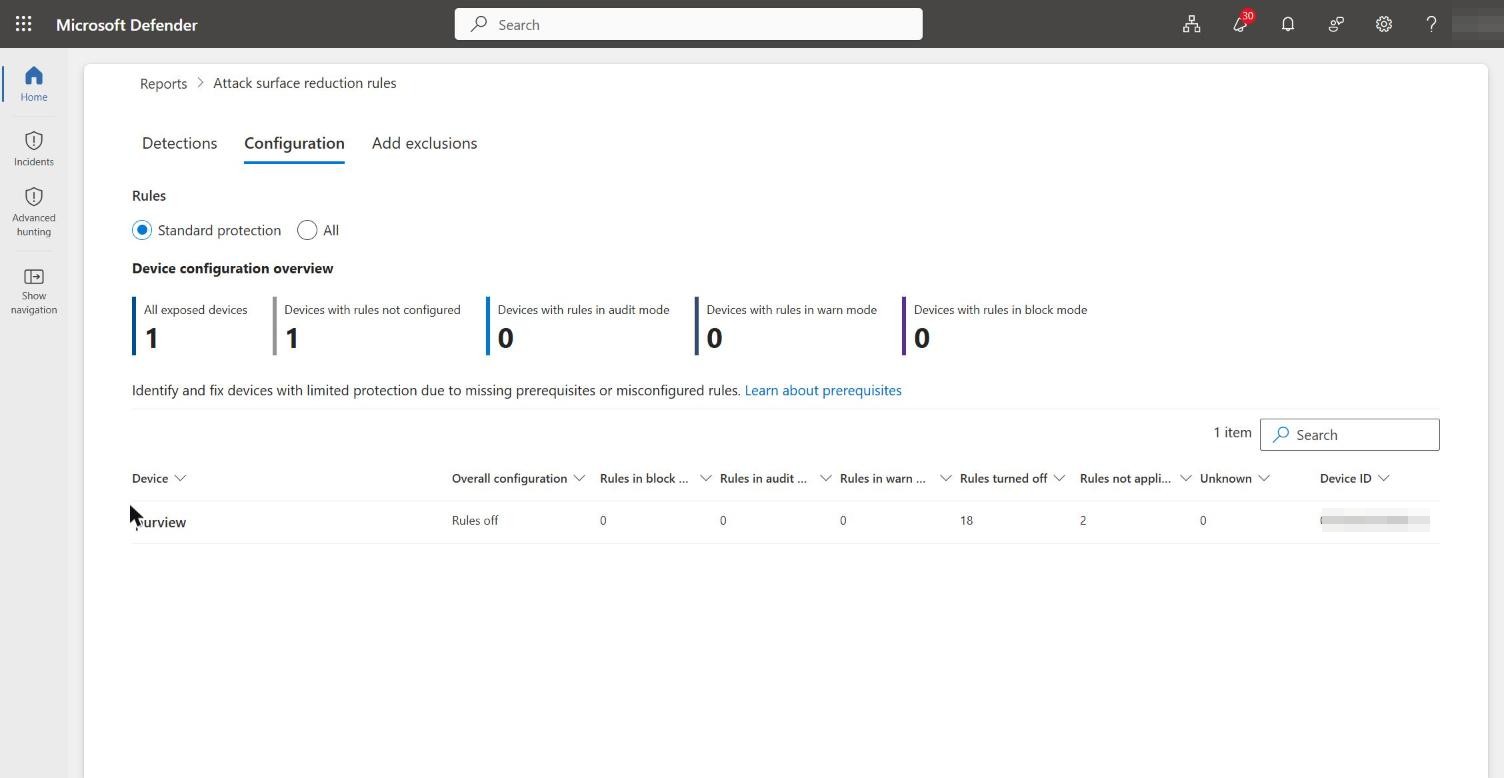
The portal bears this out. On the hardened lab device, the ASR configuration shows rules off, none in block or audit, and two rules not applicable – the credential-stealing rule among them, deactivated because LSA protection already covers it.
ASR configuration – rules not applicable
This behaviour is consistent with guidance Microsoft provides directly through support. Write it from experience; there is no need to reference any case.
So the practical rule is: lead with LSA protection (RunAsPPL) and Credential Guard. Reach for the ASR rule only where you cannot deploy them, and do not expect it to add anything when they are already on – it will simply read “not applicable”.
The ASR rule is noisy by design
There is a second reason the ASR rule is the fallback rather than the first choice: it is noisy, and Microsoft documents this plainly. Many processes make unnecessary calls to LSASS that do not need blocking, so the rule produces a large volume of audit events, almost all of which are safe to ignore in block mode. It blocks things like svchost.exe reading LSASS, which can usually be ignored, and a single event does not by itself indicate a threat.
Defender manages the noise by suppressing alerts and notification pop-ups for friendly processes and duplicate block actions – the deduplication that keeps the rule usable. Notably, for this specific rule Microsoft says you can skip audit mode and go straight to block, because the audit volume is so high and so benign that evaluating it first adds little. That runs against the usual “always audit first” advice, and it is worth calling out.
Hunting the technique
Where you do want visibility – on devices running the ASR rule rather than LSA protection – the companion repo’s 03-Credential-Theft-Commands.kql hunts the technique directly: Mimikatz-style command lines (sekurlsa::, lsadump::), LSASS OpenProcessApiCall events, and the AsrLsassCredentialTheft block and audit events. Set the DeviceNameFilter and run it in Advanced hunting.
In short
Protect LSASS with RunAsPPL and Credential Guard as the primary, quiet, strong defence. Treat the ASR rule as the noisy fallback for where you cannot, and understand that it switches itself off to “not applicable” when the stronger protections are present. One layer, chosen deliberately, beats two layers fighting for the same job.
Next
Defences are best understood under attack. The next post walks the full kill chain – credential theft, privilege escalation and ransomware – on a deliberately unhardened device, and watches each of these defences fire in turn.
Walking an attacker’s path end to end and watching Defender stop each stage, using safe, reproducible simulations.
The earlier posts in this series dealt with containment and recovery. This one steps back to the attack itself. A real intrusion is rarely a single event; it is a chain – steal credentials, elevate privileges, then deploy ransomware. This post walks that chain stage by stage in the lab and shows Defender for Endpoint stopping each one, with the hunting query that finds it.
Everything here uses Microsoft’s own safe demonstration scenarios and benign test behaviour. No real attack tooling, no real ransomware, nothing that would harm a production machine. That is deliberate: a demonstration your readers can reproduce safely is worth more than one built on live malware.
Why this needs a separate, unhardened lab device
In the credential-theft post we saw that a properly hardened device defeats this chain quietly: LSA protection and Credential Guard make the LSASS attack surface reduction rule “not applicable”, so there is nothing to see. That is the right production posture, but it is the wrong lab for a demonstration. To watch each defence fire, this post uses a deliberately unhardened test device – LSA protection and Credential Guard off, onboarded to Defender – so the ASR rule is applicable and the detections are visible. Never run this configuration in production.
You do not have to take the posture on trust – it is measurable in one line. The DeviceGuard WMI class reports which virtualisation-based security services are actually running:
On the unhardened lab device this returns {2} – only hypervisor-enforced code integrity is running, Credential Guard (service 1) is absent. On the restored, hardened device the same query returns {1, 2} – Credential Guard back alongside HVCI. That single value flipping between {2} and {1, 2} is the cleanest before-and-after proof of the device’s credential-protection posture, and worth capturing at both ends of the exercise.
Stage 0 – Stopped before it starts: web content filtering
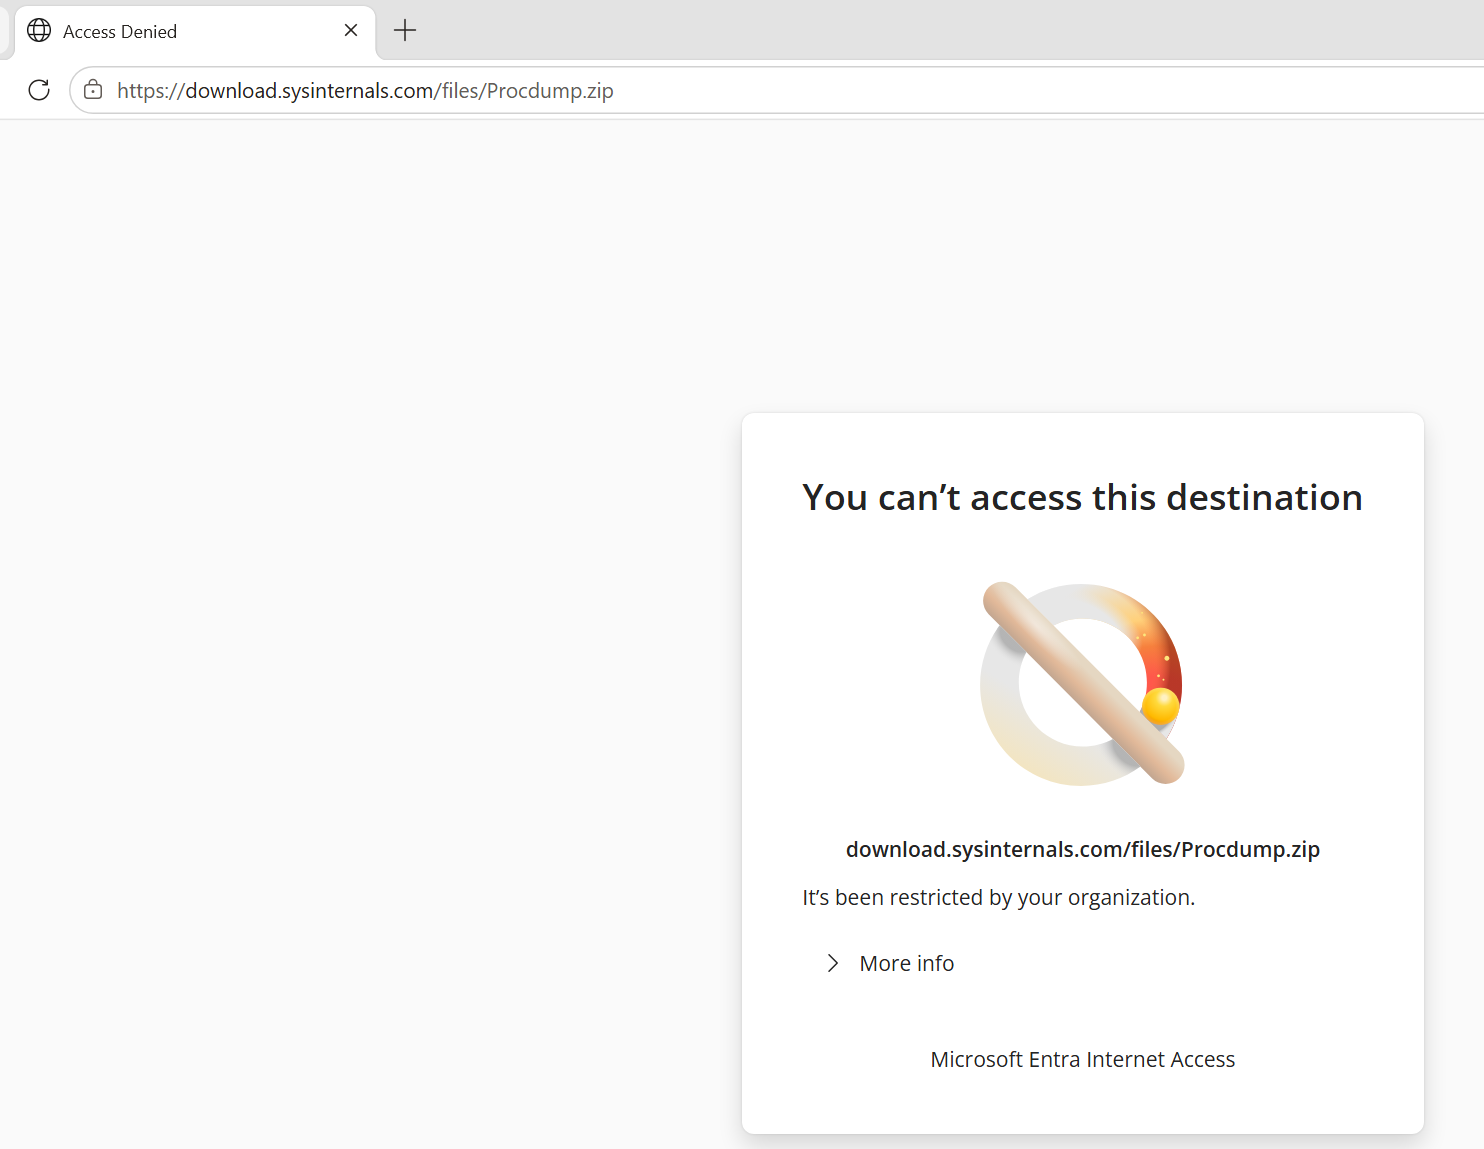
The attacker’s first practical problem is getting a tool onto the device. In this lab the device sits behind Entra Internet Access, part of Global Secure Access, which filters outbound web traffic. The attempt to download a credential-dumping utility never completed – the Secure Web Gateway classified the download as malware and blocked it outright, before a single byte of the tool reached the disk.
This is the layer most attack walkthroughs skip, and it is worth showing: the cheapest place to stop an attack is at the network edge, before the payload ever lands. It also makes a point about realism – a determined attacker will bring the tool another way, which is exactly why the on-device controls that follow still matter.
Stage 0 – Entra Internet Access blocks the tool download
Stage 1 – Credential theft
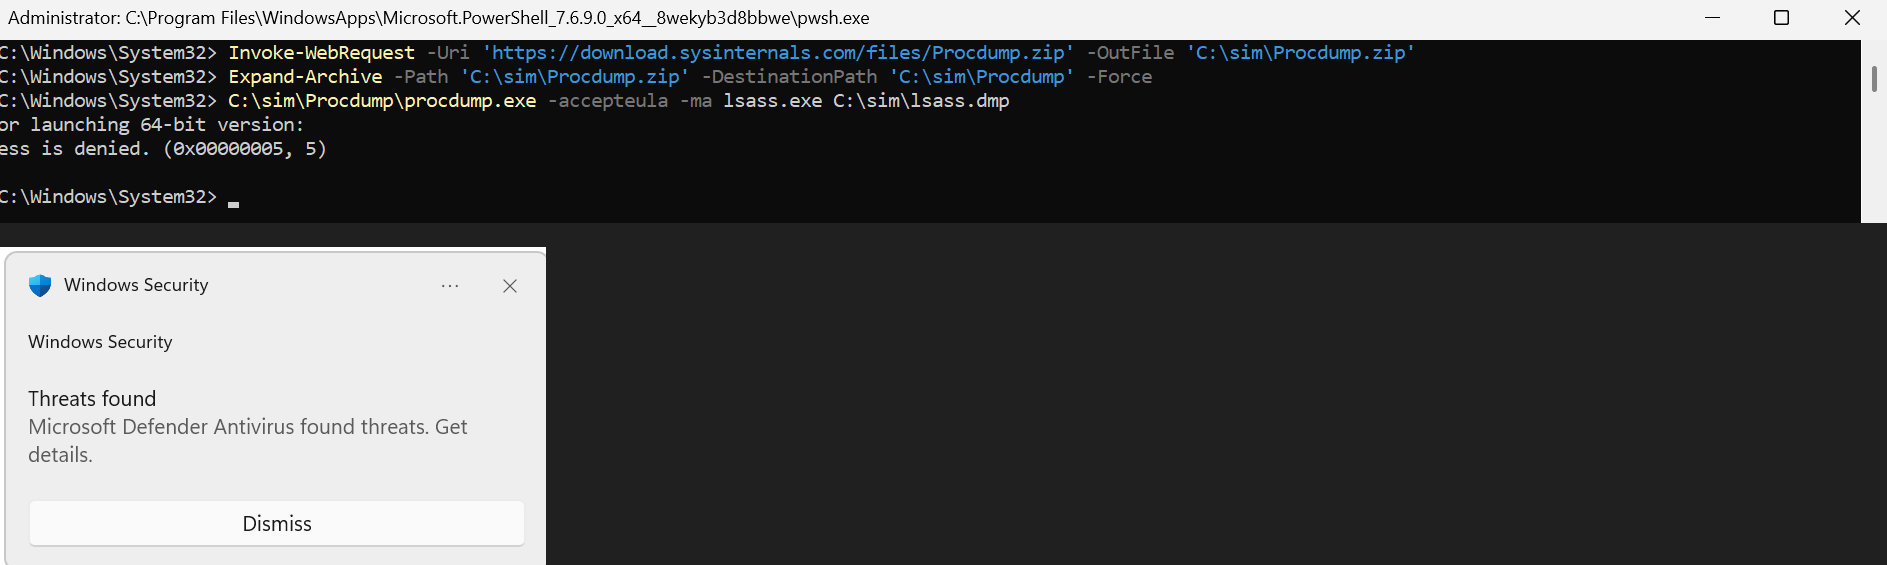
With the tool staged locally, the attacker tries to read credentials from the Local Security Authority Subsystem Service. On this deliberately unhardened device the attack surface reduction rule “Block credential stealing from the Windows LSASS subsystem” is applicable, so the attempt to open LSASS is denied – the process is refused access and the event is recorded.
You can trigger this with the Microsoft attack surface reduction demonstration, which exercises the rule with a benign sample rather than real Mimikatz, or – as in this lab – by pointing a legitimate memory-dump utility at the LSASS process. Either way the result is the same genuine block, alert and telemetry, safely, with no real credential theft.
Remember the caveat from the credential-theft post: this rule is noisy by design. Expect a large volume of events, most of them safe to ignore, with Defender suppressing duplicates. Hunt the real activity with 03-Credential-Theft-Commands.kql and 08-ASR-Rule-Events.kql from the companion repo.
Stage 1 – ASR LSASS rule blocks the dump attempt
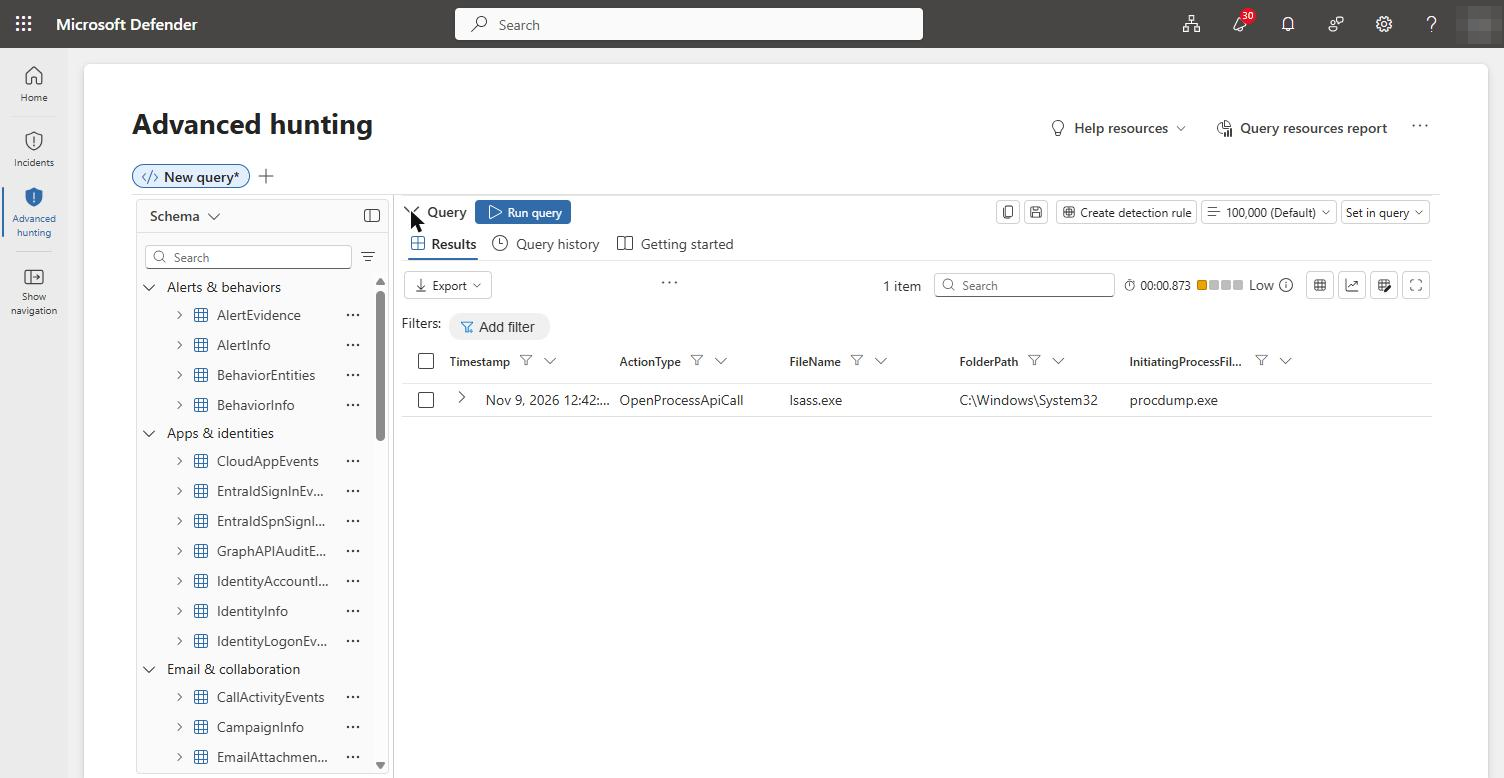
The attempt is also plain to see in Advanced hunting. A DeviceEvents query for OpenProcessApiCall against lsass.exe returns a single row with procdump.exe as the initiating process – the exact moment the attacker reached for the credential store.
What Defender did on its own – Automatic Attack Disruption
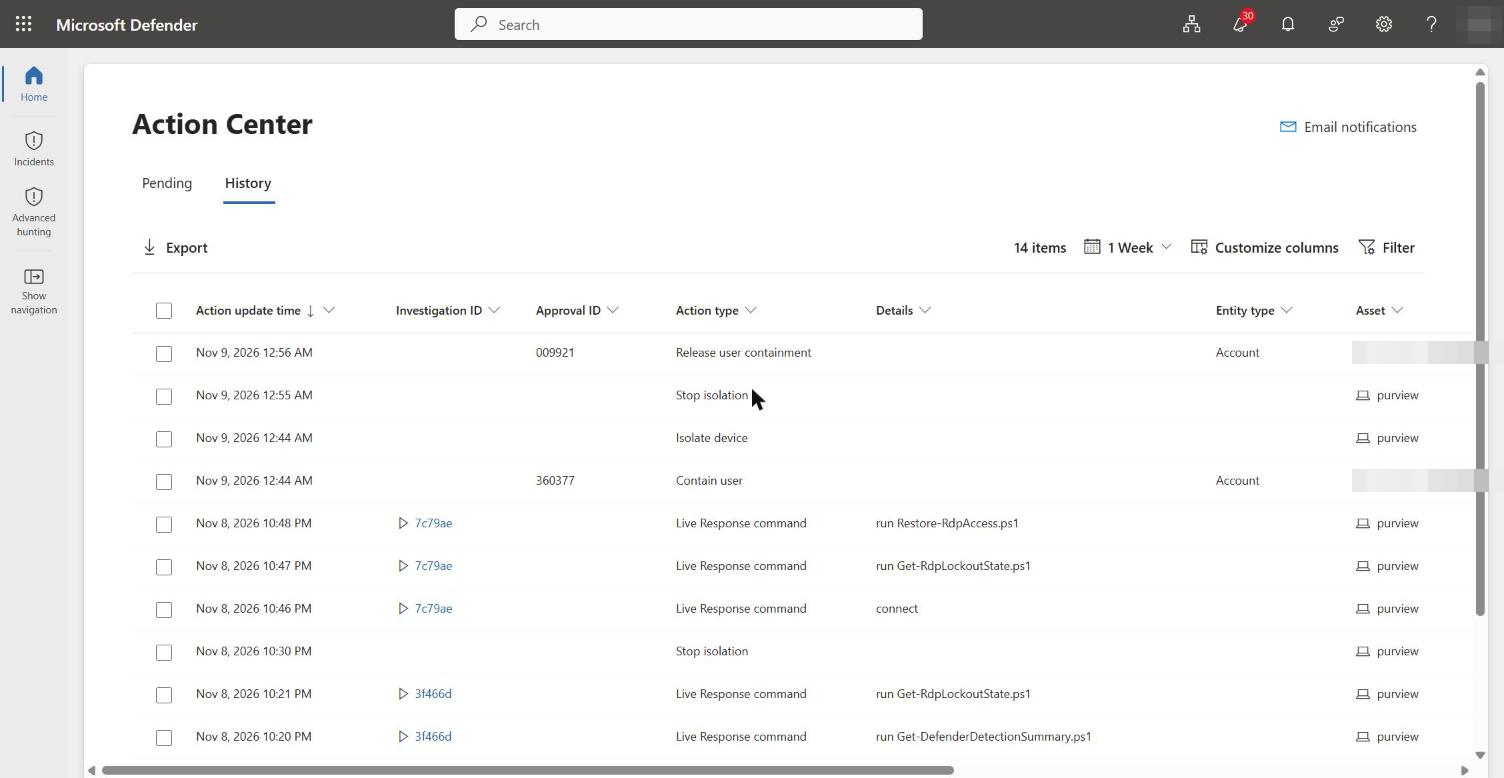
Here the lab produced something a scripted demo cannot: Defender decided the LSASS credential-theft attempt was a high-confidence attack and responded automatically, with no analyst in the loop. Automatic Attack Disruption took two containment actions within the same minute:
Isolate device – the test VM was cut off from the network (while keeping its link to Defender), which immediately dropped the live Remote Desktop session.
Contain user – the signed-in account was contained, blocking it from authenticating and moving laterally across the environment.
This is the single most important moment in the series to understand. Isolation and Live Response in the earlier posts were actions a responder chose to take. Here Defender took them itself, in seconds, on the strength of the credential-theft signal alone – it did not merely detect the attack, it severed the attacker’s foothold mid-chain. The account containment is the part defenders often miss: stopping the device is good, but a stolen credential is portable, so containing the identity closes the door the attacker was actually trying to walk through.
Automatic Attack Disruption – device isolated and user contained
Recovering from the automatic response
Automatic Attack Disruption is designed to be reversible once you have confirmed the activity and are satisfied the risk is handled. In the Action Center, on the History tab, each automatic action carries an Undo control. Selecting the “Isolate device” and “Contain user” actions and confirming the undo releases the device back onto the network and lets the account authenticate again – restoring the exact Remote Desktop access the disruption had cut off. On a hardened production device you would instead investigate first and only release once the account is confirmed clean; the container also lifts on its own after its built-in duration (seven days for isolation, five for user containment) if you take no action.
The release is recorded in the same Action Center history shown above: the “Stop isolation” and “Release user containment” entries sit directly on top of the two automatic actions, which is the full round trip – disruption, then controlled recovery – in a single view.
Stage 2 – Privilege escalation
With credentials in hand, the attacker’s next move is to elevate. Most real-world privilege escalation on Windows comes down to exploiting a memory-corruption flaw – a buffer overflow, a use-after-free – to run the attacker’s code in a higher-privileged context. Exploit protection is the layer built to defeat exactly those techniques. Unlike the earlier stages, this one is a prevention you configure rather than a single dramatic block: it hardens the process so the exploitation primitives the attacker needs simply are not available.
We apply Microsoft’s sample exploit-protection policy and confirm the mitigations are live:
# apply Microsoft's sample exploit-protection policy (elevated)
Set-ProcessMitigation -PolicyFilePath "C:\sim\ProcessMitigation.xml"

# verify the mitigations are active
Get-ProcessMitigation
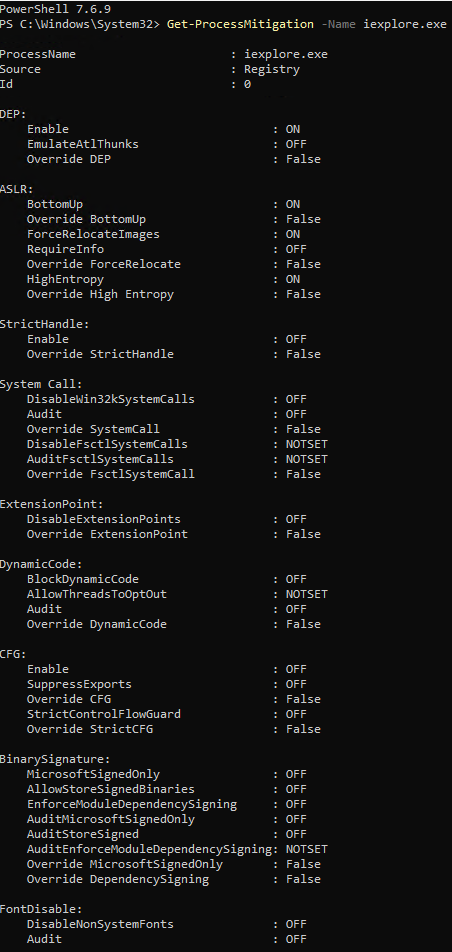
On the lab device the policy applied cleanly across 59 processes. A representative entry shows the anti-exploitation mitigations all switched on – Data Execution Prevention, Address Space Layout Randomisation, Structured Exception Handler Overwrite Protection, the Export Address Filter and the Return-Oriented Programming guards:
ProcessName : iexplore.exe
DEP      Enable                     : ON
ASLR     BottomUp                   : ON
         ForceRelocateImages        : ON
         HighEntropy                : ON
Payload  EnableExportAddressFilter      : ON
         EnableExportAddressFilterPlus  : ON
         EnableRopStackPivot            : ON
         EnableRopCallerCheck           : ON
         EnableRopSimExec               : ON
SEHOP    Enable                     : ON
Heap     TerminateOnError           : ON
Each of these closes off a step an exploit relies on: DEP and ASLR make memory layout unpredictable and non-executable, the ROP guards break the chaining technique used to bypass DEP, and the Export Address Filter denies shellcode easy access to the API addresses it needs. An escalation exploit that would have worked on an unprotected process is stopped before it can land – and where a mitigation does fire at runtime, it surfaces as an exploit-protection event in Defender for hunting.
Stage 2 – exploit protection mitigations active
Stage 3 – Ransomware
The final stage is encryption. Controlled Folder Access stops untrusted processes from modifying protected folders, which is the core of what ransomware does. It is off by default – as we confirmed on the hardened device, it showed “Disabled, Default (no configuration)” – so the first step is to enable it.
# enable Controlled Folder Access in block mode (elevated)
Set-MpPreference -EnableControlledFolderAccess Enabled

# download Microsoft's CFA test tool - a genuinely untrusted process
Invoke-WebRequest -Uri "https://demo.wd.microsoft.com/Content/CFAtool.exe" `
  -OutFile "$env:USERPROFILE\Downloads\CFAtool.exe"
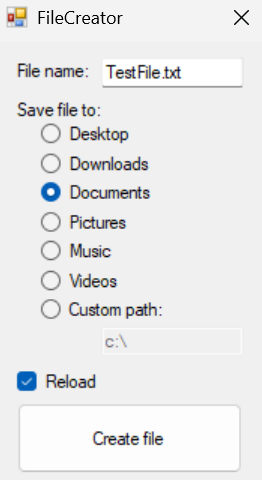
A word of warning learned in testing: Controlled Folder Access is reputation-based. It allows trusted, signed binaries, so a naive test using PowerShell to write into a protected folder is not blocked – PowerShell is trusted. To demonstrate the block you need a genuinely untrusted process, which is what Microsoft’s Controlled Folder Access demonstration tool provides. Run it and point it at a protected folder such as Documents.
Stage 3 – the untrusted tool attempts to write to Documents
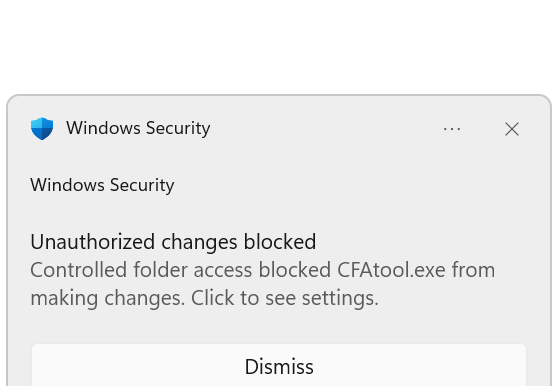
The moment it tries to create the file, Controlled Folder Access steps in. The write fails and Windows Security raises an “Unauthorised changes blocked” notification naming the offending process – the same thing a user would see the instant a real ransomware binary reached for their files.
Stage 3 – Controlled Folder Access blocks the write
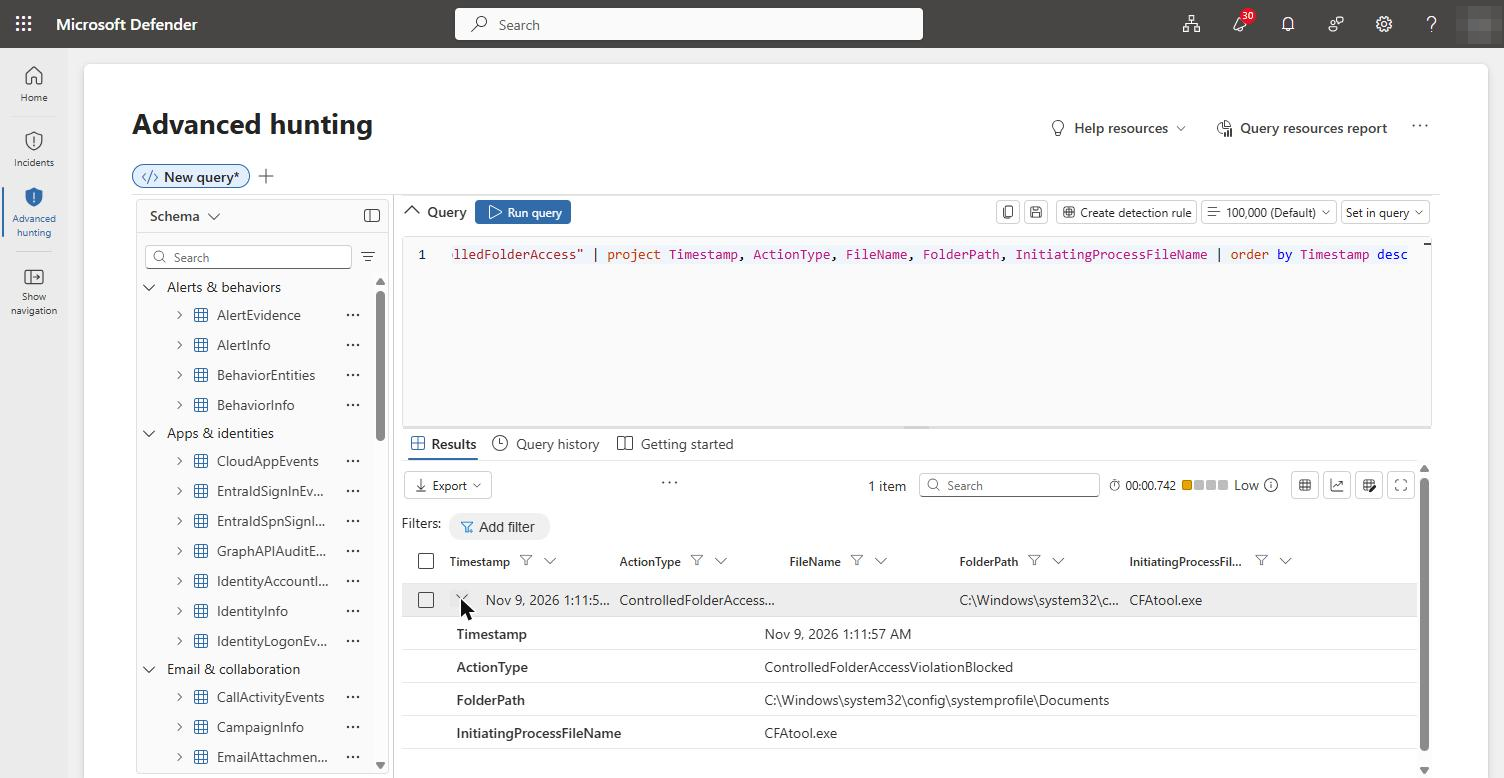
In Advanced hunting the block is recorded as a ControlledFolderAccessViolationBlocked event, with CFAtool.exe as the initiating process and the protected Documents folder as the target. Query 07-Controlled-Folder-Access.kql in the companion repo finds it.
Stage 3 – ControlledFolderAccessViolationBlocked in Advanced hunting
A KQL gotcha learned in the lab: filter on ActionType startswith “ControlledFolderAccess”, not has “ControlledFolder”. The has operator matches whole terms, and ControlledFolderAccessViolationBlocked is a single term, so has returns nothing.
The chain, correlated
Run in sequence on one device, the three stages give Defender a single story to tell. The incident correlates the credential-theft, privilege-escalation and ransomware signals into one attack, with a graph that reads like the kill chain itself. That correlation is the point: each stage is a defence in its own right, and together they are an incident a responder can act on – including the isolation and Live Response recovery from the earlier posts.
The correlated kill-chain incident
Defence in depth, stage by stage
The chain makes the layered model concrete. Each stage has a prevention and a detection:
Tool delivery – blocked at the network edge by Entra Internet Access web content filtering, before the payload lands.
Credential theft – prevented by LSA protection and Credential Guard, detected by the ASR rule where they are not in place.
Automatic response – Attack Disruption isolates the device and contains the account on its own when the credential-theft signal is high-confidence.
Privilege escalation – prevented and detected by exploit protection and EDR.
Ransomware – prevented by Controlled Folder Access, detected in the ASR and CFA telemetry.
No single control carries the whole chain. The attacker needs every stage to succeed; the defender needs only one to hold – and in this lab several held, one of them without any human deciding to act. That is the case for defence in depth, shown rather than asserted.
Restoring the lab to a safe baseline
A deliberately unhardened device is a liability the moment the demonstration is over, so re-hardening is part of the exercise, not an afterthought. Turn LSA protection and Credential Guard back on and reboot:
Worth knowing: re-enabling these needed reg add, not Set-ItemProperty. The PowerShell registry provider returned “Requested registry access is not allowed” on the Lsa key even in an elevated session, while reg.exe with /f wrote it cleanly. Tamper Protection can stay on throughout – it guards antivirus settings, not these LSA keys.
After the reboot, confirm the baseline is genuinely back, not just configured. The SecurityServicesRunning value should read {1, 2} again, and the System log should record LSASS starting as a protected process:
Event ID 12 reading “LSASS.exe was started as a protected process with level: 4” is the confirmation that RunAsPPL took effect this boot. If the lab device was a cloud virtual machine, remove the pre-lab snapshot once the restored device is confirmed healthy, so the weakened disk image is not left lying around.
The series, end to end
Across the series we built a lab, generated a clean incident, isolated and remediated a device over Live Response, recovered one locked out by an attacker, and here walked the full attack chain that leads to those incidents. The companion repository holds every KQL query and PowerShell script used along the way.