Walking an attacker’s path end to end and watching Defender stop each stage, using safe, reproducible simulations.
The earlier posts in this series dealt with containment and recovery. This one steps back to the attack itself. A real intrusion is rarely a single event; it is a chain – steal credentials, elevate privileges, then deploy ransomware. This post walks that chain stage by stage in the lab and shows Defender for Endpoint stopping each one, with the hunting query that finds it.
Everything here uses Microsoft’s own safe demonstration scenarios and benign test behaviour. No real attack tooling, no real ransomware, nothing that would harm a production machine. That is deliberate: a demonstration your readers can reproduce safely is worth more than one built on live malware.
Why this needs a separate, unhardened lab device
In the credential-theft post we saw that a properly hardened device defeats this chain quietly: LSA protection and Credential Guard make the LSASS attack surface reduction rule “not applicable”, so there is nothing to see. That is the right production posture, but it is the wrong lab for a demonstration. To watch each defence fire, this post uses a deliberately unhardened test device – LSA protection and Credential Guard off, onboarded to Defender – so the ASR rule is applicable and the detections are visible. Never run this configuration in production.
You do not have to take the posture on trust – it is measurable in one line. The DeviceGuard WMI class reports which virtualisation-based security services are actually running:
(Get-CimInstance -ClassName Win32_DeviceGuard `
  -Namespace root\Microsoft\Windows\DeviceGuard).SecurityServicesRunning
On the unhardened lab device this returns {2} – only hypervisor-enforced code integrity is running, Credential Guard (service 1) is absent. On the restored, hardened device the same query returns {1, 2} – Credential Guard back alongside HVCI. That single value flipping between {2} and {1, 2} is the cleanest before-and-after proof of the device’s credential-protection posture, and worth capturing at both ends of the exercise.
Stage 0 – Stopped before it starts: web content filtering
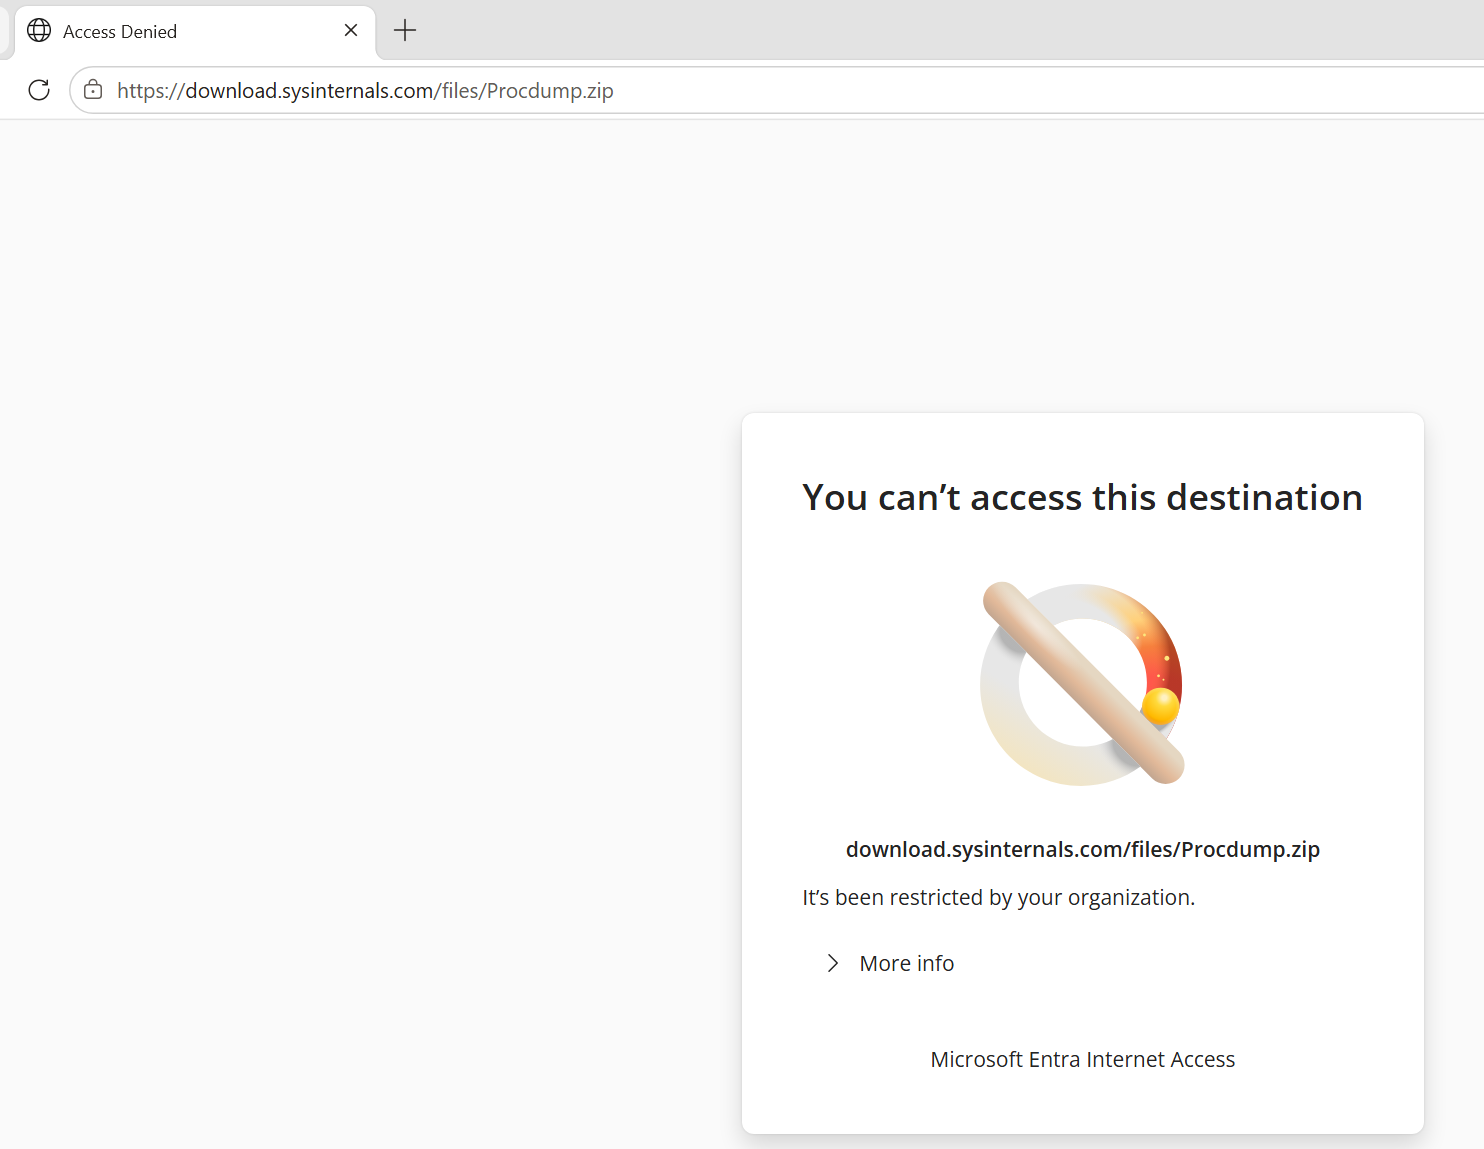
The attacker’s first practical problem is getting a tool onto the device. In this lab the device sits behind Entra Internet Access, part of Global Secure Access, which filters outbound web traffic. The attempt to download a credential-dumping utility never completed – the Secure Web Gateway classified the download as malware and blocked it outright, before a single byte of the tool reached the disk.
This is the layer most attack walkthroughs skip, and it is worth showing: the cheapest place to stop an attack is at the network edge, before the payload ever lands. It also makes a point about realism – a determined attacker will bring the tool another way, which is exactly why the on-device controls that follow still matter.
Stage 1 – Credential theft
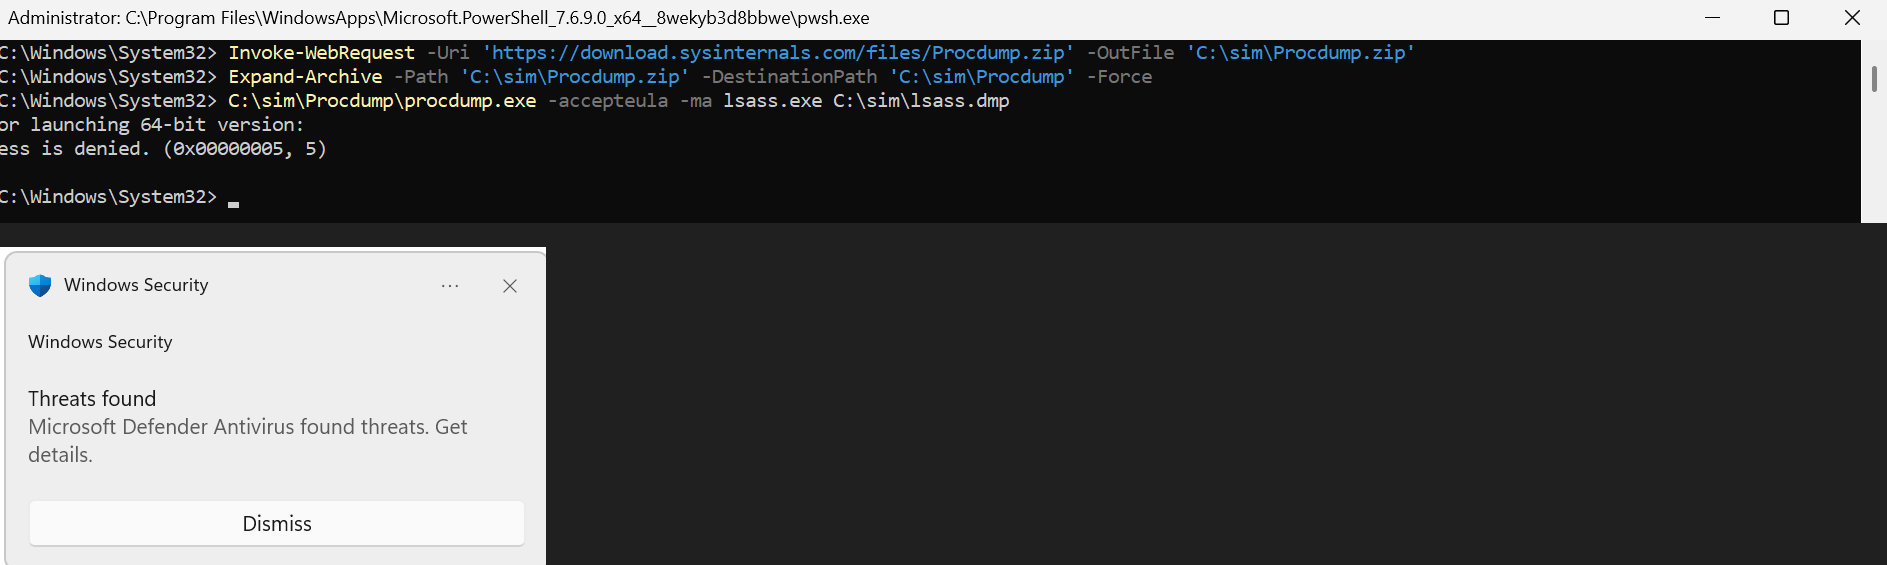
With the tool staged locally, the attacker tries to read credentials from the Local Security Authority Subsystem Service. On this deliberately unhardened device the attack surface reduction rule “Block credential stealing from the Windows LSASS subsystem” is applicable, so the attempt to open LSASS is denied – the process is refused access and the event is recorded.
You can trigger this with the Microsoft attack surface reduction demonstration, which exercises the rule with a benign sample rather than real Mimikatz, or – as in this lab – by pointing a legitimate memory-dump utility at the LSASS process. Either way the result is the same genuine block, alert and telemetry, safely, with no real credential theft.
Remember the caveat from the credential-theft post: this rule is noisy by design. Expect a large volume of events, most of them safe to ignore, with Defender suppressing duplicates. Hunt the real activity with 03-Credential-Theft-Commands.kql and 08-ASR-Rule-Events.kql from the companion repo.
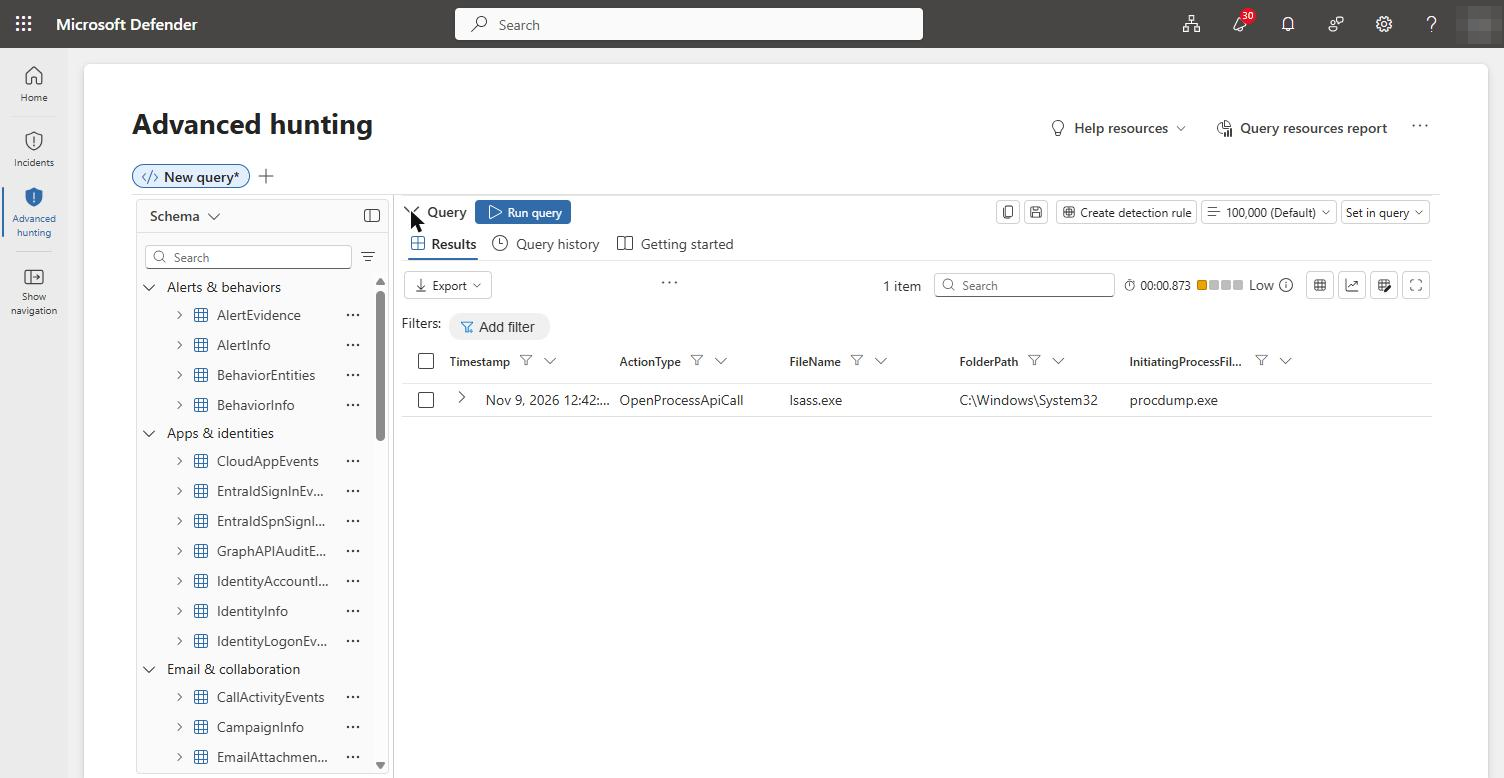
The attempt is also plain to see in Advanced hunting. A DeviceEvents query for OpenProcessApiCall against lsass.exe returns a single row with procdump.exe as the initiating process – the exact moment the attacker reached for the credential store.
What Defender did on its own – Automatic Attack Disruption
Here the lab produced something a scripted demo cannot: Defender decided the LSASS credential-theft attempt was a high-confidence attack and responded automatically, with no analyst in the loop. Automatic Attack Disruption took two containment actions within the same minute:
- Isolate device – the test VM was cut off from the network (while keeping its link to Defender), which immediately dropped the live Remote Desktop session.
- Contain user – the signed-in account was contained, blocking it from authenticating and moving laterally across the environment.
This is the single most important moment in the series to understand. Isolation and Live Response in the earlier posts were actions a responder chose to take. Here Defender took them itself, in seconds, on the strength of the credential-theft signal alone – it did not merely detect the attack, it severed the attacker’s foothold mid-chain. The account containment is the part defenders often miss: stopping the device is good, but a stolen credential is portable, so containing the identity closes the door the attacker was actually trying to walk through.
Recovering from the automatic response
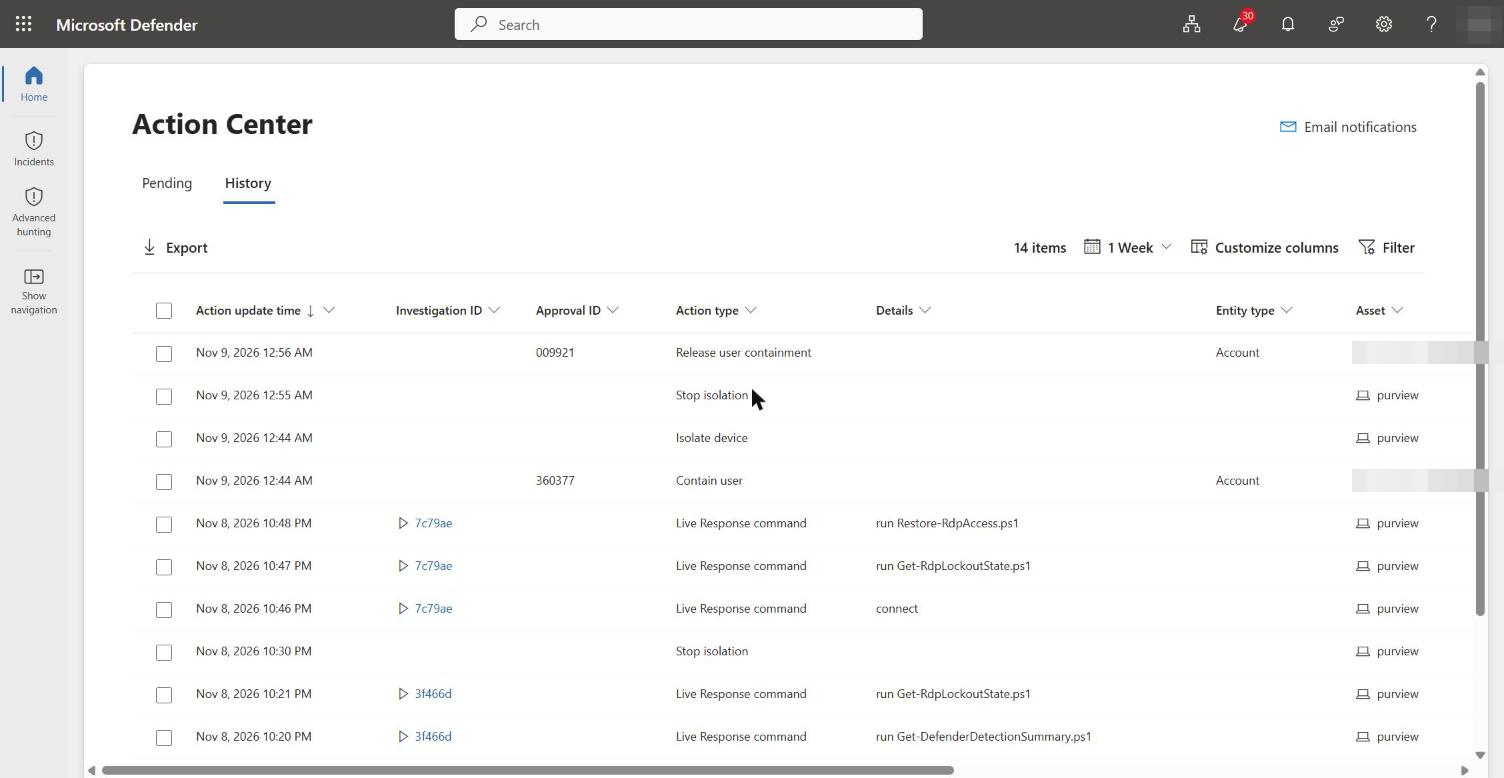
Automatic Attack Disruption is designed to be reversible once you have confirmed the activity and are satisfied the risk is handled. In the Action Center, on the History tab, each automatic action carries an Undo control. Selecting the “Isolate device” and “Contain user” actions and confirming the undo releases the device back onto the network and lets the account authenticate again – restoring the exact Remote Desktop access the disruption had cut off. On a hardened production device you would instead investigate first and only release once the account is confirmed clean; the container also lifts on its own after its built-in duration (seven days for isolation, five for user containment) if you take no action.
The release is recorded in the same Action Center history shown above: the “Stop isolation” and “Release user containment” entries sit directly on top of the two automatic actions, which is the full round trip – disruption, then controlled recovery – in a single view.
Stage 2 – Privilege escalation
With credentials in hand, the attacker’s next move is to elevate. Most real-world privilege escalation on Windows comes down to exploiting a memory-corruption flaw – a buffer overflow, a use-after-free – to run the attacker’s code in a higher-privileged context. Exploit protection is the layer built to defeat exactly those techniques. Unlike the earlier stages, this one is a prevention you configure rather than a single dramatic block: it hardens the process so the exploitation primitives the attacker needs simply are not available.
We apply Microsoft’s sample exploit-protection policy and confirm the mitigations are live:
# apply Microsoft's sample exploit-protection policy (elevated)
Set-ProcessMitigation -PolicyFilePath "C:\sim\ProcessMitigation.xml"

# verify the mitigations are active
Get-ProcessMitigation
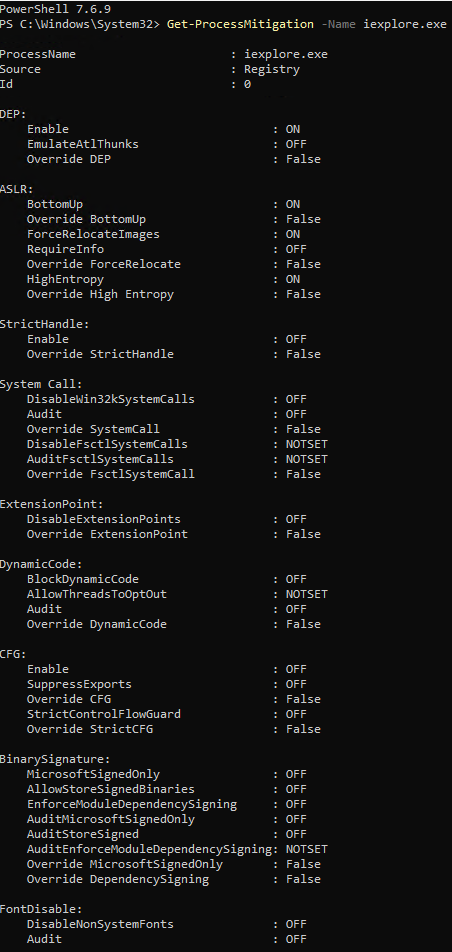
On the lab device the policy applied cleanly across 59 processes. A representative entry shows the anti-exploitation mitigations all switched on – Data Execution Prevention, Address Space Layout Randomisation, Structured Exception Handler Overwrite Protection, the Export Address Filter and the Return-Oriented Programming guards:
ProcessName : iexplore.exe
DEP      Enable                     : ON
ASLR     BottomUp                   : ON
         ForceRelocateImages        : ON
         HighEntropy                : ON
Payload  EnableExportAddressFilter      : ON
         EnableExportAddressFilterPlus  : ON
         EnableRopStackPivot            : ON
         EnableRopCallerCheck           : ON
         EnableRopSimExec               : ON
SEHOP    Enable                     : ON
Heap     TerminateOnError           : ON
Each of these closes off a step an exploit relies on: DEP and ASLR make memory layout unpredictable and non-executable, the ROP guards break the chaining technique used to bypass DEP, and the Export Address Filter denies shellcode easy access to the API addresses it needs. An escalation exploit that would have worked on an unprotected process is stopped before it can land – and where a mitigation does fire at runtime, it surfaces as an exploit-protection event in Defender for hunting.
Stage 3 – Ransomware
The final stage is encryption. Controlled Folder Access stops untrusted processes from modifying protected folders, which is the core of what ransomware does. It is off by default – as we confirmed on the hardened device, it showed “Disabled, Default (no configuration)” – so the first step is to enable it.
# enable Controlled Folder Access in block mode (elevated)
Set-MpPreference -EnableControlledFolderAccess Enabled

# download Microsoft's CFA test tool - a genuinely untrusted process
Invoke-WebRequest -Uri "https://demo.wd.microsoft.com/Content/CFAtool.exe" `
  -OutFile "$env:USERPROFILE\Downloads\CFAtool.exe"
A word of warning learned in testing: Controlled Folder Access is reputation-based. It allows trusted, signed binaries, so a naive test using PowerShell to write into a protected folder is not blocked – PowerShell is trusted. To demonstrate the block you need a genuinely untrusted process, which is what Microsoft’s Controlled Folder Access demonstration tool provides. Run it and point it at a protected folder such as Documents.
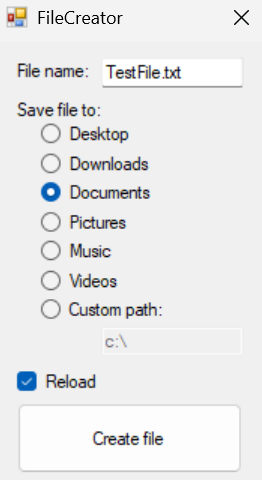
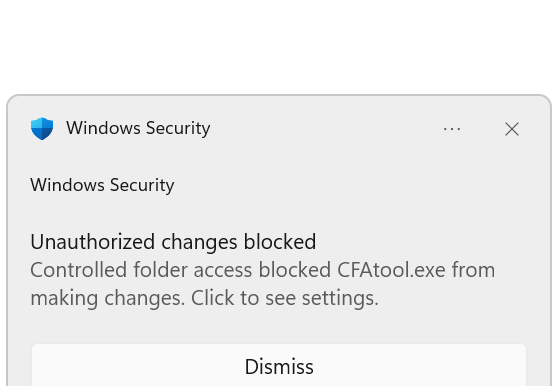
The moment it tries to create the file, Controlled Folder Access steps in. The write fails and Windows Security raises an “Unauthorised changes blocked” notification naming the offending process – the same thing a user would see the instant a real ransomware binary reached for their files.
In Advanced hunting the block is recorded as a ControlledFolderAccessViolationBlocked event, with CFAtool.exe as the initiating process and the protected Documents folder as the target. Query 07-Controlled-Folder-Access.kql in the companion repo finds it.
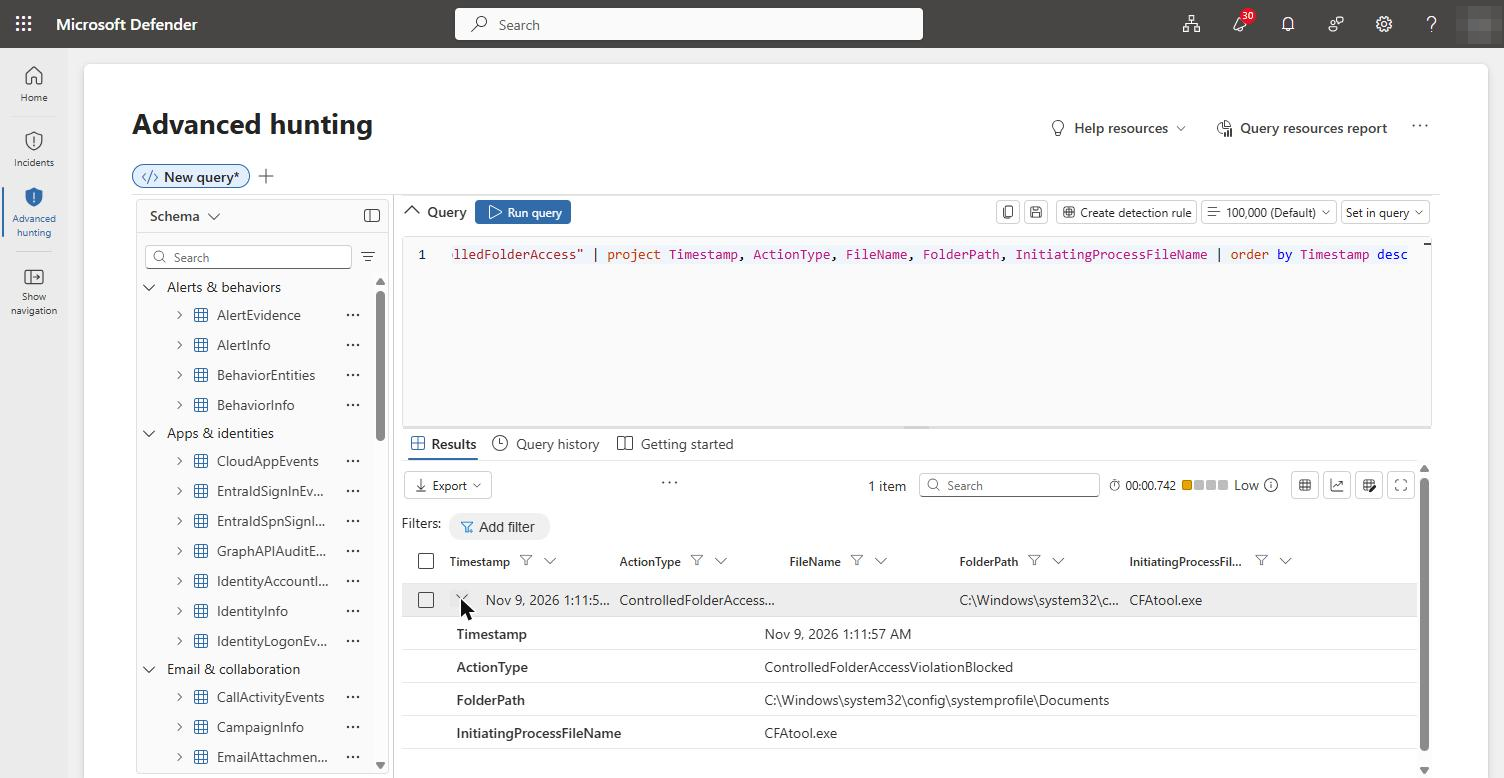
A KQL gotcha learned in the lab: filter on ActionType startswith “ControlledFolderAccess”, not has “ControlledFolder”. The has operator matches whole terms, and ControlledFolderAccessViolationBlocked is a single term, so has returns nothing.
The chain, correlated
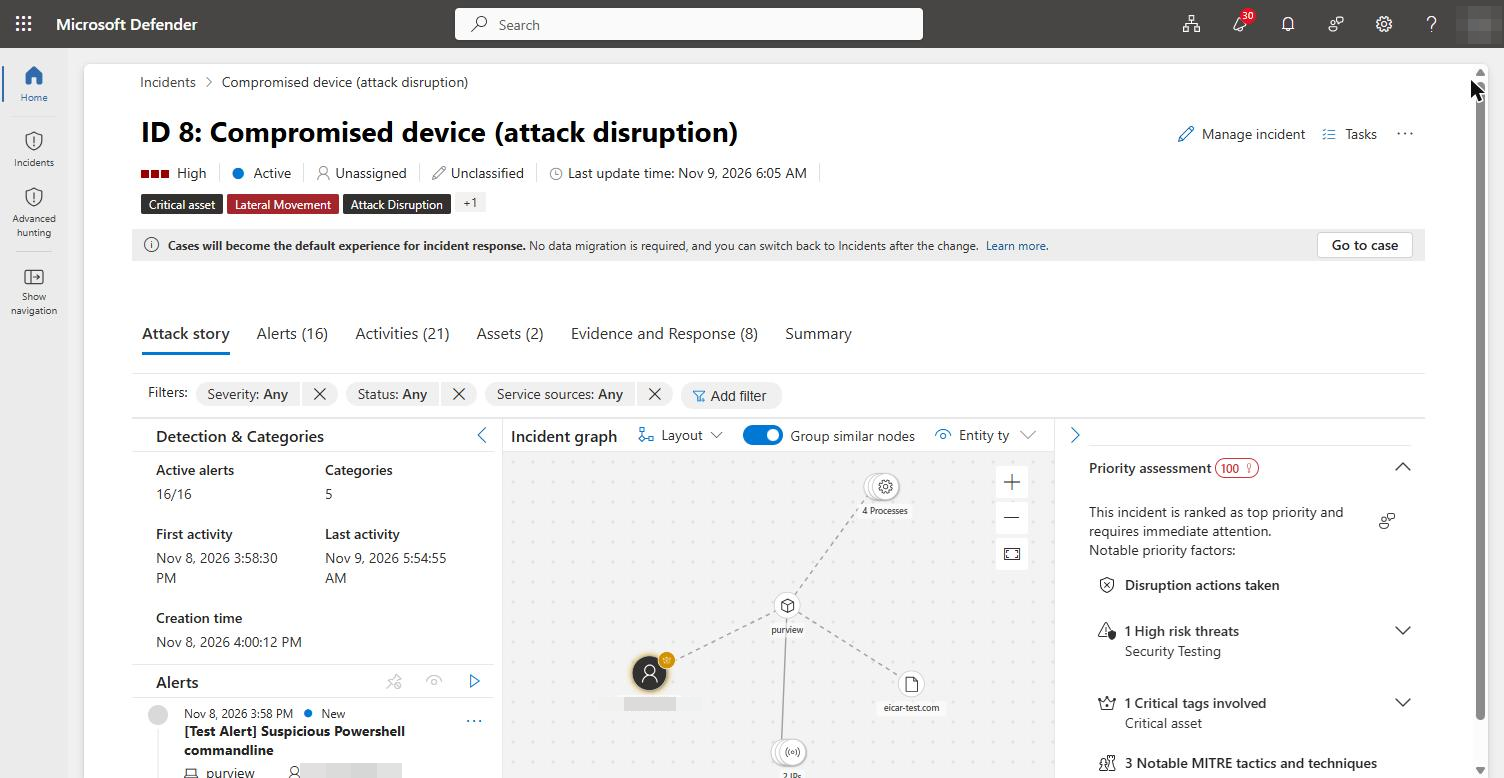
Run in sequence on one device, the three stages give Defender a single story to tell. The incident correlates the credential-theft, privilege-escalation and ransomware signals into one attack, with a graph that reads like the kill chain itself. That correlation is the point: each stage is a defence in its own right, and together they are an incident a responder can act on – including the isolation and Live Response recovery from the earlier posts.
Defence in depth, stage by stage
The chain makes the layered model concrete. Each stage has a prevention and a detection:
- Tool delivery – blocked at the network edge by Entra Internet Access web content filtering, before the payload lands.
- Credential theft – prevented by LSA protection and Credential Guard, detected by the ASR rule where they are not in place.
- Automatic response – Attack Disruption isolates the device and contains the account on its own when the credential-theft signal is high-confidence.
- Privilege escalation – prevented and detected by exploit protection and EDR.
- Ransomware – prevented by Controlled Folder Access, detected in the ASR and CFA telemetry.
No single control carries the whole chain. The attacker needs every stage to succeed; the defender needs only one to hold – and in this lab several held, one of them without any human deciding to act. That is the case for defence in depth, shown rather than asserted.
Restoring the lab to a safe baseline
A deliberately unhardened device is a liability the moment the demonstration is over, so re-hardening is part of the exercise, not an afterthought. Turn LSA protection and Credential Guard back on and reboot:
reg add "HKLM\SYSTEM\CurrentControlSet\Control\Lsa" /v RunAsPPL /t REG_DWORD /d 1 /f
reg add "HKLM\SYSTEM\CurrentControlSet\Control\Lsa" /v LsaCfgFlags /t REG_DWORD /d 1 /f
Restart-Computer
Worth knowing: re-enabling these needed reg add, not Set-ItemProperty. The PowerShell registry provider returned “Requested registry access is not allowed” on the Lsa key even in an elevated session, while reg.exe with /f wrote it cleanly. Tamper Protection can stay on throughout – it guards antivirus settings, not these LSA keys.
After the reboot, confirm the baseline is genuinely back, not just configured. The SecurityServicesRunning value should read {1, 2} again, and the System log should record LSASS starting as a protected process:
(Get-CimInstance -ClassName Win32_DeviceGuard `
  -Namespace root\Microsoft\Windows\DeviceGuard).SecurityServicesRunning   # {1, 2}

Get-WinEvent -FilterHashtable @{LogName='System';
  ProviderName='Microsoft-Windows-Wininit'} |
  Where-Object Id -eq 12 | Select-Object -First 1 TimeCreated, Message
Event ID 12 reading “LSASS.exe was started as a protected process with level: 4” is the confirmation that RunAsPPL took effect this boot. If the lab device was a cloud virtual machine, remove the pre-lab snapshot once the restored device is confirmed healthy, so the weakened disk image is not left lying around.
The series, end to end
Across the series we built a lab, generated a clean incident, isolated and remediated a device over Live Response, recovered one locked out by an attacker, and here walked the full attack chain that leads to those incidents. The companion repository holds every KQL query and PowerShell script used along the way.

