Office365 MCITP Training Resource 70-321,70-323

To obtain and Office365 MCITP , You need to pass the following 2 exams.

Exam 70-321: Deploying Office365
Exam 70-323: Administrating Office365

There is plenty of documentation from Microsoft describing the different modular components of Office365 , I always keep them on my laptop or Skydrive as I can easily access them to refresh my memory on all the different components. When all of the documentation is together , it amounts to quite a lot and could be confusing as to where to start to studying for the Office365 MCITP.

So I thought I would post this blog with the most relevant resources to help people pass the exam and better understand Office365.
Office 365 PDF eBook: Microsoft Office 365: Connect and Collaborate Virtually Anywhere, Anytime

Office 365 for Enterprise : Service Description


70-321 /323 Jumpstart Videos 

Collection 10954: 70-323: Administering Office 365 (e learning course)

Office 365 for the IT Pro – Exchange Online Microsoft Virtual Academy

Office 365 for the IT Pro – Exchange Online Virtual Academy

Office 365 for the IT Pro – Lync Online, SharePoint Online & Deployment Virtual Academy

Office 365 for the IT Pro – Platform Virtual Academy

I have found the Jumpstart videos and the virtual academy to be the best. Also if you have an opportunity to setup an Exchange Hybrid in a lab it will really help.

Microsoft Online Services € Pricing

I can never remember the pricing on all the different products , So here they are as a point of reference. These prices are subject to change by Microsoft and can change based on user quantities.

Microsoft Online Services (Per User/Per Month) Qty Unit Cost
Microsoft Exchange Online P1 1 €3.57
Microsoft Exchange Online P2 1 €7.25
Microsoft Exchange Online Kiosk 1 €1.79
Microsoft Exchange Online Archiving 1 €2.68
Dynamics CRM Online 1 €40.25
Microsoft Lync Online P1 1 €1.79
Microsoft Lync Online P2 1 €5.00
Microsoft Sharepoint Online P1 1 €3.57
Microsoft Sharepoint Online P2 1 €7.25
Microsoft Office365 P1 1 €5.25
Microsoft Office365 E1 1 €7.25
Microsoft Office365 E2 1 €12.50
Microsoft Office365 E3 1 €19.00
Microsoft Office365 E4 1 €20.75

How to federate existing Office365 users

The most common scenario for federating users that are already using Office365 is when users have transitioned from BPOS to Office 365. The customer/company was waiting to use this excellent feature of Office365 and wanted to implement it once they had transitioned from BPOS to Office365


So in this scenario I will describe how it could be done for 200 users but the same steps apply for any amount of users.

So the first thing to do is to add in a new upn for users. If the customer had an internal domain of contoso.local we will need to add in a new upn of contoso.com. To add the new UPN in , you browse to Active Directory Domains and Trusts and right click on the Active Directory Domains and Trusts icon and select properties and add the new UPN as per the image below.

In this particular scenario , there was no no onpremise exchange , so no email address fields were populated. So we need to modify all user’s UPN and add in their email addresses before we implement Directory Sync because DirSync matches the onpremise AD users with the existing Office365 users by their primary SMTP address. This is described in Microsoft KB 2641663

So we use ADMODIFY from Codeplex. You can download it HERE
Download ADMODIFY , Extract the package, Launch Admodify , Connect to AD and select a domain controller.

So firstly we will select all the users we need to modify..Then click add to list and select all and we can now easily modify all the users.

So firstly we will modify all users UPN. All existing users in Office365 have an email address policy of firstname.lastname. So when selecting the UPN tab I enter this variable switch in LegacyAccount tab %’givenname‘%.%’sn‘% as per the image below.

When we hit apply on the UPN Change , We will need to select all the users again and then go to the email tab we need to enter this string in the add smtp address as per the image below %’givenname’%.%’sn’%@contoso.com


So by adding in this address , admodfy has placed the primary email address on the general tab and updated the required Active Directory proxyAddresses attribute as per the Microsoft KB 2641663 mentioned earlier.

So now we are ready for Dirsync, So when Dirsync runs it will match the active directory user objects with the existing Office365 user accounts and both the Office365 and Active Directory users will have the same immutable ids. To verify the Office365 user’s immutable ID you can run the powershell command in the Microsoft Online Services Powershell module and output the query to a text file.

Get-MsolUser -all where {$_.isLicensed –eq $true} select-object userprincipalname,immutableid out-file c:\users.txt

The next step then is to federate the contoso.com domain , this can be done using the Microsoft Online Services Powershell module on the primary adfs server

winrm quickconfig
Connect-MsolService –Credential $cred
Set-MsolAdfscontext -Computer adfsprimary.contoso.local
Convert-MsolDomainToFederated –DomainName contoso.com

So what affect does this have on users?

All user’s domain logins remain the same as when we were modifying UPN’s we didnt alter the (pre-Windows 2000) value.


Outlook will prompt for a user name and password so the user will enter sean.ofarrell@contoso.com , their ad passord and remember credentials.

Smartphone user names will be the user’s priamry email address followed by the users active directory password.

Within the domain via group policy the service name of the adfs farm will be published to each users internet explorer intranet zone which will allow single sign on to the Office 365 portal and Sharepoint.

Lync will auto sign in provided the sign in assistant is installed.

One last thing , dont forget to apply Rollup2 for ADFS 2.0

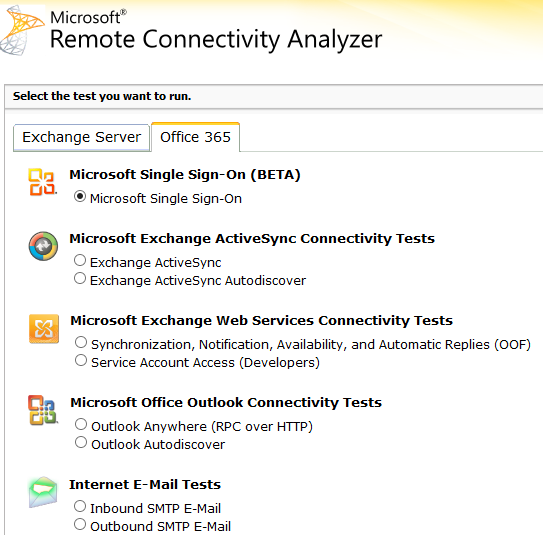
And also the Exchange Remote Connectivity Analyzer can also troubleshoot Single Sign On as well as ActiveSync and Auto Discover

Tier 1 Bpos to Office 365 Transition


I recently completed Ireland’s first Tier 1 Bpos to Office 365 transition and would like to share the steps involved to achieve this.

My client was a global charity with their head quarters in Dublin and operating in 14 countries with 1400+ users spread over 90 locations and most with little or no it support.

As users were so dispersed throughout the globe the charity did not want to implement Single Sign On. One of the most critical requirements for the charity was the need to keep existing ost files on client machines. The reason for this is because some locations in Africa have poor Internet connectivity speeds and it could take weeks for the creation of a new Outlook profile to download and re-sync a local cached copy of a mailbox.So I confirmed with Microsoft that we could keep the existing OST’s and they said we could. However the Office 365 Client Prereqs needed to be installed on each client machine prior to transition.

So I am going to bullet point in order the steps.

  • Engage with a Microsoft Office 365 transition manager
  • Remove Office Communicator prior to transition – this can be done running this command or a batch file MsiExec.exe /I{0F3AB690-1F39-40B8-9D4A-6E8DDA850FB0}/passive
  • Once that has been done install Microsoft Lync
  • Then install this UPDATE on all Client computers
  • Send out a communication to all staff stating that after transition they can access their web mail via https://portal.microsoftonline.com and smart phones can access m.outlook.com
  • One week before transition , setup Lync SRV Records for each domain as per Microsoft’s GUIDE and internal firewall rules
  • One week prior to transition , reset user’s passwords so that they comply with Office 365’s password policy I did this very quickly and easily via Messageops powershell gui for Bpos

  • Then run the powershell below to ensure any mailboxes with delegated control preserve their custom permissions

Export Public Delegates

#$LiveCred = Get-Credential

#$Session = New-PSSession –ConfigurationName Microsoft.Exchange –ConnectionUri https://ps.outlook.com/powershell/ -Credential $LiveCred -Authentication Basic –AllowRedirection

#Import-PSSession $Session
get-mailbox -filter {grantSendOnBehalfTo –ne $null} select userprincipalname, grantsendonbehalfto export-clixml delegates.xml

get-mailbox -filter {grantSendOnBehalfTo –ne $null} select userprincipalname, grantsendonbehalfto export-csv delegates.csv

Import Public Delegates
#$LiveCred = Get-Credential

#$Session = New-PSSession –ConfigurationName Microsoft.Exchange –ConnectionUri https://ps.outlook.com/powershell/ -Credential $LiveCred -Authentication Basic –AllowRedirection

#Import-PSSession $Session
$logfile = “log-” + (get-date –uformat “%H%M-%Y%m%d”) +”.txt“
start-transcript $logfile
import-clixml delegates.xml foreach{
“User: ” + $_.userprincipalname
foreach($i in $_.grantsendonbehalfto){
“GrantSendOnBehalfTo: ” + $i
set-mailbox -identity $_.userprincipalname –grantsendonbehalfto @{Add=$i}
}

“———————————–”

}

“number of mailboxes with grantSendOnBehalfTo : ” + (get-mailbox -filter {grantSendOnBehalfTo –ne $null} ).count

stop-transcript

  • During transition the external DNS records for autodiscover can be edited. So if you have a domain named contoso.ie you would create a CNAME record called autodiscover.contoso.ie and point it to autodiscover.outlook.com
  • So once the transition has been complete, a user can still sign into the single sign in utility but Outlook will not be visible. The user can then open Outlook and will get a warning stating ” An administrator has performed maintenance on your Outlook profile, Please restart outlook” So once the user restarts Outlook , the user will then be prompted for his/her user name and password.
  • Some Outlook clients may not want to connect to Office 365 via autodiscover and if that happens simply configure the Outlook profile via this website config.365.com another great site from messageops.
  • Once Outlook can open and close without password prompts you can remove the single sign in utility by running this command MsiExec.exe /X{A91E3887-5185-4091-AF33-AB0048444055} /passive
  • I then wanted to chat to the charity’s ICT manager so I enabled external federation by doing the following steps.

    Click “Manage” from Lync Online under Admin page
    If you are using E account, you will see current setting for Lync online for management page. If Domain federation or Public IM connectivity was disable under Current settings section, please enable them first.
    Click Domain federation: Select “Allow federation with all domains except those I block”
    Click Public IM: click “Enable” to active Public IM.
    After your enable federation, then you can see the External Access for particular user when editing setting

Ok so there are the technical steps and what is next for the charity. They were waiting for Office 365 before they did some customized development of Sharepoint online and now they can start this work. They absolutely love Lync and can easily communicate between 14 countries.Of the 1400+ users , there was an issue with 2 users , one in Dublin and one in Sudan!

My next blog post on Office 365 will be around the design and implementation of a ADFS 2.0 Farm which can tolerate one Active Directory site failure of a multi site Active Directory and still allow users to authenticate.