

Securing Intune Enrolment

I have been working a lot with Intune for Android & IOS MDM. This post is focused on securing enrollment for Android & IOS devices. There are different methods available for Windows 10 devices which will be covered in a later post.

The Intune enrollment process can be secured via Conditional Access & Azure MFA and Microsoft have an article available HERE that describes how to secure the Intune Enrollment APP via Azure MFA.

But first we need to secure the Azure MFA registration process, If an attacker has obtained a user’s credentials and the user that has been compromised has not registered for MFA, the attacker could use his\her phone to register for MFA.

So there are 3 methods to secure the MFA registration process.

  1. Multi-factor authentication registration policy 
  2. User risk Sign In Policy
  3. Populating the phone numbers as described in this ARTICLE
If using method 3 and using a text message or call authentication process, The organisation admins can populate the mobile phone number per user and manage the MFA registration process.

Some helpful commands

##Using MSONLINE module, Query what the existing MFA auth method is
get-msoluser -UserPrincipalName sean@contoso.com | Select-Object -ExpandProperty StrongAuthenticationMethods

##Using MSONLINE module to cancel existing MFA Auth methods
set-msoluser -UserPrincipalName sean@contoso.com -StrongAuthenticationMethods $null

##Export all MFA enabled users to a csv
Get-MsolUser -All | where {$_.StrongAuthenticationMethods -ne $null} | Select-Object -Property UserPrincipalName | export-csv “CSV PATH”

Once we have followed the guidelines in the Microsoft article to secure the Intune enrollment process with MFA , We can proceed to create our policy for Android & IOS

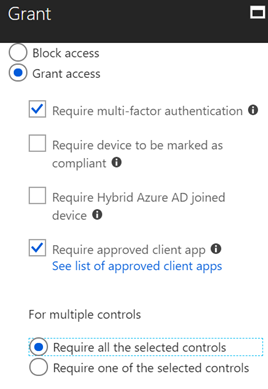
In the conditional access policy for Android & IOS devices, The final actions are listed below, Devices must be compliant but the compliance enrollment process is secured with MFA




One Drive for Business next gen client

Finally OneDrive really is OneDrive, The next gen client uses the same engine for OneDrive personal and OneDrive for business. I have always found the OneDrive personal client better than the OneDrive for business client.

The next gen client uses the same engine and it just works, no more sync issues. To ensure you are using the correct client browse to https://onedrive.live.com/about/en-us/download/ and click on the download link and update your client.

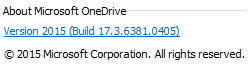
After your client is updated you should have version 17.3.6381.0405 as per the image below

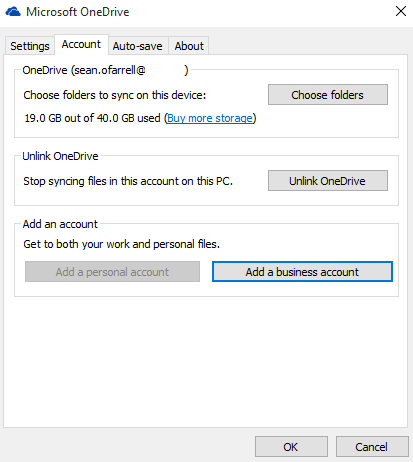
After the client has been updated, Sync your personal OneDrive and select only the folders required. Then right click on the OneDrive icon in the system tray and select : settings. You can now add a business account as per the image below and select only folders required for syncing.

If you have Office installed the next thing is to disable OneDrive for Business client startup which is part of the Office suite as per image below.

So now finally , OneDrive simply works and a lot of the old limitations like the 20,000 item sync limit have been removed.


How to Deploy Office365ProPlus & OneDrive for Business Click to Run


When I first began to work with Office365 ProPlus click to run I couldn’t get my head around how to deploy Office in a software as a service model and to deploy it in bulk in Enterprise organisations.

It really is quite simple and I hope this post will help people to deploy Office365 ProPlus and OneDrive for Business with ease. 

So to create two distribution points for Office365 Pro Plus and OneDrive for Business we do the following.

Download the Office Deployment tool for Click to Run HERE
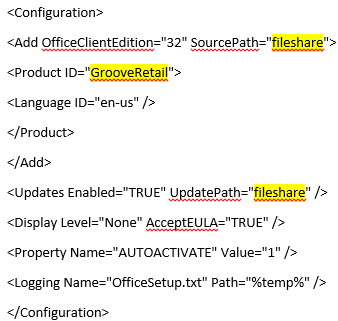
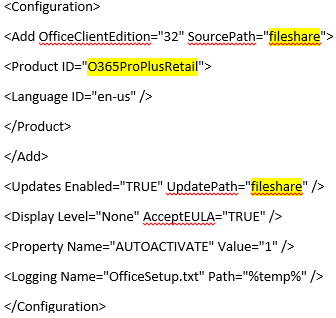
We then need to create a configuration file.

#This is the configuration file for OneDrive for Business which will be saved as odfb.xml
#This is the configuration file for Office365 ProPLus which will be saved as office.xml
So we create a folder for each product that contains the Office Deployment tool and run the following command to download the source files.

#Office365 ProPlus
setup.exe /download office.xml

#OneDrive for Business
setup.exe /download odfb.xml

If you do not have Microsoft System Center Configuration Manager and want to deploy it via a batch file you could use a batch file like this.

@echo off
echo /******************************************
echo /* Installing Office 365
echo /******************************************
net use q: \\fileshare
q:
cd\
Setup.exe /CONFIGURE OFFICE.xml
c:
net use q: /delete /yes
pause

For people that are fortunate enough to have Microsoft System Center Configuration Manager. Here is a quick VIDEO on how to add Office365 ProPlus and OneDrive for Business into your Application Catalog.

Office365 Desktop Readiness & Server Patches/Utilities


Microsoft Office365 sign in assistant 

Microsoft Office 2013 Service Pack 1 x86

Microsoft Office 2013 Service Pack 1 x64

Microsoft Office 2010 Service Pack 2 x86

Microsoft Office 2010 Service Pack 2 x64

Microsoft Outlook 2010 SP2 February 2014 Cumulative Update

Microsoft Office 2007 Service Pack 3 x86

Microsoft Office 2007 Service Pack 3 x64

Microsoft Outlook 2007  Patch KB2596598

Microsoft Outlook 2007 Patch KB268704

Azure RMS Sharing Application

Lync2013 April 2014 Cumulative Update

Microsoft Exchange Server 2010 Service Pack 3

Microsoft Exchange Server 2010 Service Pack 3 Rollup 5

Windows Azure Active Directory Sync tool – 64 bit

IdFix DirSync Error Remediation Tool

Windows Azure Active Directory Module for Windows PowerShell (32-bit version)

Windows Azure Active Directory Module for Windows PowerShell (64-bit version) 

Windows Azure AD Rights Management Administration Tool

SharePoint Online Management Shell

Windows PowerShell Module for Lync Online

Microsoft Exchange Server 2013 Service Pack 1 (SP1)