Most enterprises use a corporate proxy to control Internet access for an organisation. Skype for Business makes connections to the Internet to display the tips on start up and this can cause the dreaded error message displayed above and a lot for help desk calls.
So this is how we can stop this from happening
Whitelist the following URS for unauthenticated access
How to lock down Office365 Global Admin access with managements scopes.
To help describe why an enterprise would like to lock down global admin access, I would like to describe a typical enterprise organisation and scenario.
Contoso.com is an enterprise organisation that consists of 15 companies.
Contoso.com is the root AD Forest of the organisation and all other companies have their own child domains.
Contoso.com is the head office of the organisation and are responsible for data protection and governance within the organisation.
AD Connect synchronizes the root forests and child domains.
Contoso would like to remove global admin privileges from ICT Admin staff in one of the organisation’s companies Fabrikam and grant the ICT admin staff some custom Exchange Online administration privileges. The Fabrikam ICT admin staff must also have the ability to log Office365 service requests.
The following steps are required to lock down the Fabrikam ICT staff access to Office365 as per Fabrikam’s parent company Contoso’s new security and data protection policies.
####################Windows Azure Active Directory###########################
|
Function
|
Commandlet
|
|
Import CSV
|
$Users = Import-Csv “CSV PATH“
|
|
Assign Role
|
$Users | ForEach-Object {Add-MsolRoleMember -RoleMemberEmailAddress $_.UserPrincipalName -RoleName “Service Support Administrator”}
|
############################Summary####################################
Fabrikam ICT admins can access the Exchange Online Control Panel via this URL: https://outlook.office365.com/ecp
Fabrikam ICT admins can log Office365 service request via this URL:
One Drive for Business next gen client
Finally OneDrive really is OneDrive, The next gen client uses the same engine for OneDrive personal and OneDrive for business. I have always found the OneDrive personal client better than the OneDrive for business client.
The next gen client uses the same engine and it just works, no more sync issues. To ensure you are using the correct client browse to https://onedrive.live.com/about/en-us/download/ and click on the download link and update your client.
After your client is updated you should have version 17.3.6381.0405 as per the image below
Folder Filtering and mapping with Dell MFNE
~SENT=Sent Items
~CALENDAR=Calendar
~CONTACTS=Contacts
~TASKS=Tasks
~TRASH=Deleted Items
~DRAFTS=Drafts
~OUTBOX=Outbox
~JOURNAL=Journal
JUNKMAIL=Junk E-mail
JUNKMAIL_2013=Junk Email
Chat History=Conversation History
RSS Subscriptions=RSS Feeds
filter1=(Group Calendars)
filter2=(Rules)
filter3=($Design)
filter4=Alarms
filter5=(CalSummary)
filter6=(~MAPISP(Internal))
filter7=(IPMCOMMONVIEWS)
filter8=(IPMVIEWS)
filter9=(Search Root)
filter10=($MAPIInbox)
filter11=($MAPIInfo)
filter12=($MAPIIPM Subtree)
filter13=($MAPIOutbox)
filter14=($MAPISent)
filter15=($MAPITrash)
filter16=(Discussion Threads)
filter17=($ToDo)
filter18=($FolderInfo)
filter19=($POP3)
filter20=(To do’s\By Category)
filter21=(To do’s\By Status)
filter22=(Mail Threads)
filter23=($FolderAllInfo)
filter24=($Inbox-Categorized1)
filter25=(MAPIUseContacts)
filter26=(APIUseContacts)
filter27=($MAPIUseContacts)
filter28=$MAPIUseContacts
filter29=JUNKMAIL
filter30=(JUNKMAIL)
filter31=($JUNKMAIL)
filter32=$JUNKMAIL
filter33=EML
filter34=(EML)
filter35=($EML)
filter36=$EML
filter37=(Manage Folders)
filter38=Manage Folders
filter39=$Manage Folders
filter40=($Manage Folders)
filter37=(Custom Expiration\By Date)
filter38=Custom Expiration\By Date
filter39=$Custom Expiration\By Date
filter40=($Custom Expiration\By Date)
filter41=FolderHiddenPublic
filter42=(FolderHiddenPublic)
filter43=(namecolumn)
filter44=(attachment icon)
filter45=$(FolderHiddenPublic)
filter46=($FolderHiddenPublic)
Filter47=(~CustomExpiration)
Filter48=(&CustomExpiration)
Filter49=(CustomExpiration)
Filter50=CustomExpiration
Filter51=$CustomExpiration
Filter52=($CustomExpiration)
Filter53=(~EML)
Filter54=(&EML)
Filter55=(EML)
Filter56=EML
Filter57=$EML
Filter58=($EML)
Filter59=(~FolderHiddenPublic)
Filter60=(&FolderHiddenPublic)
Filter61=(FolderHiddenPublic)
Filter62=FolderHiddenPublic
Filter63=$FolderHiddenPublic
Filter64=($FolderHiddenPublic)
Filter65=(~MAPIUseContacts)
Filter66=(&MAPIUseContacts)
Filter67=(MAPIUseContacts)
Filter68=MAPIUseContacts
Filter69=$MAPIUseContacts
Filter70=($MAPIUseContacts)
Filter71=(~NameColumn)
Filter72=(&NameColumn)
Filter73=(NameColumn)
Filter74=NameColumn
Filter75=$NameColumn
Filter76=($NameColumn)
Filter77=(~Stationery)
Filter78=(&Stationery)
Filter79=(Stationery)
Filter80=Stationery
Filter81=$Stationery
Filter82=($Stationery)
Filter83=(~Drafts)
Filter84=(&Drafts)
Filter85=(Drafts)
Filter86=Drafts
Filter87=$Drafts
Filter88=($Drafts)
Filter89=(~Manage Folders)
Filter90=(&Manage Folders)
Filter91=(Manage Folders)
Filter92=(Manage Folders)
Filter93=$(Manage Folders)
Filter94=($Manage Folders)
Filter95=(~Sent)
Filter96=(&Sent)
Filter97=(Sent)
Filter98=Sent
Filter99=$(Sent)
Filter100=(~SametimeInfo)
Filter101=(&SametimeInfo)
Filter102=(SametimeInfo)
Filter103=SametimeInfo
Filter104=$SametimeInfo
Filter105=($SametimeInfo)
Filter106=(~Attachment Icon)
Filter107=(&Attachment Icon)
Filter108=(Attachment Icon)
Filter109=Attachment Icon
Filter110=$Attachment Icon
Filter111=($Attachment Icon)
Filter106=(~Custom Expiration\Manage Folders)
Filter107=(&Custom Expiration\Manage Folders)
Filter108=(Custom Expiration\Manage Folders)
Filter109=Custom Expiration\Manage Folders
Filter110=$Custom Expiration\Manage Folders
Filter111=($Custom Expiration\Manage Folders)
Filter112=(~By Date)
Filter113=(&By Date)
Filter114=(By Date)
Filter115=By Date
Filter116=$By Date
Filter117=($By Date)
Filter118=((~Custom Expiration\Manage Folders))
Filter119=((&Custom Expiration\Manage Folders))
Filter120=((Custom Expiration\Manage Folders))
Filter121=(Custom Expiration\Manage Folders)
Filter122=($Custom Expiration\Manage Folders)
Filter123=(($Custom Expiration\Manage Folders))
Filter124=((~Custom Expiration\By Date))
Filter125=((&Custom Expiration\By Date))
Filter126=((Custom Expiration\By Date))
Filter127=(Custom Expiration\By Date)
Filter128=($Custom Expiration\By Date)
Filter129=(($Custom Expiration\By Date))
Filter130=(~Company Column)
Filter131=(&Company Column)
Filter132=(Company Column)
Filter133=Company Column
Filter134=$Company Column
Filter135=($Company Column)
Filter136=(~E-mail Column)
Filter137=(&E-mail Column)
Filter138=(E-mail Column)
Filter139=E-mail Column
Filter140=$E-mail Column
Filter141=($E-mail Column)
Filter142=(Custom Expiration\Manage Folders)
Filter143=(To do’s\Incomplete)
Filter144=FolderRefInfo
Filter145=(Custom Expiration\Expired Documents)
Filter146=(Recently Archived)
Filter147=MAPIIPMCOMMONVIEWS
Filter148=MAPIIPMVIEWS
Filter149=MAPINet Folder Inbox
Filter150=MAPISearch Root
Filter151=PrivateIcon
Filter152=(By Person)
Filter153=Phone Column
Filter154=Address column
Filter155=EML
Filter156=MAPIUseContacts
Synchronize an Exchange Online Mailbox with a different Active Directory Forest.
I recently worked on a project whereby I was migrating a Global Company that owned a number of business and they wanted to break down the barriers between the different brands and all collaborate under a new brand in Office365.
I synchronized a number of forests from around the world into the organization’s Office365 tenant using the new Azure Active Directory synchronization tool.
One of the businesses shared their Exchange Server (Business A) with another business (Business B) and to migrate their mailboxes I implemented an Exchange Hybrid and migrated the mailboxes into Exchange Online.
Business A Active Directory was authoritative for Business B mailboxes. So how do we disjoin them from Business A and synchronize them with Business B , so that Business B can perform identity management on their own Active Directory Forest.
So the following steps explain how to do this. This can of course be scripted if there were hundreds or thousands of users.
- Run this command on Business B Active Directory Forest to obtain all user’s immutable ID
ldifde -f con -r userprincipalname=sean@contoso.com -l objectguid - Then on in the AAD tool stop synchronizing the users’ from Business B
- This will then delete the users accounts, got to the Office365 recycle bin and restore the user’s account. This will also convert the user’s account to a cloud identity.
- The run this command in the ‘Windows Azure Active Directory Module for Windows PowerShell’ to convert the cloud user’s immutable id so that it matches the object guids obtained in step 1
set-MsolUser -UserPrincipalName sean@contoso.com -ImmutableID I3/MGNcBbUWWVs+jXPTH4g==
- Finally their are some attributes that we need to match from Business A Active Directory Forest with each user’s account in Business B Active Directory
msExchAddressBookFlags
msExchMailboxGuid
msExchMasterAccountSid
msExchRemoteRecipientType - No we are ready to sync the OU with the AAD tool from Business B and Business B Active Directory will be the authoritative Active Forest for these mailboxes.
Dell Migrator for Notes to Exchange – Admin Pool
2.) Click the Menu button in the upper right and select Global Default Settings.
3.) In the text file that opens, save the copy of current Global Default Setting, and locate the [PowerShell] heading.
4.) Remove the [PowerShell] heading and all values directly beneath it.
5.) Save and Close the file.
6.) Exit the MNE Migration Manager.
7.) Open the MNE Migration Manager and try configuring the Office 365 PowerShell Throttling settings again. You can also refer to the following KB article:
Script to add legacyexchangedn as x500 alias into AD user object for Exchange Online
As you begin to convert the onpremise users’ to federated or managed users. You need to capture that user’s legacyexchangedn and ingest it into the users’ AD users’ proxyaddresses attribute as an x500 alias to prevent potential NDRs from existing Office365 users.
So run this Exchange Online command
get-mailcontact – resultsize unlimited | select-object legacyexchangedn,primarysmtpaddress | export-csv “csv file path” delete the first line 1 from the output of the csv
Then download this SCRIPT and edit the following lines
- edit line 11 and enter your domain name
- edit line 25 and enter your domain name
Credit : Eduardo Martin
Quest Powershell Script to change UPN for Office365
I normally use AD Modify to modify users’ UPNs. But it is only really practical when you are changing the UPN’s per OU.
Lets say you were migrating from a different messaging platform , like Lotus Notes or GroupWise. But AD had the mailnickname attribute populated and the correct UPN added into your AD. To run the script you need to do the following
- Create a csv mail.csv and place it in the root C:\mail.csv. The heading of the csv will be ‘mail’ and then all the mailnicknames like sean@contoso.com
- On line 29 add in the distinguished name of the domain/forest scope
- Create a folder C:\logs to analyse any errors
- Watch out for ‘ which are acceptable characters in a smtp email address but unacceptable as a UPN in Office365.
- The script can be downloaded HERE.
Outlook Security Warning when clicking on Lotus Notes Doc Links
Folder Filtering and mapping with Dell MFNE 4.1
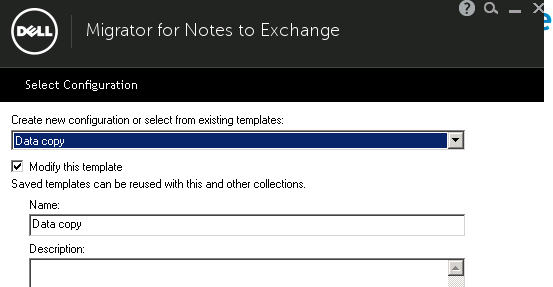
When using templates in Dell MFNE 4.1 , The template does not read the global settings defined in the tool.
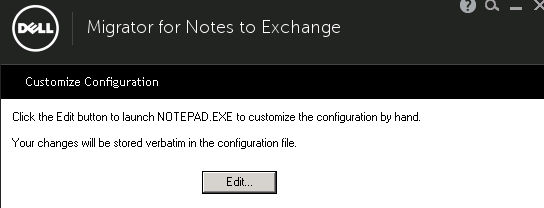


