
Multi-tenant management in Microsoft Defender XDR (MTO) is designed to provide security operation teams with a single, unified view of all the tenants they manage. This feature allows teams to quickly investigate incidents and perform advanced hunting across data from multiple tenants, thereby improving their security operations.
Multi-tenant management in Microsoft Defender XDR became generally available (GA) on February 20th, 2024.
A copilot search can provide more details 🙂
Blog Purpose
The goal of this blog post is to show you how to set up multi-tenant management in Microsoft Defender XDR with the least privilege needed. Multi-tenant management in Microsoft Defender XDR allows you to manage and monitor multiple tenants from a single console. This feature was released for general availability (GA) on February 20th, 2024.
Topology Scenario
Source tenant : Contoso.com
Target tenant : Fabrikam.com
Typically, I choose a hub and spoke topology. Source and target tenants’
Roles
Global Admin Role, is required for the initial set up in the ‘Contoso.com’ source tenant, when configuring the ‘cross tenant’ configurations
Browser Sessions
Sometimes using multiple Microsoft Edge profiles to sign into the source tenant and the target tenants can cause problems, due to cookies and too many Edge active browser sessions.
Typically, I use the Microsoft Edge browser in private window option to sign into the source ‘Contso.com’ tenant
And then Google Chrome ‘Incognito Mode’ session to sign into the target ‘Fabrikam.com’ tenant.
#####Step 1
Log into the target tenant ‘Fabrikam.com’, browse to https://entra.microsoft.com/ / external identities/ cross-tenant access settings
Select ‘Add organization’ and add the tenant id for ‘Contoso.com’

When the Contoso organization has been added to Fabrikam.com, select the inbound access/ cross-tenant sync and select ‘Allow users sync into this tenant’

Select the inbound access/ trust settings ‘Automatically redeem invitations with the tenant’
(Typically, this setting will automatically be selected, but just in case, it needs to be checked)

#####Step 2
Log into the target tenant ‘Contoso.com’, browse to https://entra.microsoft.com/ external identities/ cross-tenant access settings

Select ‘Add organization’ and add the tenant id for ‘Fabrikam.com’

When the organisation ‘Fabrikam.com has been added, select Outbound Access/ trust settings/ automatically redeem invitations with the tenant Fabrikam
#####Step 3
Now login to ‘Contoso.com’ and browse to , browse to https://entra.microsoft.com/ / external identities/ cross-tenant access settings

Select ‘Add organization’ and add the tenant id for ‘Fabrikam.com’

In the source tenant ‘Contoso.com’ / cross-tenant access settings, select ‘Fabrikam.com’ outbound settings / trust settings

#####Step 4
This section is where global admin privileges are required in the source tenant ‘Contoso.com’
Browse to Contos.com | cross-tenant synchronization > Cross-tenant synchronisation
Select new configuration
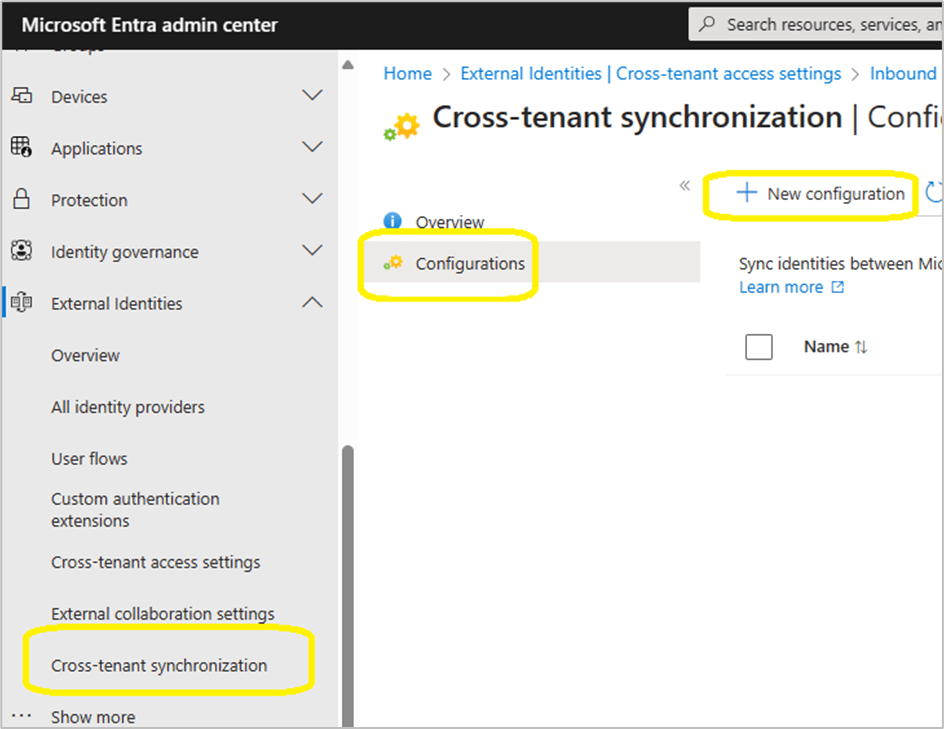
Provide a name for your configuration
It can take up to 60 seconds for the configuration to be created, if the browser session appears like it is hung, JUST WAIT!
Select ‘Get Started’

Change the provisioning mode, authentication mode and tenant ID as per the image below.

When pressing save, the browser session does not revert to the global cross-tenant synchronization / cross-tenant synchronization / configurations GUI.
#####Step 5
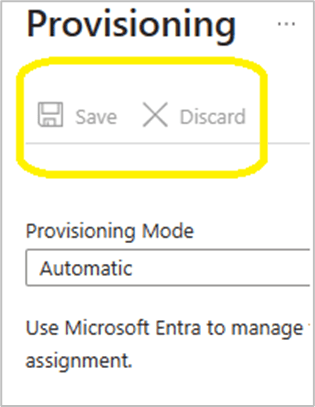
At this stage we will configure the provisioning configuration.
Select the ‘Contoso – Fabrikam organization’

Add the admin user accounts from the source tenant ‘Contoso.com’ that will be provisioned into ‘Fabrikam.com’

Select the provisioning status and change it from off to on.

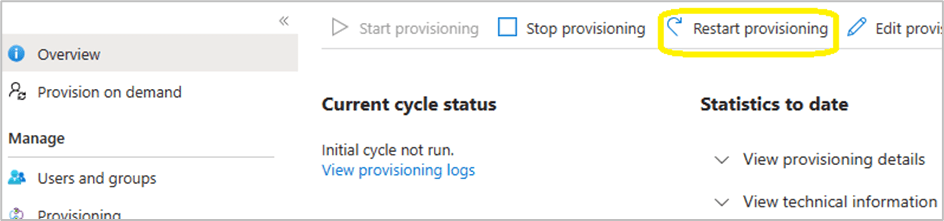
Within the provisioning overview section, select ‘Restart provisioning’
Note: Do not keep clicking on ‘start provisioning’ , ‘stop provisioning’ and ‘restart provisioning’ , be patient and wait!
#####Step 6
To access the security data of the ‘Fabrikam.com’ tenant, the admin users from ‘Contoso.com’ need to be assigned the ‘Security reader’ role in ‘Fabrikam.com’. This role allows them to view security reports and alerts, but not to make any changes.
However, if ‘Fabrikam.com’ has Privileged Identity Management (PIM) enabled and is an Enterprise Identity Protection 2 (EIP2) tenant, there is an extra step involved.
The ‘Security reader’ role assignment must be activated through PIM, either for a specific duration or as permanently eligible. Note that the permanent option is not really permanent, it still expires after 6 months and needs to be renewed manually.
Therefore, it is recommended to set a reminder to check the PIM role assignments in ‘Fabrikam.com’ and renew the ‘Security reader’ role for the ‘Contoso.com’ admin accounts when necessary.
‘Security Reader’ role can manually be added per Contoso admin in Fabrikam or a Microsoft Entra ID security group can be created and assigned the ‘Security Reader’ role. This process could make life easier for admins, they simply need to add the Contoso admins to the newly created security group.
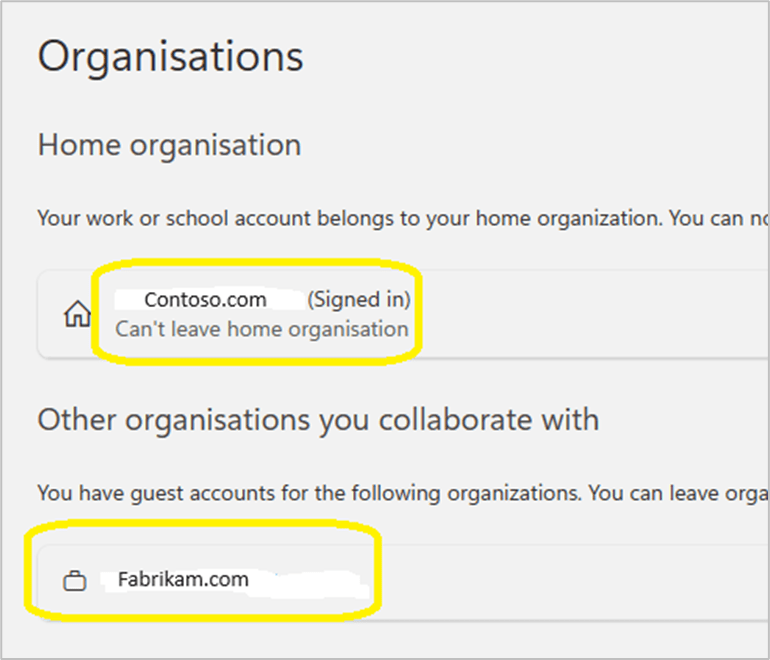
#####Step 7 Each admin account should confirm that ‘Fabrikam.com’ appears in their list of organisations that they can collaborate with via this url: https://myaccount.microsoft.com/organizations
#####Step 8
Each ‘Contoso.com’ admin must login to https;//mto.security.microsoft.com and select settings/ add tenants / and select ‘Fabrikam.com’

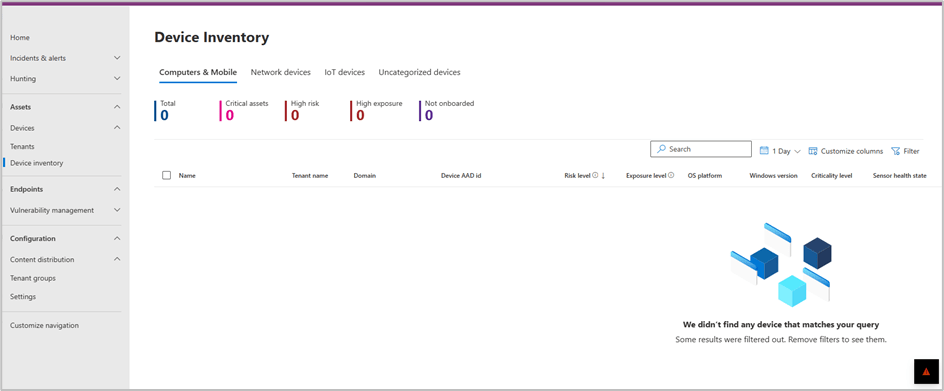
To validate successful configuration and visibility of multi tenant devices. The Contoso admin needs to browse to the Devices \ Devices Inventory

By selecting Devices/ Tenants, it will provide an image that provides a high level overview of device status per tenant.


#####Step 9
In this scenario ‘Contoso.com’ and ‘Fabrikam.com’, corporate office locations have trusted named locations in Entra ID conditional access. When a ‘Contoso.com’ admin accesses MTO, the Conditional access policies, may simply grant a ‘Contoso.com’ admin access to ’Fabrikam.com’ tenant without MFA challenge.
In the scenario where an organisation does not have ‘named locations’ configured in ‘Entra conditional access’, the source tenant admin, may be unable to view the organisations target tenant.
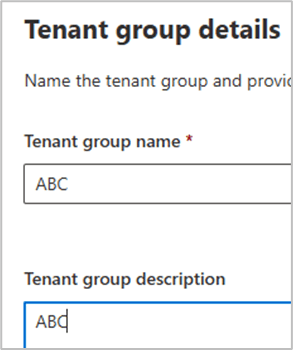
Browse to content distribution / tenant groups / create tenant group


In the bottom right hand corner, the image below may display and prompt for MFA login.
Once logged into Fabrikam , via MFA. The Fabrikam tenant will and devices will become visible in MTO

Also test login to the target tenant via https://security.microsoft.com/tenantid to ensure security admins can view all sections of the security.microsoft.com portal.
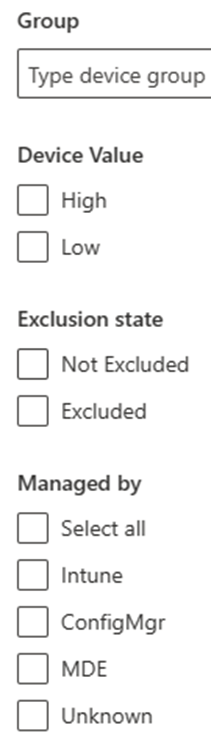
#####Step 10
MTO device filer view

#####Step 11
Advanced hunting.
Advanced hunting queries can be executed against ‘Contoso.com’ and ‘Fabrikam.com’
#Some sample KQL queries
## All mitre attack alerts
AlertInfo // Define timerange | where Timestamp > ago(30d) | where AttackTechniques != “” | mvexpand todynamic(AttackTechniques) | summarize count() by tostring(AttackTechniques) // Define graphic | render piechart
## Device Scans
DeviceEvents
| where ActionType == “AntivirusScanCompleted”
| summarize arg_max(Timestamp, *) by DeviceId
| extend ScanType = tostring(parse_json(AdditionalFields).ScanTypeIndex),
DaysAgo = datetime_diff(‘day’, now(), Timestamp)
| project DeviceName, ActionType, ScanType, DaysAgo
// Filter only devices that have not performed a antivirus scan in the last day
| where DaysAgo > 0
| sort by DaysAgo
#####Summary
#Some of the positive features are:
– Simplified threat hunting with multi-tenancy support.
– Centralized view of all device inventory across all tenants and within each tenant.
– Instant insights and ability to filter views according to needs.
The most amazing feature for me is the ability to run KQL queries across all tenants. I ran some KQL queries across 8 tenants with thousands of devices and the results took between 1 – 5 seconds.
#One of the negative features is:
– The service does not provide a cross-tenant reporting functionality.
#### Reference for KQL queries.
https://github.com/Bert-JanP/Hunting-Queries-Detection-Rules/blob/main/MITRE%20ATT%26CK/Mapping.md
