Publish CRM2011 IFD via TMG 2010

I recently had to publish Microsoft Dynamics CRM2011 with claims based authentication and internet facing domains.

So to set this up within the lan , HERE is an excellent blog on how to setup the configurations on CRM 2011 and ADFS within your LAN. So the purpose of this blog posting is to show people how to securely publish CRM 2011 via TMG.


In terms of best practice , it is never a good idea to punch a hole through a corporate firewall to a service running on a server on a LAN. I am surprised Microsoft are discontinuing their Forefront TMG Servers on December 15th. Microsoft will continue to support TMG but wont be selling it anymore from December 15th 2012.

TMG 2010 needs to be patched in a certain order.

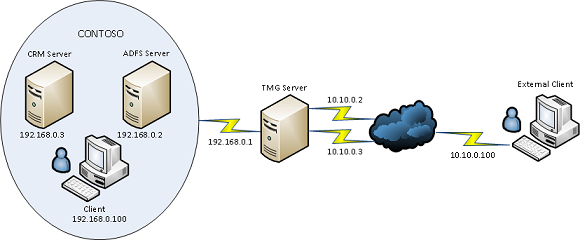
So the image below describes the required topology for CRM 2011 IFD via TMG and I will outline the steps needed to implement this and get it working as there are quite a few things left out of the official Microsoft documentation.


Create WebListener

So as per the image above we would need to add the IP’s 10.10.10.2 & 10.10.0.3 to the external nic on the tmg server.During the creation of the web listener when the external network is created we click the radio button and add the dmz ips we added earlier on as per the image below.


The next section in the web listener creation is very important. Select the SSL Certificate for each of the DMZ ips we added in the previous component of the web listener creation.
Ok so we have the web listener created , now is time to get all the rest of the dependencies in place before we can quickly create the web publishing rules.

Disable ADFS Server Loopback Check
1. Click Start, click Run, type regedit, and then click OK.
2. In Registry Editor, locate and then click the following registry key:HKEY_LOCAL_MACHINE\SYSTEM\CurrentControlSet\Control\Lsa
3. Right-click Lsa, point to New, and then click DWORD Value.
4. Type DisableLoopbackCheck, and then press ENTER.
5. Right-click DisableLoopbackCheck, and then click Modify.
6. In the Value data box, type 1, and then click OK.
7. Quit Registry Editor, and then restart your computer.


DMZ to LAN & LAN to DMZ Routing

The next thing to take into account is the routes from the TMG Server to the LAN and from the LAN to the DMZ. In the diagram above it is a very basic small network. But most companies can have multiple subnets.
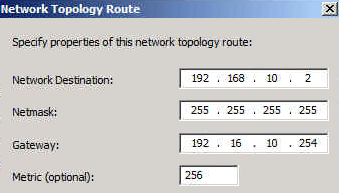
So lets say the the internal adfs server is 192.168.10.2 , To enable TMG to route traffic to this server we would need to add a network routing rule as per the image below.

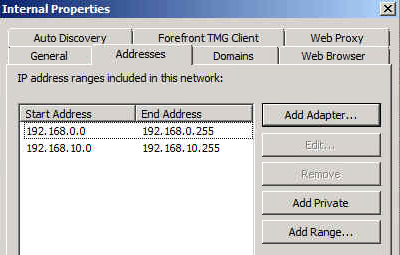
We will also need to add the extra subnet to the internal network as per the image below

Nearly done! We may also need to add a static persistent route to the ADFS & CRM Server so it can then get back to the TMG Server.

External / Internal DNS Records

adfs.contoso.com  points to adfs server

dev.contoso.com points to crm server
auth.contoso.com points to crm server
orgname.contoso.com points to crm server

Creating Web Publishing Rules

Ok so now we will create one rule for the crm server first.


Publish a Website
Use SSL
Enter the IP address of the CRM Server
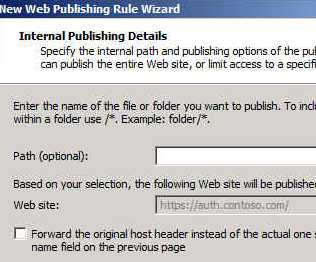
Leave the defaults and click next
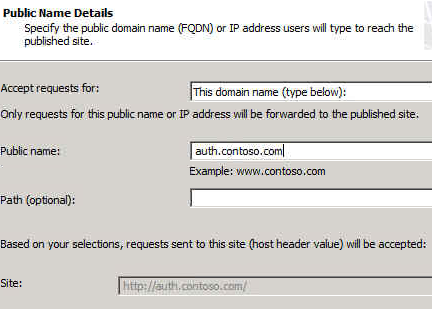
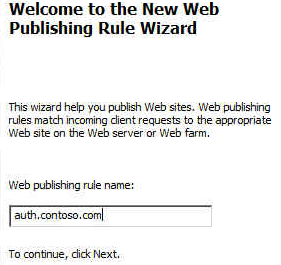
Enter the public name auth.contoso.com
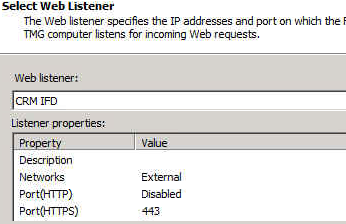
Select the web listener
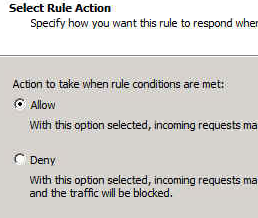
Leave at defaults and click next


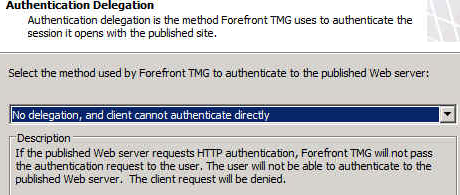
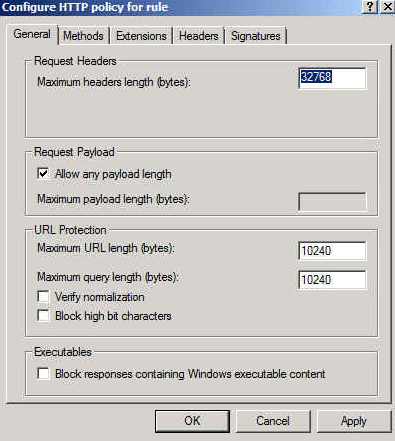
So when the rule is created, You need to right click on the rule and select “configure http”

And then untick  “Verify normalization” & ” Block high bit characters”
Remaining Rules

There are 2 more rules for CRM. So we simply copy and paste the rule we just created and edit the ‘to’ tab and ‘public name’ tab and add in dev.contoso.com and orgname.contoso.com

We copy and paste the rule again for adfs except as well as editing the to & public name tab we will also edit the computer ip and change it to 192.168.0.2 so that traffic for this rule is directed to the adfs server.
ADFS Login Page
Here is a great blog post on how to customise the ADFS login page to include a corporate logo. 


My thanks to Paul Mc Guinness who helped me get this working 🙂 

Exchange 2013 Storage, High Availability and Site Resilience

Here is an excellent slide on Exchange 2013 Storage, High Availability and Site Resilience.

Some of the key features are as follows.

Passive copy DB on 2013 consumes 50% of the iops of the iops required for an active copy.


Autoreseed – Can use spare disks. Periodically scan for failed and suspended copies, check pre-requisites,allocate remap a spare, start the seed, verify health, alert admin about failed disk.

Data Center Failover can be automated.
  

Office 365 Support for Windows Server 2012


I recently installed an ADFS Server farm on Windows Server 2012 but when I tried to federate to Office365 via the Microsoft Onlien Services Powershell Module it would not work!


The reason for the error is that in ADFS 2012 the cmdlets are surfaced by a module instead of a snapin, and the MSOnline cmdlets are hardcoded to load the old snapin which was available in ADFS 2.0. You can work around this issue by creating your own reference in the registry to the ADFS module as a snapin.
To do so, copy and paste the items below into notepad and save them as a .reg file and then execute.


Windows Registry Editor Version 5.00

[HKEY_LOCAL_MACHINE\SOFTWARE\Microsoft\PowerShell\1\PowerShellSnapIns\Microsoft.Adfs.PowerShell]
“ApplicationBase”=”C:\\Windows\\ADFS”
“Version”=”6.2.9200.0”
“AssemblyName”=”Microsoft.IdentityServer.PowerShell, Version=6.2.0.0, Culture=neutral, PublicKeyToken=31bf3856ad364e35”
“Description”=”This powershell snap-in contains cmdlets used to manage Microsoft Identity Server resources.”
“PowerShellVersion”=”1.0”
“ModuleName”=”C:\\Windows\\ADFS\\Microsoft.IdentityServer.PowerShell.dll”
“Vendor”=”Microsoft”

You can now use Windows Server 2012 for Single Sign on to Office365 🙂

Please note :  This solution is not supported by Microsoft. It is my understanding that a new Microsoft online services powershell module will be available for download when the new Office365 is generally available in Q1 of next year.

Office365 MCITP Training Resource 70-321,70-323

To obtain and Office365 MCITP , You need to pass the following 2 exams.

Exam 70-321: Deploying Office365
Exam 70-323: Administrating Office365

There is plenty of documentation from Microsoft describing the different modular components of Office365 , I always keep them on my laptop or Skydrive as I can easily access them to refresh my memory on all the different components. When all of the documentation is together , it amounts to quite a lot and could be confusing as to where to start to studying for the Office365 MCITP.

So I thought I would post this blog with the most relevant resources to help people pass the exam and better understand Office365.
Office 365 PDF eBook: Microsoft Office 365: Connect and Collaborate Virtually Anywhere, Anytime

Office 365 for Enterprise : Service Description


70-321 /323 Jumpstart Videos 

Collection 10954: 70-323: Administering Office 365 (e learning course)

Office 365 for the IT Pro – Exchange Online Microsoft Virtual Academy

Office 365 for the IT Pro – Exchange Online Virtual Academy

Office 365 for the IT Pro – Lync Online, SharePoint Online & Deployment Virtual Academy

Office 365 for the IT Pro – Platform Virtual Academy

I have found the Jumpstart videos and the virtual academy to be the best. Also if you have an opportunity to setup an Exchange Hybrid in a lab it will really help.

Troubleshooting Outlook Connectivity


Microsoft have released an excellent utility called the Outlook Connectivity Analyzer which you can download HERE
________________________________________________________________________________
Overview
The Outlook Configuration Analyzer Tool 2.0 provides a detailed report of your current Outlook profile and mailbox. This report includes many parameters about your profile, and it highlights any known problems that are found in your profile or mailbox. For any problems that are listed in the report, you are provided a link to a Microsoft Knowledge Base (KB) article that describes a possible fix for the problem. If you are a Help Desk professional, you can also export the report to a file. Then, the report can be viewed in the Outlook Configuration Analyzer Tool on another client computer where the tool is installed. The Outlook Configuration Analyzer Tool 2.0 also includes a command-line version that can be used to collect an OCAT scan without user intervention.
________________________________________________________________________________
This tool can be used via command line without user intervention. Now this is really useful. Some users are too busy for the IT guy to run a report on their pc and use up their valuable time.
The tool can be used for mailboxes connected to Exchange on-premise or Office365.

 
A user can send you the xml file which was output from their own report which can then be viewed by importing into your own local copy of this tool.


A lot of the times Outlook Add-Ins can cause problems and for an engineer that is supporting Exchange on a regular basis it becomes easy to spot the culprit add in.

 
It also picks up hotfixes which are not available in Windows update , like this one KB2598374which fixes quite a few issues.


Enabling serialized hyper-v virtual machine backups in dpm

Here is an excellent blog posting by Matthew Hodgkins describing with screen shots on how to enable serialized hyper-v virtual machine backups in dpm.

So I would say follow Matthew’s Blog article , However I would make one slight change.

Copy the text below and save is as a .bat file and schedule the task to run the .bat file.

powershell “& {set-executionpolicy -executionPolicy bypass -force}” 

powershell “& “C:\Datascripts\ListVMsOnClusterForDPM.ps1”


Enabling serialized backups will prevent the following DPM error occurring.

Failed to prepare a Cluster Shared Volume (CSV) for backup as another backup using the same CSV is in progress. (ID 32612 Details: Back up is in progress. Please wait for backup completion before trying this operation again (0x8007173D))

Scheduling DPM Reports fails

I  ran into a problem today where I could not schedule reports to be emailed to recipients even though all the  smtp server details were entered correctly and when I send a test message , it is received ok.

So the problem was happening when I enter an email recipient for a scheduled report I was getting the error message below.

So the fix is quite simple. Launch SQL Reporting Configuration Wizard and connect to the MSDPM2010 instance.

Then enter the email server settings as per the image below.


Now when you add an email recipient for a scheduled report, you will not receive an error message anymore.