Exchange Online Distribution Group Delivery Management

I recently carried out a large migration and my customer had 700 Distribution Groups. My customer asked me to restrict delivery of emails to the groups by members only. So end users could not email the distribution group unless they were a member. 

So how do I do this for 700 users!! Powershell to the rescue.

Connect to Exchange Online via Powershell and run this command.

  1. Get-Distributiongroup | export-csv C:\users\disti.csv
  2. I then deleted all columns in the csv except for PrimarySmtpAddress and then renamed that column to distiname.
  3. Then run this command
    Import-Csv “C:\Users\sofarrell\Desktop\disti.csv” | Foreach-Object{get-distributiongroup $_.distiName | Set-distributiongroup -AcceptMessagesOnlyFromDLMembers $_.distiname}
  4. And then run this command
    Import-Csv “C:\Users\sofarrell\Desktop\disti.csv” | Foreach-Object{get-distributiongroup $_.distiName | Set-distributiongroup -AcceptMessagesOnlyFromSendersOrMembers $_.distiname}
Job done , Happy Customer.


Exchange Online Mailbox only has 25gb Storage Quota

Some of my customers mailboxes were still displaying 25gb as their mailbox storage quota size instead of 50gb. 


So the fix is quite simple.

Firstly connect to Exchange Online via Powershell.

1. Set-ExecutionPolicy unrestricted 

2. $LiveCred = Get-Credential 

3. $Session = New-PSSession -ConfigurationName Microsoft.Exchange -ConnectionUri https://ps.outlook.com/powershell/ -Credential $LiveCred -Authentication Basic -AllowRedirection 
4. Import-PSSession $Session
Then run the following CMDlet which will increase the size to 50gb for all user mailboxes:
Get-mailbox -resultsize unlimited | Set-Mailbox -ProhibitSendReceiveQuota 50GB -ProhibitSendQuota 49.75GB -IssueWarningQuota 49.5GB

Google Apps – Office365 email co-existence

I recently migrated a large Google Apps tenant to Microsoft Office365 (10k + users). Google require a verification code to set up forwarding to a user’s .onmicrosoft.com alias. Which means it is not possible to automate the forwarding from Google Apps to Office365.

So the way we enable co-existence is as follows.

Domain Name : Contoso.com 

  1. Add an alias domain into Google Apps. Relay.contoso.com. Google state that this can take up to 24 hours. I have seen it complete in 10 hours. This will add an alias to all Google Apps users  user@relay.contoso.com
  2. Export all Office365 user’s userprincipal names to a csv.
     
  3. Enable forwarding for all users in Office365 to their smtpaddress@relay.contoso.com. This is done by using the following powershell command in Exchange Online.
    Import-Csv “C:\Users\sofarrell\Desktop\RelayAddress.csv” | Foreach-Object{Get-Mailbox $_.DisplayName | Set-Mailbox -ForwardingSMTPAddress $_.MailAddress -DeliverToMailboxAndForward $true} -verbose
  4. When the last mailbox has migrated we then remove the forwarding and edit the delivertomailboxandforward value.
    Get-Mailbox | Set-Mailbox -ForwardingSmtpAddress $null -delivertomailboxandforward $false

PST Capture – no mailboxes found for exchange online

PST Capture 2.0 is a great tool from Microsoft and works really well when migrating PST files into Exchange Online. I recently had a problem when trying to select destination mailboxes , The solution is really simple. You need to get your tenant server name and you can do this by browsing to http://www.outlook.com/contoso.com and taking note of the server name and then entering it in the Exchange Online settings in PST capture as per the image below.


You can download PST Capture 2.0 HERE
PST capture requires Outlook 2010 x64
You can download Office 2010 x64 Service Pack 2 HERE
October 2013 Cumulative updates for Outlook 2010 can be downloaded HERE
Office365 Single Signin Assistant can be downloaded HERE

Bulk activation of users in Office365

I recently had to activate 2000 Exchange Online P1 users and 100 Office365 E4 Users.

So how can we do this quickly?

Powershell to the rescue.

Ensure that the Windows Azure Active Directory Module for Windows PowerShell is installed. Launch the module and run the following commands.You can download the module HERE

I need a CSV file for Exchange Online Plan 1 users and Office365 E4 users. To do this I run the following powershell commands to export all unlicensed users to a csv file.

Get-MsolUser -all | where {$_.isLicensed -eq $false} | select-object userprincipalname | out-file c:\users.csv

I can then review the contents of this csv file and create two csv files.

Exchange Online Plan 1 users : p1.csv
Office365 E4 users : e4.csv

Connect-MsolService (Enter Global Administrator credentials)
Get-MsolAccountSku (Take note of the account skus)

Assign a usage location to each set of users with the following powershell commands. The usage location in this example is Ireland IE

Import-Csv -Path c:\P1.CSV | foreach {set-MsolUser -UserPrincipalName $_.UPN -UsageLocation IE} 

Import-Csv -Path c:\E4.CSV | foreach {set-MsolUser -UserPrincipalName $_.UPN -UsageLocation IE} 

Then assign a license to each set of users.

Import-Csv -Path c:\P1.CSV| Set-MsolUserLicense -UserPrincipalName {$_.’UPN’} –AddLicenses “Contoso:EXCHANGESTANDARD” 

Import-Csv -Path c:\E4.CSV| Set-MsolUserLicense -UserPrincipalName {$_.’UPN’} –AddLicenses “Contoso:ENTERPRISEWITHSCAL” 

And there we go all users activated.


Exchange 2003 – Exchange Online Co-Existence

A customer recently asked me how do we enable co – existence between Exchange 2003 and Exchange Online wave 15. The upgrade path from 2003 to 2013 on premise or Exchange online can take a few too may steps. So as per my previous blog posting , I have chosen Quest On Demand as my migration tool of choice for moving customers to Exchange Online.

A cut over migration using the Exchange Online native migration tools is often not practical for enterprise customers , simply because of the volume of data , amount of users , bandwidth.

So Quest on Demand comes to the rescue.
In this example I will using contoso.com as the external email domain and will not be using windows azure directory sync and will describe in sequence the steps required for co-existence.

  1. Add contoso.com to the domains section in your exchange online tenant , verify ownership of the domain and then set the domain usage to use exchange online.
  2. On the exchange 2003 server, browse to exchange system manager , expand mailboxes and then in the actions menu , export to list. This will export a list as a text file which you can then open in Excel. I normally then present this excel file to my customer and ask them to remove users that do not require migration. Once that has been done , we have our user list for migration.
  3. The next step is to bulk create exchange online external contacts. The method for creating exchange online contacts is described HERE in an Office365 Wiki Page. We will use the user list that was exported from exchange 2003 to populate the csv for external contacts. I normally create contacts for all existing mail users.
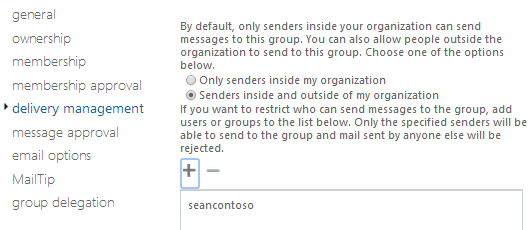
  4. We then Create an Outbound Connector for Contoso.com with the following configuration.
    Name: Contoso.com
    Connection Type: on premise
    Retain Service Headers on Transmission: True
    Connection Security: Opportunistic TLS
    Outbound Delivery: Route mail through smart host
    (add in the name of the mx record value for contoso.com)
    Domains: Contoso.com
  5. * Lets say we were migrating 50 users per evening.
  6. We would delete the external contacts for the users that we want to migrate and run the following commands in the windows azure active directory module for powershell Get-MsolUser –ReturnDeletedUsers | Remove-MsolUser –RemoveFromRecycleBin -force
  7. We would then create the users in Exchange Online via the sample user csv and populate the csv with the user details we obtained from exporting user details from exchange online.
  8. We would then set the usage location with the following command  in the windows azure active directory module for powershell
    Get-MsolUser -UnlicensedUsersOnly |Set-MsolUser -UsageLocation IE
  9. We would then assign a license to the users we created  in the windows azure active directory module for powershell.
    Get-MsolUser -UnlicensedUsersOnly | Set-MsolUserLicense -AddLicenses “Contoso”:EXCHANGESTANDARD
  10. Now we are ready to use Quest On Demand. We use the same user names that we just created to create the Quest On Demand migration text file.
  11. Quest on Demand will also allow us to set the forwarding per user. The on premise user’s mailboxes will forward mail to each user@contoso.onmicrosoft.com. When email arrives at the Exchange 2003 server , if the user is an exchange online user then then mail is forwarded to the user’s proxy address.
  12. Lastly add : spf.protection.outlook.com to your existing SPF record.
And that is it. 

Exchange online users can browse the global address list and send email to users and not know where the mailbox is located in Exchange online or Exchange 2003 on premise.

Exchange 2003 users can browse their global address list and send email to users and not know where the mailbox is located in Exchange online or Exchange 2003 on premise.

Note:
When an Exchange 2003 mailbox has been migrated to Exchange online the user must have a minimum Outlook client version of Office 2007 SP3 should they wish to use a full Outlook client.

Quest on Demand Email Migration to Office365

I do not mean to sound like a Quest Sales Man , But this product from Quest truly is a super product.

It allows you to migrate email from the following sources.

Microsoft Exchange 2000/2003/2007/2010
IMAP
Lotus Notes
Microsoft Bpos
Microsoft Live@edu
Microsoft Office365
Novell Groupwise
Sun One / iPlanet
Pop
Windows Live Hotmail

You can then migrate to the following targets

Microsoft Exchange 2010/2013
Office365
Microsoft Live@edu

So why would you use this service?

A couple of reasons, It is hosted in Windows Azure and can allow for zero touch migrations.Exchange 2007 messaging platforms upwards give us the ability to implement hybrid environments which can then create a platform which will allow rich co-existence and migration.

Its a hell of a lot cheaper than the full email migration products from quest.

It can migrate from Lotus Notes!!!

I have worked on quite a few corporate companies that  acquire companies. Extracting email from a business first before an AD consolidation project makes the AD consolidation project a lot easier and a tool like this allows zero touch email extraction into a companies own on-premise exchange messaging environment or into my preferred platform Office365.

I have taken some screen shots of how easy the wizard is to begin a migration. In this example I   wanted to migrate from Exchange 2010 to Office365 wave15. So before I did that , I created an application impersonation role in the exchange 2010 on-premise environment and one in the Office365 environment.

After that we sign into the Quest On Demand Portal HERE

Then agree to the service’s agreement and select your data center location.

Then create a Migration Plan. There are four simple steps.

  1. Connect to the email services
  2. Import Mailboxes
  3. Choose what to migrate
  4. Migrate
On the connections tab you connect to the source exchange 2010 messaging platform and enter the credentials of an account that has the application impersonation. There is a test connection tab to verify connectivity.

Then you connect to the target , in this case Office365. You will need to add an exchange license to the office365 account in order to make it a member of the application impersonation group. Microsoft throttle the amount of data that can be migrated into Office365. So you can add multiple accounts for the target to increase migration throughput.

In section 2 you specify the source and target mailbox which is populated by a simple text file.
You then select what to migrate.

Finally you begin migration.

And once all the mail has been extracted from the business and when the ad consolidation project has been complete , you can refer to one of my previous blogs HERE on how to convert existing Office365 users to federated users.