QUEST NME unable to create admin pool

In the image above I ran into an issue when trying to create an admin pool for on Quest Notes For Exchange migration toolkit.This was for a migration to Exchange Online.

So the first thing i did was set-executionpolicy unrestricted -force on both the x64 and x32 versions of powershell. But that didn’t fix the issue.

Most enterprises have quite a few group policies and sometimes these policies are applied before the machines have been moved to an OU that has inheritance blocked.

So to remove the group policies causing the issue. 

Browse to HKLM\Software\micrsoft\windows\currentversion\group policy and then delete any S-x-x-xx-xxxxxxxxxxxxxx keys.
Ensure you have the Windows Azure Active Directory Module for powershell installed on all the nme machines.

Once I had removed all the group policies I could create the admin pool and proceed with migrations.

Exchange Hybrid GAL not populating

As per one of my previous posts HERE on how to edit active directory attributes , When dirsync  is enabled it wont populate the GAL with exchange online and exchange on-premise.


Lets say my email address is sean@contoso.com. 

You need to populate some ad attributes.

Proxy Address: SMTP:sean@contoso.com & smtp:sean@contoso.mail.onmicrosoft.com
Target Address: SMTP:sean@contoso.mail.onmicrosoft.com
UPN:sean@contoso.com

So after those attributes have been synced via dirsync run this powershell command in the exchange management shell 

Enable-RemoteMailbox sean@contoso.com -RemoteRoutingAddress sean@contoso.mail.onmicrosoft.com

So once this is done all you need to do is apply a license and usage location to sean@contoso.com

And then the GAL will be populated between Exchange On premise and Exchange online.

Exchange Hybrid Mailbox Migrations slow when using TMG

When using Exchange online in Hybrid mode , if you want to have a unified global address list with exchange online users and onpremise users then you need to create on premise blank mailboxes for the users that you want to use exchange online and then create ‘remote move requests‘ to move the onpremise mailboxes to exchange online.

During the move request , if you open the log you may see ‘Relinquishing job because the mailbox is locked

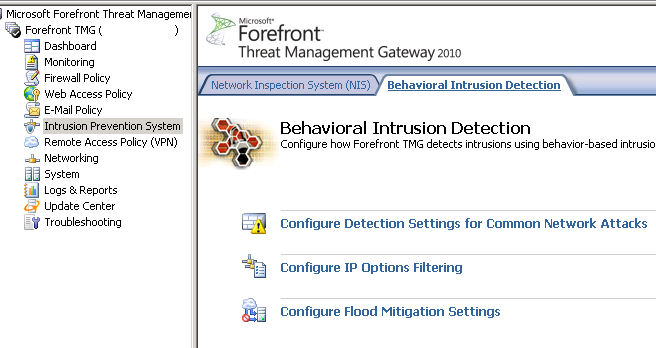
So in order to fix this and really speed up the remote move requests we need to go to the intrusion prevention section of TMG and then the Behavioral Detection\Configure Flood Mitifgation Settings as per the image below.

We click on the link for Configure Flood Mitigation Settings and then click on ‘IP Exceptions‘ and create a new computer set. In the image below I called it ‘Exchange Online Protection‘ and add a computer set with the exchange online protection range as per the image below

All of the Exchange Online Protection IP ranges can be found at this SITE 

You can susbscribe via RSS feed HERE to the Microsoft Online IP Ranges 

So now Remote move requests will migrate a lot quicker 🙂 

Migrating Lotus Notes users into an Exchange Hybrid

In this post I just wanted to highlight what active directory attributes need to change on a user account when you have an existing Exchange Hybrid and want to migrate Lotus Domino users into exchange online.

Primary Email Address: Sean@contoso.com
Hybrid email Domain: contoso.mail.microsoft.com

The existing users that have exchange mailboxes will already have exchange active directory attributes. So lets take a look at what happens when you migrate an on premise exchange mailbox to exchange online.

When you run dirsync , a proxy hybrid domain is created in the example above it is contoso.mail.microsoft.com. So when you initiate a ‘new remote move request‘ and move an onprem user to the cloud the user becomes a mail contact and their routing email address becomes


So how do we populate the active directory users that have came into our active directory from Lotus notes with the right attributes so that when they sync with dirsync to exchange online they will have the correct PRIMARY email address and be able to co-exist with the onpremise users.

We use my good friend ADMODIFY to modify some key attributes

So in this example the default email address policy is firstname.secondname@contoso.com

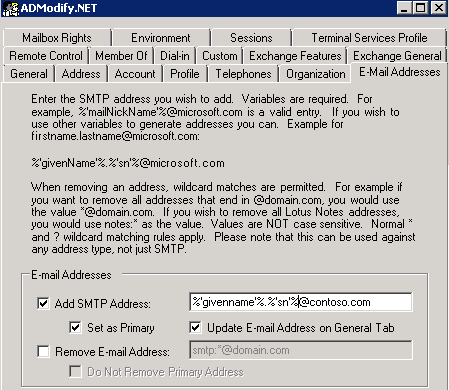
So we connect to our active directory via admodify and select all the users or organisational units we want to modify and add them to the list we then enter ‘%’givenname’%.%’sn’%@contoso.com‘ on  the email address tab


So now that we have modified this attribute the user’s primary email address will be ‘firstname.secondname@contoso.com‘ when synced with dirsync.

We need to make sure the users have the correct UPN and this can be done by viewing one of my previous blogs HERE

We need to modify one more attribute as these users will be in exchange online and will need to co-exist with the exchange on premise users.So as per the image below  we enter the following syntax ‘SMTP:%’givenname’%.%’sn’%@contoso.mail.microsoft.com‘ in the ‘targetAddress‘ attribute.


So the beauty of ADMODIFY is that you can modify thousands of users attributes in a couple of minutes and if something goes wrong it writes the config changes to an xml file. So you can quickly undo the changes you made if there were problems.
SO KEEP THE ADMODIFY CONFIGURATION XML FILES SAFE!

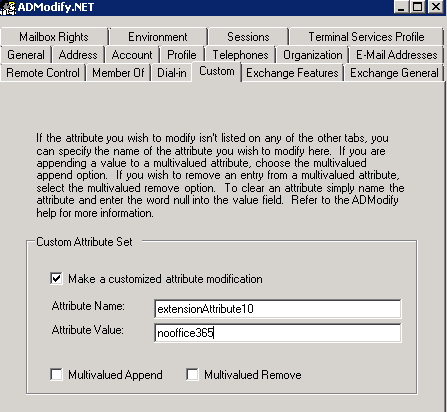
Lets say you don’t want some users to sync to exchange online , you can filter them by what organisational unit gets synced or you can use admodify again to modify a custom attribute by entering ‘nooffice365‘ as per the image below in the ‘extensionAttribute10‘ attribute


Ok so now we have users in exchange online and we have no dirsync error notification emails. How do we mass activate them. Well we run two powershell commands.

  1. We set the user’s location , in this example the country is US
    Get-MsolUser -UnlicensedUsersOnly |Set-MsolUser -UsageLocation US
  2. Get-MsolUser -UnlicensedUsersOnly | Set-MsolUserLicense -AddLicenses “Contoso.com”:EXCHANGESTANDARD
Now we have populated our Active Directory with all the correct attributes that will enable co-existence and mass activated those users via powershell.

So now its over to my choice of software for Lotus Notes migration.

I will post a step by step blog on setting up quest nme next month. This post was to show people how to prep ad and exchange online for mass migration to exchange online where an existing hybrid was in place.

Note:
Quest NME will not populate the GAL as the source directory will be Lotus Notes and target directory Exchange Online.So to populate the gal after you have made all the attribute changes above run this command in the exchange management shell Enable-RemoteMailbox sean@contoso.com -RemoteRoutingAddress sean@contoso.mail.onmicrosoft.com


Bulk activation of Office365 Users

When using DirSync and ADFS it can take a long time to activate thousands of users. So here is a really quick way of doing it.

Firstly HERE is a great article on msexchangeguru.com on dirsync filtering. So there are plenty of organisational units in Active Directory that do not need to be syncronised to Office365.

So I always filter the OU’s that are synchronized to Office365.

Within the organisation section of the Office365 portal make your external domain which has been verified the default domain.

Ensure all user’s have the correct User Principal Names as per one of my previous BLOGS 

So once all the user’s have been synced to Office365 , they need a license assigned to them.

So connect to Office365 via the Windows Active Directory Module for Windows Powershell and do the following.

connect-msolservice # and enter an Office365 Global Administrator’s credentials.

Get-MsolAccountSku  # this will tell you what office365 skus are available. For this example it will be EXCHANGESTANDARD


As all of the users are currently unlicensed , we will set a location for the users as per the command below and the location will be us.

Get-MsolUser -UnlicensedUsersOnly |Set-MsolUser -UsageLocation US

Then we will add a mailbox for all the users that were synced and we can do so with the following command.

Get-MsolUser -UnlicensedUsersOnly | Set-MsolUserLicense -AddLicenses “Contoso”:EXCHANGESTANDARD

Now all the users have a mailbox and can start using Exchange Online 🙂

SMTP relay to Office365

Microsoft have an article on how to setup smtp relay to Office365 KB2600912


An example of why would you would need this is whereby you need to continue to scan to email from your on-premise multi function printer.

Another way of doing this is by relaying through your isp’s smtp outbound mail server. For example UPC’s outgoing mail server is ‘smtp.upcmail.ie

But if you are using the new exchange online (tenant version 15) then it will get processed as spam.

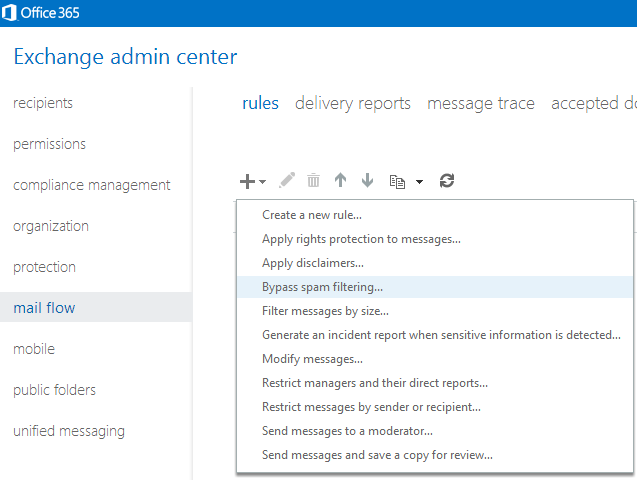
So to fix this you simply need to create a rule, So below I will show some screenshots in whitelisting  scanner@contoso.com

So you need to login to https://portal.microsoftonline.com  and in the top right hand corner , select exchange management.

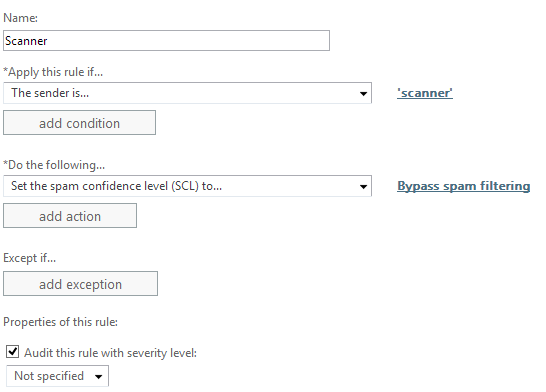
Then go to mail flow and add a new rule as per the image below, selecting the bypass spam filtering rule template.

Then specify the sender as ‘scanner@contoso.com’ with the default options.


Now you can receive your scan to email documents 🙂

Upgrading DPM2010RTM to SP1 Rollup 1


The upgrade from DPM2012 to DPM2012 SP1 RU1 is quite simple or so I thought!

  1. In order to install SP1  for dpm2012 rollup3 is a pre-requisite which you can download HERE
  2. However I could not get Rollup 3 to install as it kept failing on execute sql strings section.
  3. Open a command prompt with elevated privileges and make this the current directory “C:\Program Files\Microsoft System Center 2012\DPM\DPM\bin” and then run this command dpmbackup -db. This will place a backup of the dpm database in the following folder C:\Program Files\Microsoft System Center 2012\DPM\DPM\Volumes\ShadowCopy\Database Backups
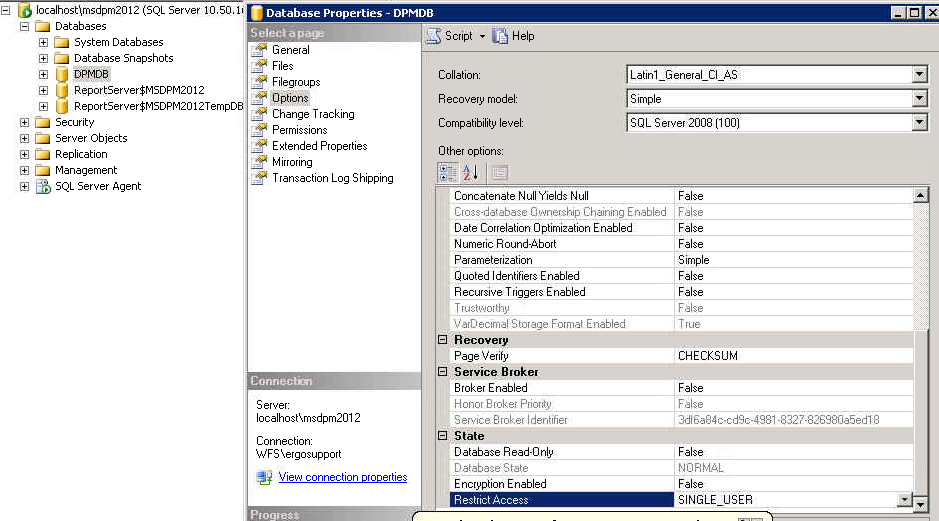
  4. So once we have done a backup , the trick is to set the options on the DPM database to single user mode as per the image below.So once this is done. You can install Rollup 3.

  1. I would then still leave it in single user mode when installing DPM 2012 SP1
  2. You may get an error with id:820 when DPM2012 begins the upgrade to SP1. HERE is a description on how to fix it. HERE is also a great post about WMI Service errors
  3. You may also get an error 812 stating that reporting services cannot be configured. So to fix this there are a few steps.

    Firstly run this command ‘netsh http show urlacl’ and copy all the http urls on port 80.
    So in my case I deleted the following urls with the following cmmands

    netsh http delete urlacl http://+:80/Temporary_Listen_Addresses/
    netsh
    http delete urlacl http://+:80/ReportServer_MSDPM2012/

    netsh
    http delete urlacl http://+:80/Reports_MSDPM2012/

    Then open up SQL 2008R2 / Reporting Services Configuration Manager and connect to the dpm2012 instance. Within the web services url section click apply. Then you can re-run setup and no more error 812

  4. Then after SP1 has been installed , you need to install ROLLUP1 for DPM 2012 SP1
  5. Finally you can then re-enable multi-user mode on the database and login to DPM2012 SP1 RU1 🙂
  6. Final version number will display as per the image below. Version 4.1.3322.0

The target mail user doesn’t have an SMTP ddress that matches the target delivery domain

I recently came across the error in the image above when trying to move mailboxes from an on-premise hybrid server to Office365.

Why would this happen? 

Configure your hybrid servers before you configure dirsync. During the hybrid configuration wizard , the wizard creates a sub domain  ‘domain.mail.onmicrosoft.com’ 

Now that the target delivery domain has been created by the Hybrid Wizard, We can run the DirSync configuration wizard. Select enable ‘hybrid configuration’  so once the wizard can see the target delivery domain it will add the smtp:email@domain.mail.onmicrosoft.com to the proxyaddress attribute in Active Directory for each user account.

So now when you try to run a remote move request, it will complete without issue.


ADFS Farm Highly Available between geographical sites

I am working on a project now moving 700 users to Exchange Online. I am implementing single sign on via an ADFS Farm and DirSync.


Not every organisation has load balancers or the even the ability to load balance external DNS.

A very important factor that needs to be taken into consideration is this. If the Microsoft Online Services federation gateway cannot communicate with a customers on premise active directory then users are not getting their email , lync or sharepoint. 

Email will still flow, but the users will think the service is down. So because of this it is always a good idea to have some high availability with the ADFS farm.

So I came across a company called Cloudfloor DNS .Cloudfloor provide the ability to loadbalance the traffic via round robin or active passive to my adfs proxy servers.It is quite a simple service but a lifesaver in the event of one site going down and all users not being able to use their Microsoft online services.

Cloudfloor can also do geographical dns based rules. This could be very useful in a gloabl lync or exchange deployment. Australian traffic goes to australian exchange servers and lync servers etc…. etc…

To set it up takes 5 minutes and works perfectly when tested.