Securing Intune Enrolment

I have been working a lot with Intune for Android & IOS MDM. This post is focused on securing enrollment for Android & IOS devices. There are different methods available for Windows 10 devices which will be covered in a later post.

The Intune enrollment process can be secured via Conditional Access & Azure MFA and Microsoft have an article available HERE that describes how to secure the Intune Enrollment APP via Azure MFA.

But first we need to secure the Azure MFA registration process, If an attacker has obtained a user’s credentials and the user that has been compromised has not registered for MFA, the attacker could use his\her phone to register for MFA.

So there are 3 methods to secure the MFA registration process.

  1. Multi-factor authentication registration policy 
  2. User risk Sign In Policy
  3. Populating the phone numbers as described in this ARTICLE
If using method 3 and using a text message or call authentication process, The organisation admins can populate the mobile phone number per user and manage the MFA registration process.

Some helpful commands

##Using MSONLINE module, Query what the existing MFA auth method is
get-msoluser -UserPrincipalName sean@contoso.com | Select-Object -ExpandProperty StrongAuthenticationMethods

##Using MSONLINE module to cancel existing MFA Auth methods
set-msoluser -UserPrincipalName sean@contoso.com -StrongAuthenticationMethods $null

##Export all MFA enabled users to a csv
Get-MsolUser -All | where {$_.StrongAuthenticationMethods -ne $null} | Select-Object -Property UserPrincipalName | export-csv “CSV PATH”

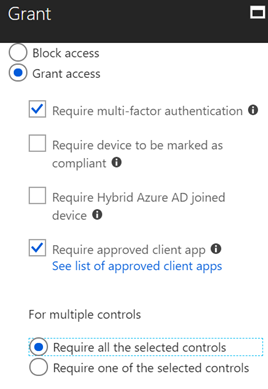
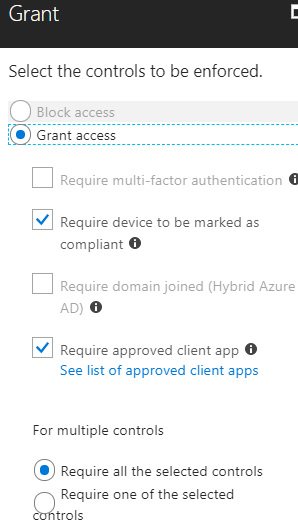
Once we have followed the guidelines in the Microsoft article to secure the Intune enrollment process with MFA , We can proceed to create our policy for Android & IOS

In the conditional access policy for Android & IOS devices, The final actions are listed below, Devices must be compliant but the compliance enrollment process is secured with MFA


Block native mail app on Apple IOS using Azure conditional access policies

I recently set up EMS for a customer and they wanted to ensure all ios native mail apps were blocked and that all client phones must use the Microsoft Outlook app and that devices are enrolled before they can access corporate email.

Azure conditional access policies make this really simple and the following screenshots ill show how we can create this conditional policy.

Browse to the Azure Active Directory admin center / Azure Active Directory/ Conditional Policies

   Firstly Create the Policy

    Next we assign what users the policy will be applied to
   Select the cloud app – Exchange Online
    Select the client app – Active Sync

    Select the controls to enforce
Finally save & enable the policy


Now when a client attempts to setup and use the native Apple IOS app , this message will appear in the end users mailbox, the native app will be unusable for sending and receiving messages. The user can then proceed with the device enrollment process.


Clear down Exchange 2016 Transaction Logs

During enterprise migrations to Exchange 2016 , Logfiles can grow very large and the role of an Exchange backup service becomes critical to clear down log files and ensure log file volumes do not run out of space.

Quite often businesses request bulk upload migrations are performed outside business hours, the problem with this is that backups run at the same time as bulk uploads and then prevents the backup program from truncating log files.

Circular logging is not an option when there Exchange is hosting a DAG.

These simple commands can trick Exchange into thinking a full backup has been performed and then Exchange will take care of truncating the logs and not cause any corruption to databases.

  1. Log on to Exchange server that hosts the volume running low on space
  2. Launch a command prompt with elevated privilages
  3. Type : Diskshadow and press enter

    ####Browse to the root of the volume, NTFS mount points are fine, the following command mounts DBVolume1

  4. Add volume C:\-Exchange-Disks\DBVolume1
  5.  Begin backup and press enter
  6. Create and press enter
  7. End backup and press enter
Exchange will then truncate the logs 

One Drive for Business next gen client

Finally OneDrive really is OneDrive, The next gen client uses the same engine for OneDrive personal and OneDrive for business. I have always found the OneDrive personal client better than the OneDrive for business client.

The next gen client uses the same engine and it just works, no more sync issues. To ensure you are using the correct client browse to https://onedrive.live.com/about/en-us/download/ and click on the download link and update your client.

After your client is updated you should have version 17.3.6381.0405 as per the image below

After the client has been updated, Sync your personal OneDrive and select only the folders required. Then right click on the OneDrive icon in the system tray and select : settings. You can now add a business account as per the image below and select only folders required for syncing.

If you have Office installed the next thing is to disable OneDrive for Business client startup which is part of the Office suite as per image below.

So now finally , OneDrive simply works and a lot of the old limitations like the 20,000 item sync limit have been removed.


Synchronize an Exchange Online Mailbox with a different Active Directory Forest.

I recently worked on a project whereby I was migrating a Global Company that owned a number of business and they wanted to break down the barriers between the different brands and all collaborate under a new brand in Office365.

I synchronized a number of forests from around the world into the organization’s Office365 tenant using the new Azure Active Directory synchronization tool. 

One of the businesses shared their Exchange Server (Business A)  with another business (Business B) and to migrate their mailboxes I implemented an Exchange Hybrid and migrated the mailboxes into Exchange Online. 

Business A Active Directory was authoritative for Business B mailboxes. So how do we disjoin them from Business A and synchronize them with Business B , so that Business B can perform identity management on their own Active Directory Forest.

So the following steps explain how to do this. This can of course be scripted if there were hundreds or thousands of users.

  1. Run this command on Business B Active Directory Forest to obtain all user’s immutable ID
    ldifde -f con -r userprincipalname=sean@contoso.com -l objectguid
  2. Then on in the AAD tool stop synchronizing the users’ from Business B
  3. This will then delete the users accounts, got to the Office365 recycle bin and restore the user’s account. This will also convert the user’s account to a cloud identity.
  4. The run this command in  the ‘Windows Azure Active Directory Module for Windows PowerShell’ to convert the cloud user’s immutable id so that it matches the object guids obtained in step 1

    set-MsolUser -UserPrincipalName sean@contoso.com -ImmutableID I3/MGNcBbUWWVs+jXPTH4g==

  5. Finally their are some attributes that we need to match from Business A Active Directory Forest with each user’s account in Business B Active Directory

    msExchAddressBookFlags
    msExchMailboxGuid
    msExchMasterAccountSid
    msExchRemoteRecipientType

  6. No we are ready to sync the OU with the AAD tool from Business B and Business B Active Directory will be the authoritative Active Forest for these mailboxes. 

Dell Migrator for Notes to Exchange – Admin Pool

As of from yesterday 30.01.15 , The admin pool feature stopped working.

To resolve this issue , assign a license to all the admin pool accounts.

Also I noticed that I could configure /adjust the Office 365 PowerShell Throttling in the MFNE console. So to Resolve this perform the following steps.


1.) Open the MNE Migration Manager.
2.) Click the Menu button in the upper right and select Global Default Settings.
3.) In the text file that opens, save the copy of current Global Default Setting, and locate the [PowerShell] heading.
4.) Remove the [PowerShell] heading and all values directly beneath it.
5.) Save and Close the file.
6.) Exit the MNE Migration Manager.
7.) Open the MNE Migration Manager and try configuring the Office 365 PowerShell Throttling settings again. You can also refer to the following KB article:


Script to add legacyexchangedn as x500 alias into AD user object for Exchange Online

If a scenario existed whereby there was a non exchange hybrid like lotus notes or group wise messaging platform and some users were using Office365 and co-existence was achieved by uploading all of the onpremise users’ as external contacts. Office365 users recipients have messages forwarded to from the source messaging platform. 

As you begin to convert the onpremise users’ to federated or managed users. You need to capture that user’s legacyexchangedn and ingest it into the users’ AD users’ proxyaddresses attribute as an x500 alias to prevent potential NDRs from existing Office365 users.

So run this Exchange Online command

get-mailcontact – resultsize unlimited | select-object legacyexchangedn,primarysmtpaddress | export-csv “csv file path” delete the first line 1 from the output of the csv

Then download this SCRIPT and edit the following lines

  • edit line 11 and enter your domain name
  • edit line 25 and enter your domain name
Then hold down shift and right click on the csv and select copy as path and paste the path into the window as per the image below and press the green play button.

This script will then search the root of the domain based on the domain name and mailnickname and add an x500 alias into the users’ proxyaddresses attribute which will then be synced to Office365 via dirsync

So before the OU containing the AD user objects that needs to be synced you will need to run this command as there will be conflicts in dirsync.

import-csv “C:\Users\admin\Desktop\contacts to be deleted\contacts.csv” | Foreach-Object{Get-Mailcontact $_.primarysmtpaddress | remove-mailcontact -Confirm:$false}

Credit : Eduardo Martin

Quest Powershell Script to change UPN for Office365

I normally use AD Modify to modify users’ UPNs. But it is only really practical when you are changing the UPN’s per OU. 

Lets say you were migrating from a different messaging platform , like Lotus Notes or GroupWise. But AD had the mailnickname attribute populated and the correct UPN added into your AD. To run the script you need to do the following

  • Create a csv mail.csv and place it in the root C:\mail.csv. The heading of the csv will be ‘mail’ and then all the mailnicknames like sean@contoso.com
  • On line 29 add in the distinguished name of the domain/forest scope
  • Create a folder C:\logs to analyse any errors
  • Watch out for which are acceptable characters in a smtp email address but unacceptable as a UPN in Office365.
  • The script can be downloaded HERE.
The author of the script is a colleague of mine Adam Smith

Outlook Security Warning when clicking on Lotus Notes Doc Links

After performing a migration from Lotus Notes to Exchange Online , Some users may see the following security pop ups when trying to click on doc links.

To resolve this issue the following items need to be added to a client machine’s registry.

1. Click Start, click Run, type regedit, and then click OK.
2. Locate the following registry subkey:
HKEY_CURRENT_USER\Software\Policies\Microsoft\Office\xx.0\Common\Security\Trusted Protocols\All Applications
Note In this subkey, replace “xx.0” with 15.0 for Outlook 2013
3. Click the All Applications subkey.
4. On the Edit menu, point to New, and then click Key.
5. Type the name of the protocol that you want to exclude. For example, to disable the display of a security warning for the “Notes:” protocol, type Notes:.

Note Make sure that you include the colon (:) character.
Then use Group Policy Preferences to push it out to machines.