Office365 ADFS 2.0 with full SQL Server

As per my previous post about DirSync for Enterprise organisations , We also need to install ADFS farms into SQL clusters for high availability and scalability. So below are the steps to install ADFS 2.0 into a SQL Cluster.

In this example on how to set this up for the purposes of this demo , Please take note of the following items.

Domain:contoso
ADFS Server : adfs.contoso.local
SQL Cluster: sqlclus
ADFS Service Account: contoso\adfs
ADFS Service Name: signin.contoso.com

  1. Download and install ADFS 2.0 RTW which you can download HERE The ADFS 2.0 installer installs the pre-requisites required for the software.
  2. Do not open the ADFS configuration wizard after the install has complete, Download and install ADFS 2.0 Rollup 3 which you can download HERE 
  3. Now get your trusted ssl certificate for your adfs service name ‘signin.contoso.com‘ and bind it to the default site. I always remove any http bindings for the default website on your adfs lan server.
  4. In certificate manager. Right Click on the trusted certificate ‘signin.contoso.com‘ and select all tasks\manage private keys and then add the contoso\adfs service account permissions ‘Full Control & Read’
  5. From a command prompt with elevated privileges make this the current directory  C:\Program Files\Active Directory Federation Services 2.0\
  6. Now we are ready to create the ADFS farm and we do so with the following command

    FSConfig.exe CreateSQLFarm /ServiceAccountcontoso\adfs/ServiceAccountPassword “password” /SQLConnectionString “database=AdfsConfigurationServer;server=sqlclus;integrated security=SSPI” /port 443 /FederationServiceNamesignin.contoso.com/CleanConfig /AutoCertRolloverEnabled

    And you will see the following output from the command prompt window

  7. Ideally the lan adfs servers will be load balanced , If you need to use a sql cluster for your adfs deployment then there is a good chance the customer will have load balancers like F5, Netscaler or Kemp.My preference would be Kemp.So there will be a virtual ip for the ADFS Service name ‘signin.contoso.com
  8. To enable kerberos authentication to Outlook Wep App and Sharepoint , place the https://signin.contoso.com into the intranet settings in Internet explorer for clients via group policy.
  9. ADFS proxy servers will be in a DMZ or else TMG Servers can also act as adfs proxy servers and will point at the loadbalanced ‘signin.contoso.com‘ vip in the lan. 
  10. Cloudfloor DNS provide GEO dns routing. So for example they can direct traffic from iso country codes to a location of choice. For example us adfs requests can hit us adfs servers. Irish requests can hit Irish adfs servers etc… So a service like this can take care of the external load balancing.
  11. So now we have all this done , time to federate the onpremise domain name ‘contoso.com‘ with our Office365 tenant.
  12. Before we do this we need to ensure we have done the following.
    A: Verify ownership of contoso.com
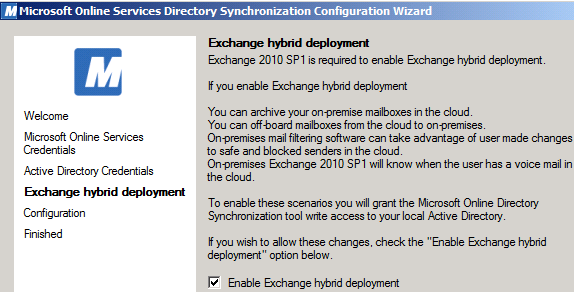
    B:Activate Active Directory Synchronisation
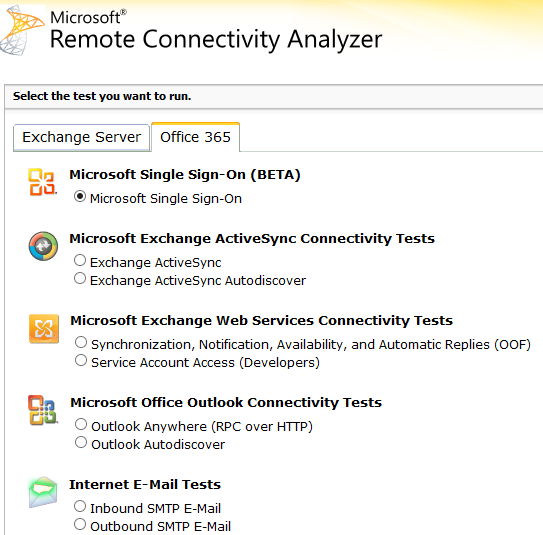
    C: Download and install the Microsoft Single Sign in Assistant HERE
    D: Once the Single Signin Assistant has been installed , Download and install the Windows Azure Directory Module for Powershell HERE
  13. Now we are ready to run the commands to federate ‘contoso.com‘ with Office365 and we will do so with the following command
    $cred=Get-Credential

    Connect-MsolService –Credential $cred

    Set-MsolAdfscontext -Computer
    adfs.contoso.local  # then enter contoso\adfs credentials
     
    Convert-MsolDomainToFederated –DomainName contoso.com -SupportMultipleDomain
  14. You might have only one domain, But I always recommend using the -SupportMultipleDomain switch as it can future proof your adfs service. For example your customer could acquire a company.
  15. Finally we want to brand our ADFS Proxy pages with company logos and here is a great blog posting by Laurent Bel on how to customise the ADFS 2.0 login page HERE
  16. So now that we have created our first ADFS Server to connect to a SQL Cluster , How do we add more ADFS servers. We do so with the following command as per the original ADFS server setup.

    FSConfig.exe joinSQLFarm /ServiceAccount ‘contoso\adfs/ServiceAccountPassword password/SQLConnectionString “database=AdfsConfigurationServer;server=sqlclus;integrated security=SSPI” 


The term “primary federation server” does not apply when the AD FS configuration database is stored in a SQL database instance because all federation servers can equally read and write to the AD FS configuration database that is using the same clustered SQL Server instance, as shown in the following illustration 

I have not installed ADFS 2.1 on Windows Server 2012 into a SQL Cluster yet but I think it would be the exact same process. I will be doing this on a project coming up shortly and will create a new blog post for this. 

I hope people find this blog posting useful as it took me quite a bit of time to get ADFS right when I first started working with ADFS.

Sean 

Intsall DirSync into full SQL

Installing Dirsync is a requirement for enterprise directory synchronisation’s. When I say enterprise  i mean , directories with over 50,000 active directory objects or users. By using full sql server as apposed to the standard sql express , we can also make the database highly available via SQL clustering.

So to install it requires some small steps.

1. Open a command prompt with elevated privileges and make the directory where the dirsync.exe installation file is located the current directory. Then run this command ‘dirsync /fullsql’

2. This will install Dirsync without the standard SQL Express.

3. Next ,  browse to C:\program files\Microsoft Online Directory Sync\DirSyncInstallShell and follow the install syntax in this Microsoft Article 


4. Make Sure you are installing into a minimum of Server 2008R2 SP1 ideally SP2

5. IDFIX is a great utility recently released from Microsoft to troubleshoot DirSync errors which you can download HERE

Office 365 Support for Windows Server 2012


I recently installed an ADFS Server farm on Windows Server 2012 but when I tried to federate to Office365 via the Microsoft Onlien Services Powershell Module it would not work!


The reason for the error is that in ADFS 2012 the cmdlets are surfaced by a module instead of a snapin, and the MSOnline cmdlets are hardcoded to load the old snapin which was available in ADFS 2.0. You can work around this issue by creating your own reference in the registry to the ADFS module as a snapin.
To do so, copy and paste the items below into notepad and save them as a .reg file and then execute.


Windows Registry Editor Version 5.00

[HKEY_LOCAL_MACHINE\SOFTWARE\Microsoft\PowerShell\1\PowerShellSnapIns\Microsoft.Adfs.PowerShell]
“ApplicationBase”=”C:\\Windows\\ADFS”
“Version”=”6.2.9200.0”
“AssemblyName”=”Microsoft.IdentityServer.PowerShell, Version=6.2.0.0, Culture=neutral, PublicKeyToken=31bf3856ad364e35”
“Description”=”This powershell snap-in contains cmdlets used to manage Microsoft Identity Server resources.”
“PowerShellVersion”=”1.0”
“ModuleName”=”C:\\Windows\\ADFS\\Microsoft.IdentityServer.PowerShell.dll”
“Vendor”=”Microsoft”

You can now use Windows Server 2012 for Single Sign on to Office365 🙂

Please note :  This solution is not supported by Microsoft. It is my understanding that a new Microsoft online services powershell module will be available for download when the new Office365 is generally available in Q1 of next year.

How to federate existing Office365 users

The most common scenario for federating users that are already using Office365 is when users have transitioned from BPOS to Office 365. The customer/company was waiting to use this excellent feature of Office365 and wanted to implement it once they had transitioned from BPOS to Office365


So in this scenario I will describe how it could be done for 200 users but the same steps apply for any amount of users.

So the first thing to do is to add in a new upn for users. If the customer had an internal domain of contoso.local we will need to add in a new upn of contoso.com. To add the new UPN in , you browse to Active Directory Domains and Trusts and right click on the Active Directory Domains and Trusts icon and select properties and add the new UPN as per the image below.

In this particular scenario , there was no no onpremise exchange , so no email address fields were populated. So we need to modify all user’s UPN and add in their email addresses before we implement Directory Sync because DirSync matches the onpremise AD users with the existing Office365 users by their primary SMTP address. This is described in Microsoft KB 2641663

So we use ADMODIFY from Codeplex. You can download it HERE
Download ADMODIFY , Extract the package, Launch Admodify , Connect to AD and select a domain controller.

So firstly we will select all the users we need to modify..Then click add to list and select all and we can now easily modify all the users.

So firstly we will modify all users UPN. All existing users in Office365 have an email address policy of firstname.lastname. So when selecting the UPN tab I enter this variable switch in LegacyAccount tab %’givenname‘%.%’sn‘% as per the image below.

When we hit apply on the UPN Change , We will need to select all the users again and then go to the email tab we need to enter this string in the add smtp address as per the image below %’givenname’%.%’sn’%@contoso.com


So by adding in this address , admodfy has placed the primary email address on the general tab and updated the required Active Directory proxyAddresses attribute as per the Microsoft KB 2641663 mentioned earlier.

So now we are ready for Dirsync, So when Dirsync runs it will match the active directory user objects with the existing Office365 user accounts and both the Office365 and Active Directory users will have the same immutable ids. To verify the Office365 user’s immutable ID you can run the powershell command in the Microsoft Online Services Powershell module and output the query to a text file.

Get-MsolUser -all where {$_.isLicensedeq $true} select-object userprincipalname,immutableid out-file c:\users.txt

The next step then is to federate the contoso.com domain , this can be done using the Microsoft Online Services Powershell module on the primary adfs server

winrm quickconfig
Connect-MsolService –Credential $cred
Set-MsolAdfscontext -Computer adfsprimary.contoso.local
Convert-MsolDomainToFederatedDomainName contoso.com

So what affect does this have on users?

All user’s domain logins remain the same as when we were modifying UPN’s we didnt alter the (pre-Windows 2000) value.


Outlook will prompt for a user name and password so the user will enter sean.ofarrell@contoso.com , their ad passord and remember credentials.

Smartphone user names will be the user’s priamry email address followed by the users active directory password.

Within the domain via group policy the service name of the adfs farm will be published to each users internet explorer intranet zone which will allow single sign on to the Office 365 portal and Sharepoint.

Lync will auto sign in provided the sign in assistant is installed.

One last thing , dont forget to apply Rollup2 for ADFS 2.0

And also the Exchange Remote Connectivity Analyzer can also troubleshoot Single Sign On as well as ActiveSync and Auto Discover